Snake Sewing Pattern

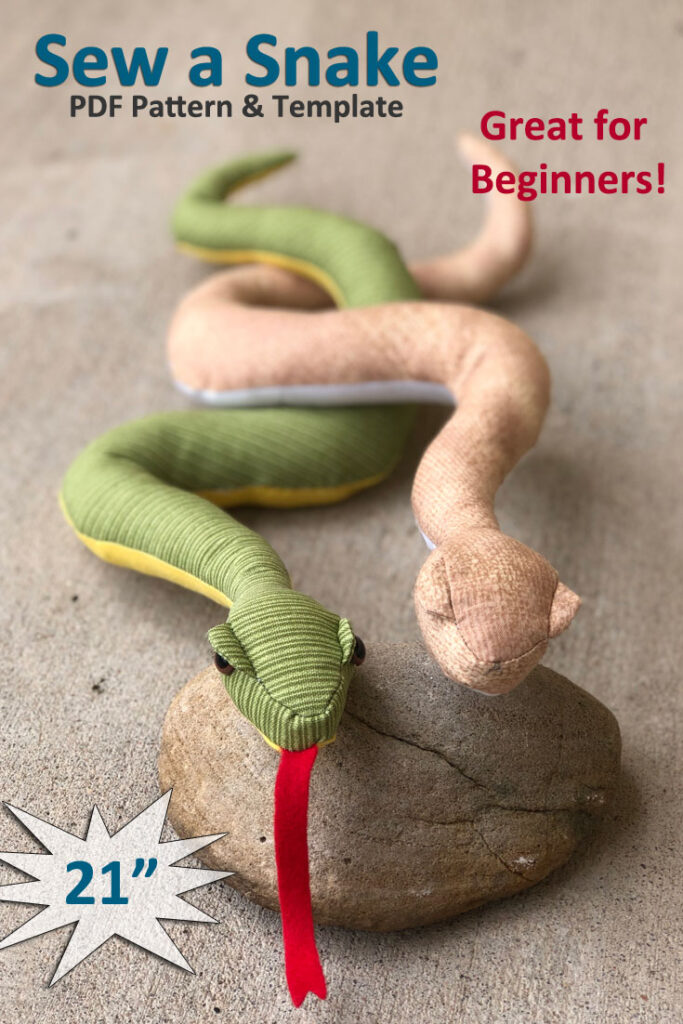
Looking for a fun toy for the kids? Snakes are a blast to play with and they look great in a wide variety of fabric! This step-by-step sewing tutorial has printable templates to make a 21″ long snake. What makes this particular pattern unique is the eye hood. Some snakes have what appears to be a brow above their eyes…so we’ve added that feature to this pattern. It definitely gives this serpent an aura of invincibility.

The safety eyes used can make a big difference in how “sinister” your snake will look. We used various colors and sizes of safety eyes to demonstrate how that one little detail will impact the look of your stuffed animal.

What’s in the Snake Sewing Pattern?

This is a step-by-step tutorial with printable template. The template is at 100% scale so you’ll tape together pieces from 3 pages to create the 21″ long snake top and another 3 pages to create the bottom. Here’s what’s in the PDF pattern.

  • Step-by-step written instructions
  • 15 color photos
  • Template printable on 8 1/2″ x 11 paper
  • Materials List
  • Helpful tips
  • Links to sewing videos

Snake Sewing Pattern Available on Etsy

This snake sewing pattern is available in our Etsy Shop.

Available now on Etsy.

Etsy Shop

Pin This Snake Pattern to Pinterest

Share the love, pin this picture to Pinterest.

What Will You Need to Sew This Snake?

The materials you’ll need to are pretty minimal. Here’s what you’ll need to sew your own snake.

  • Template: at the end of the pattern
  • Fabric: 2 different colors – 22” x 7”
  • Felt or Ribbon for Tongue:    Red – 4” x ¼” or ½”
  • Needle and Thread: To match snake fabric
  • Straight Pins
  • Stuffing and Chopstick
  • Safety Eyes: (2) 5mm, 8mm, or 12mm
  • Scissors
  • Pencil or Washable Marker

We’ve kept this snake design pretty simple, yet added a few special details to make it interesting.

Happy sewing!

Statue of Liberty Gnome Pin Loom Pattern

Weave your own Lady Liberty with pin looms! This step-by-step PDF pattern will show you how to transform simple squares and rectangles into your very own Statue of Liberty Gnome toy.

This plushie has many similarities to the actual Statue of Liberty. The torch, tablet and crown being the key elements. But did you also notice the broken chain? Because of the nature of pin loom weaving and the size of the project, this stuffed gnome isn’t an exact replica, but she is pretty darn cute!

What’s Included in the Statue of Liberty PDF Pattern?

  • Statue of Liberty with crown, torch and tablet
  • Detailed writtten instructions
  • 30+ color photos
  • 16 Pages
  • Tips and Tricks for shaping and finishing

Statue of Liberty Gnome PDF Pattern Available Now

The Statue of Liberty Gnome PDF Pattern is now available in our Etsy Shop.

Available Now on Etsy.

Buy Now on Etsy

This gnome was made with medium worsted weight (4) yarn. Any worsted weight should work. We love the color of Red Heart Soft in Sea Foam #9520. Besides the usual items like stuffing, the other odd item needed is black felt. Let’s take a look at what you need more closely.

What You’ll Need to Weave Statue of Liberty.

  • Pin Looms:   Squares: 2” and 4”,
  • Pin Looms: Rectangles: and 2” x 4” and 2”x6” and
  • Pin Looms: Rectangle: 1” x 4” (for the chains only)
  • Yarn:   Red Heart: Soft – Medium (4) SEA FOAM #9520 –  250 yds
  • Lion Brand: Basic Stitch – Medium (4) MUSTARD #158I – 5 yds
  • Needles:  6” needle for weaving and yarn needle for sewing
  • Stuffing
  • Felt – black, ½” x 5” strip
  • Fabric Glue
  • Beans to weigh the gnome down
  • Pet comb – metal
  • Steamer (optional)

Pin This Statue of Liberty Gnome Pin Loom Pattern to Pinterest

Share the love; pin this Statue of Liberty Gnome Pin Loom Tutorial to Pinterest.

About the Statue of Liberty and the Gnome

Liberty Enlightening the World is a statue more commonly referred to as the Statue of Liberty. Libertas, the Roman Goddess of Liberty, holds a torch and tablet, and stands in New York Harbor. She is a copper statue, given to the United States by France, and dedicated in 1886. There is a broken chain and shackle at her feet symbolizing the abolition of slavery in the United States. Though this gnome only has 5, Liberty has 7 rays forming a halo that represent the sun, the seven seas and the seven continents. There are 25 windows in the crown for viewing the harbor (the gnome has 11).

This gnome has a simple construction with components added to it that represent elements on the real statue. For instance, the Statue of Liberty is wearing robe, the gnome is wearing a sash. The halo, or rays, on the gnome is a band attached to the hat. Little bits of felt create the windows.

Get your copy of the Statue of Liberty Gnome Pin Loom Pattern on our Etsy Shop.

Buy Now on Etsy

Shark Attack Gnome

Shark Attack Gnome Pin Loom Pattern

This beach loving gnome spent a bit too much time in the water. His magnetic personality attracted a hammerhead shark and a trio of starfish!

Weave your own hammerhead shark gnome with this easy to follow tutorial. The Shark Attack Gnome Pin Loom Pattern includes:

  • 25+ Photos and Charts
  • 14 Pages
  • Step-by-Step Instructions
  • Hammerhead Shark
  • Gnome
  • 2 Types of Starfish

Several sizes of pin looms were used to create this beachy gnome. You’ll need:

  • Square Looms in 4″ and 2″ and 1″
  • Rectangle Looms in 1″x4″ and 2″x4″
  • Triangle Loom in 2″

Every element is plain weave woven on a pin loom except the shark teeth which are crocheted.

Get your Shark Attack Gnome Pin Loom Pattern today on our Etsy Shop.

Available now on:

Pin Shark Attack Gnome to Pinterest

Share the love; pin Shark Attack Pin Loom Gnome Pattern to Pinterest.

About Shark Attack Gnome Pin Loom Pattern

The assembled gnome measures about 18″ tall x 7″ wide x 5 1/2″ deep.

The pattern provides a chart of how many shapes are needed and in what color so you can weave them all ahead of time before you begin assembling the project. The yarn used was Lion Brand Basic Stitch.

There are helpful tips in the pattern. For the beard, for example, the pattern will mentioned that the yarn should be attached above the nose so the shark hat covers it. And that a metal cat comb was used to separate the strands making the beard appear more full. And a steam iron will help straighten out the yarn.

The shark is created separately and sits on the gnome like a hat.

The pattern includes a tutorial for making 2 different types of starfish. These were made on 1″ square looms.

Though the pattern is for your eyes only, we encourage you to give away or sell your finished projects.

Enjoy!

Gingham Gnome Pin Loom Pattern

This pin loom gnome has gorgeous fashion sense! Make your own gnome, hat and muff and learn a new pattern for pin loom weaving.

This step-by-step tutorial will show you how to use two colors to make a square and a rectangle with a quadrant print which looks just like gingham. The pattern has lots of photos and clear written instructions for making the gnome, hat and muff, too.

The Gingham Gnome Pattern includes:

  • Instructions to make a Gnome, Hat and Muff
  • Instructions to make a Gingham Square and Rectangle
  • 12 pages with color photos
  • Step-by-Step written instructions

PDF Download for Gingham Gnome Pin Loom Pattern Available Now.

The Gingham Gnome Pin Loom Pattern is available in our Etsy shop.

Available now on Etsy.

Buy Now on Etsy

Pin the Gingham Gnome to Pinterest

Share the love; pin this Gingham Gnome to pinterest.

More About the Gingham Gnome Pin Loom Pattern

You’ll be surprised at how easy it is to make this gnome. We list it as intermediate because of all the folding, tucking and sewing but this step-by-step tutorial will make it easy and fun to create.

What you’ll need to make this Gingham Gnome:

  • Pin Looms: –4” square, 2” x 4” rectangle
  • Yarn:   Red Heart: Soft – Medium (4)
  •  BLACK #4614 – 130 yds
  •  OFF WHITE #4601 – 45 yds
  •  WHITE #4600 – 50 yds
  • WHEAT #9388 – 10 yds
  • Needle:  6” needle for weaving and yarn needle for sewing
  • Pompom Maker: – 1 ¾” pom pom
  • Stuffing
  • Beans: to weigh the gnome down
  • Crochet Hook: – size G (optional)
  • Fabric Marker: – white, dark
  • Pet comb: – metal
  • Steamer (optional)

About Pin Loom Weaving the Gingham Gnome

This gingham gnome is made with only two pin looms: 4″ square and 2″x4″ rectangle. That’s all! It’s hard to imagine that this cute little gnome is made with only squares and rectangles, but simple folds, rolls and tucks transform simple shapes into a darling toy.

The base of the gnome is stuffed with beans to give it weight and prevent it from wabbling about. The rest is filled with polyfill stuffing.

The beard is made with yarn, then combed with a metal cat come to separate the strands. Then a steam iron was used to straighten out the yarn. These little details really make the beard shine.

Get your copy of the Gingham Gnome Pin Loo Pattern in our Etsy Shop.

Buy Now on Etsy

Pin Loom Diary: Floral Afghans Pattern

Flower Blankets to Pin Loom Weave

First you make one flower, then another. Before you know it, you have a garden of flowers and a little bee, too!

We’ll confess, the first blanket we wove was the detailed one. It has 9 flowers and 1 bee. And it takes 7 pin loom shapes including squares, triangles and rectangles. And we love it. And we wanted every pin loom weaver to make one. But….not all pin loom weavers have 7 pin looms let alone the ones used in this pattern. So, a more simplified version was created. And it uses only 2 looms. Now everyone can weave their own flower garden!

About the Pin Loom Flower Afghan Pattern

This is great for beginners and experienced weavers alike as every shape is woven in plain weave.

There are two blankets in this Pin Loom Diary: Floral Afghans Pattern available in our Etsy Shop. Each has it’s own unique design and appeal.

Blanket A is the simple version with 5 flowers and a bee. The flowers are larger and the border is a solid color. It uses only 2 pin looms. The finished afghan measures approximately 56″x76″.

Blanket B is a more detailed version and has 9 flowers with stems and a bee. The flowers are smaller to allow space for leaves and stems. It uses 7 pin looms. The background and border on the detailed blanket is more quilt-like with pops of color sprinkled throughout. The finished afghan measures approximately 48″x72″.

What’s Included in the pattern:

  • 2 Flower Afghan Patterns
  • 16 pages
  • Charts of flowers and bees
  • Table of each shape, color and quantity needed for each motif
  • Table of total number of shapes, color and quantity needed for each blanket
  • Complete materials list
  • Pattern for simple flowers: sunflower, tulip, daffodil, daisy, zinnias
  • Pattern for detailed flowers: tulip, delphinium, daisy, daffodil, sunflower, indian paintbrush, calla lily, zinnia, poppy

PDF Instant Download Available Now

The Floral Afghans Pin Loom Pattern is now available in our Etsy Shop.

Available on Etsy.

Buy Now on Etsy

What You’ll Need:

With Flower Afghans Pin Loom Pattern in hand, here is a list of the other items you’ll need to weave one or both of these floral afghans.

  • Yarn: Caron Simply Soft or any medium worsted weight (4) yarn
  • Blanket A uses 11 colors
  • Blanket B uses 15 colors
  • 6″ needle for weaving and yarn needle for sewing
  • Blanket A Pin Looms: Square 4″ and Triangle 4″
  • Blanket B Pin Looms: Square 4″, 2″, 1″ and Triangle 4″, 2″ and Rectangle 2″x4″ and 2″x6″

These designs can be used for more than just afghans. We’ve made pillows and garden flags, too. What will you make with these flower shapes?

Oh, and be sure to join the Pin Loom Flower Afghan Weave Along in the Pin Loom Support Group on Facebook!

Pin This to Pinterest

Share the love: pin this photo to Pinterest.

Floral Afghans Pattern Now Available

Are you ready to weave your own garden of flowers?

The Pin Loom Diary: Floral Afghans is available as a PDF download in our Etsy Shop.

Available now on Etsy.

Buy Now on Etsy

Sheep Pillow Published in Little Looms

Sheep are neat and so are pillows that look like them! Deborah designed an adorable sheep pillow using yarn and pin loom woven shapes.

We love this pillow because it’s fairly easy to make, yet has lots of little details that make it quite interesting. The 4″ squares give it a puffed / quilted look. The woven texture of each square adds more interest. The fleck in the yarn adds still more depth.

Sheep Pillow Pin Loom Pattern in Little Looms Magazine

Little Looms Magazine first published this “Counting Sheep” pattern in their Spring 2023 issue. You can access the pattern either by purchasing that single issue or joining their all access subscription service.

About the Pin Loom Sheep Pillow Pattern

The finished size is approximately 10″ x 11″ x 4 1/2″.

There are two weaving structures: plain weave and Loomette Weave #1. Check out our blog post for the Loomette Weave #1 pattern. Here are the supplies needed to make your own Pin Loom Sheep Pillow:

  • Pin Loom Square: 4″
  • Pin Loom Rectangle: 2” x 4”
  • 5” weaving needle
  • Tapestry Needle
  • Yarns: Lion Brand Yarns Vanna’s Choice Heather (92% acrylic/8% rayon; 145 yd/3 oz), #400D Oatmeal, 160 yd.
  • Lion Brand Yarns Vanna’s Choice Solid (100% acrylic, 170 yd/3.5oz), #153 Black, 40 yd.
  • Stuffing
  • Pins

It’s really fun to see how many people find this project so appealing. Even though it’s pin loom woven, we find that fiber enthusiasts of all kids find this little guy irresistible. So do farmers and city folk…and people who like to count sheep before they nod off to sleep.

Wolf Pencil Case Pin Loom Pattern

There’s no need to scratch and claw through the junk drawer looking for a pen. Make your own wolf pencil case with yarn and pin looms to store them in. These are great for holding pens, pencils, crochet hooks, mini scissors and more. And since it’s pin loom woven, you can even weave your needle through the outside of the case when you’re not using it.

The wolf pencil case measures approximately 12” long x 7” tall x 4” wide.

Pin These Pictures to Pinterest.

Share the love, pin this image to Pinterest.

Wolf Pencil Case Available on Etsy

The Wolf Pencil Case Pin Loom Pattern is now in our Etsy Shop.

Available now on Etsy.

Buy Now on Etsy

About the Wolf Pencil Case Pin Loom Pattern

This pencil case was a special request from one of the boys…he wanted a coyote. Both wolves and coyotes are a bit dog like, so sure, it’s not a wolf, it’s a coyote!

The pattern is 5 pages which includes step-by-step written instructions. There are 10+ photos that show the pencil case at different points of construction. Instructions are for the grey wolf, though step-by-step photos are often for the black dog. The shape for the black dog and grey wolf are the same.

Here’s what you’ll need to make the Pin Loom Wolf Pencil Case:

  • Pin Loom Square: 1”, 2”, and 4”
  • Pin Loom Rectangles: 2”x4”, 1”x4”
  • Yarn:   Red Heart: Soft – Medium (4), acrylic, 5 oz/256 yds
  •             Grayscale #9931
  •             Black #4614
  •             White #4600
  • Needle:           6” needle for weaving and yarn needle for sewing
  • Safety eyes: (2) 14mm
  • Safety nose: 2cm
  • Zipper: 9” in color of yarn
  • Fabric for lining: approximately 12” x 12”
  • Can – with 2 5/8” diameter for helping sew the ends to the body of the pencil case (optional)
  • Notions: straight pins, needle and thread

Please note that there are not photos to match each step-by-step written instruction. But there are photos throughout the pattern to help provide clarity.

PDF Instant Download Available

Buy the Wolf Pencil Case Pin Loom Pattern in our Etsy Shop.

Available Now on Etsy.

Buy Now on Etsy

The pattern is for your eyes only. We encourage you to give away or sell your finished work as long as you credit yarnovations.com as the designer.

Dishie Fauxchet Patterns

Dishie Fauxchet Patterns

Dish clothes are great projects for learning how to Fauxchet. In fact, these were some of the first projects we made.

fauxchet dishies

As we mentioned in our product review of the easyloop fauxchet tool, any pattern that uses a chain, slip stitch or single crochet can be made with the easyloop tool. The patterns below will list the abbreviation for both crochet and fauxchet.

dishie on sink

The dishies in these fauxchet patterns measure approximately 6”x6”. We love the smaller size for getting into cups and such.

Skill Level: Easy

Stitches Used: Chain (ch), slip stitch (sl st), single fauxchet (sf), single crochet (sc)

Techniques Used: fauxchet/crochet in rows, fauxceht/crochet in the round


FAUXCHET PATTERN 1: V-Stitch Dishie

The v-stitch is widely used in crochet…and is easy to fauxchet as well.

v-stitch dishie

Materials List:

  • Easyloop fauxchet tool (or Crochet Hook: H/8/5.00mm)
  • Lily Sugar’n Cream worsted weight (4) cotton
    HOT PURPLE
  • Yarn Needle for sewing

V-Stitch Dishie Fauxchet Pattern

Ch 17

Row 1: In 3rd ch from tool work *sf(sc), ch 1, sf(sc), skip 2 ch* across.

Row 2-17: Ch 2, turn. *In ch-1 sp work sf(sc), ch 1, sf(sc), skip 2 sts* across.

Rnd 18: Sf(sc) around all four sides of dishie. Join with sl st. Weave in ends.


FAUXCHET PATTERN 2: Mini Blocks Dishie

Another popular crochet pattern is mini blocks. Again, an excellent project for learning the easyloop fauxchet tool.

mini blocks dishie

Materials List:

  • Easyloop fauxchet tool (or Crochet Hook: H/8/5.00mm)
  • Lily Sugar’n Cream worsted weight (4) cotton
    LAVENDER
  • Yarn Needle for sewing

Mini Blocks Dishie Fauxchet Pattern

Ch 23

Row 1: Sf(sc) in 6th ch from tool, sf(sc) *ch 2, skip 2 ch, 2 sf(sc)* across. End with ch 2, skip 2 ch, 1 sf(sc).

Row 2: Ch 1, turn. *2 sf(sc) on ch-2 sp, ch 2, skip 2 sts* across. End with 2 sf(sc).

Row 3: Ch 3. *Skip 2 sts, 2 sf(sc), ch 2* across. End with skip 2 sts, 1 sf(sc).

Rows 4-18: Repeat Rows 2 & 3 alternately.

Rnd 19: Sf(sc) around all four sides of dishie. Join with sl st. Weave in ends.


More Fauxchet

To learn more about the easyloop fauxchet tool, visit the fauxchet website.

PDF’s of our Free Fauxchet Patterns are available on the Free Fauxchet Patterns page.

Colorful Heart in Grandma’s Favorite Dishcloth

Ever since I charted the Heart in Grandma’s Favorite Dishcloth knitting pattern, I’ve wanted to knit it in color. I love the stockinette heart in the middle of the garter stitch…but what would a change of color do?

The Front of Grandma’s Favorite Dishie

Colorful Heart in Grandma's Favorite Dishcloth knitting pattern

I’m thrilled with my first ever attempt to knit with a color change.

But I had two challenge:

  1. I had to learn how to pick up a new color without leaving a hole.
  2. Since there is no “back” to this project, that meant I couldn’t carry my color. Yep, there were 5 mini balls of yarn for this project! Way too many for a first timer.

This gave me a new appreciation for any and all knitting projects that use more than one color. And an even greater appreciation for knit groups! I’m definitely going to hit one up next time I start this project!

The Back of Grandma’s Favorite Dishie

back of dishie

So…since I didn’t carry the color…what does the back look like? Here ya go…a sneak peak.

Yeah, not very pretty. But you know what? I’m still gonna use it. Or is this one of those projects only a mother could love…so I should send it to my mom???

If you’ve got some knitting advice, I’m all ears. Leave me a comment below.

Get your free Heart in Grandma’s Favorite Dishcloth knitting pattern.


Featured Crochet Patterns

Lil-Slugger-Baseball-Set-Photoshoot Aviator Hat Newborn Football Outfit

Newborn Baseball Set

Hat, Baseball Mitt,
Catcher’s Mitt and Bib!

For more info:
Blog: Baseball Set
Store: Baseball Set

Aviator Hat

Hat, Goggles & Scarf
Sizes for whole family!

For more info:
Blog: Aviator Hat Set
Store: Bomber Set

Football Fan

Newborn outfit.
Hats for whole family!

For more info:
Blog: Football Fan
Store: Football Fan