Featured Patterns

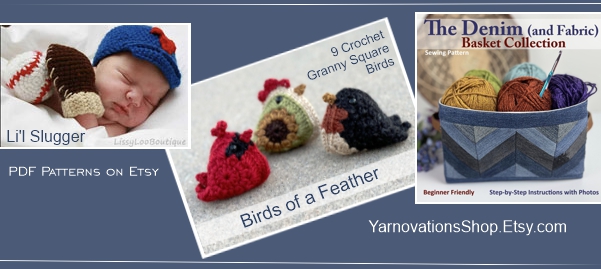
Instantly download our most popular patterns on Etsy at:
www.YarnovationsShop.Etsy.com

Li’l Slugger Newborn Crochet Photo Prop
Ball Cap, Baseball Mitt, Catcher’s Mitt, and Bib

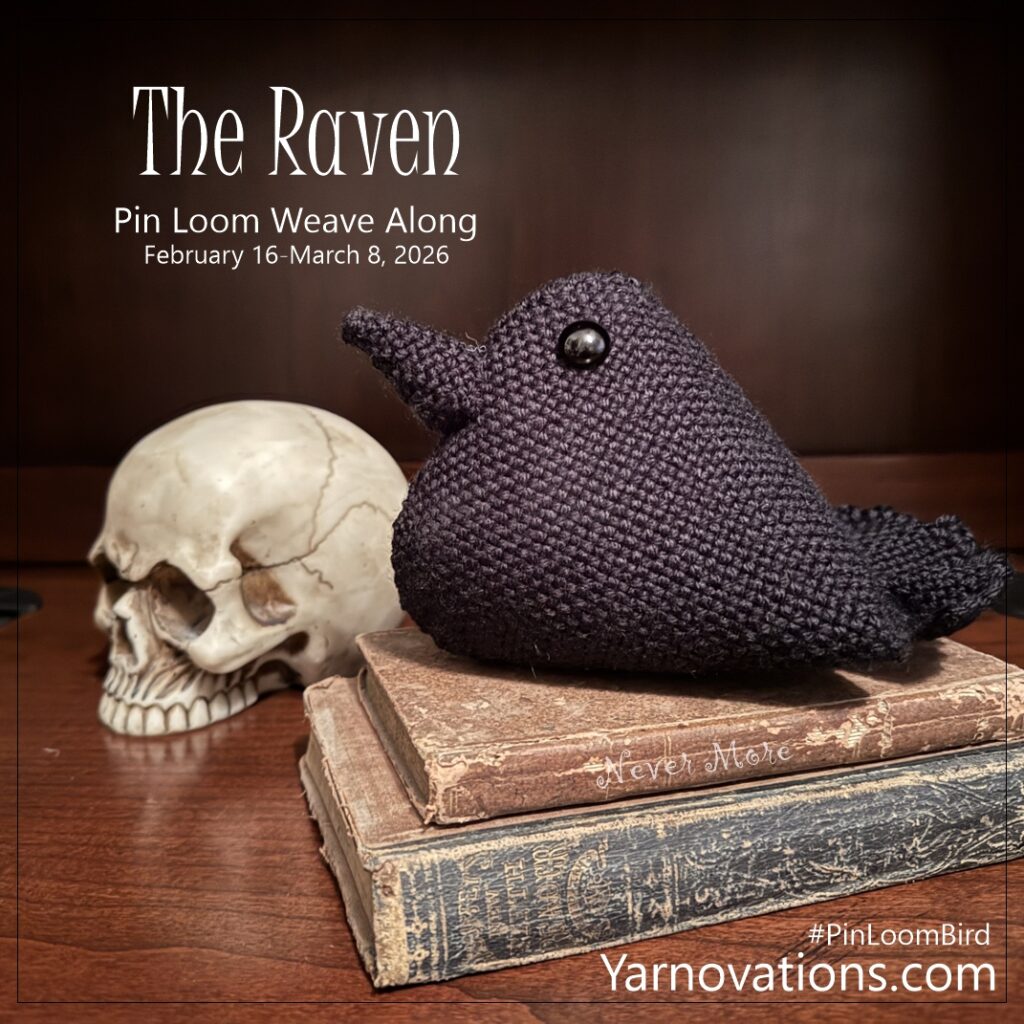
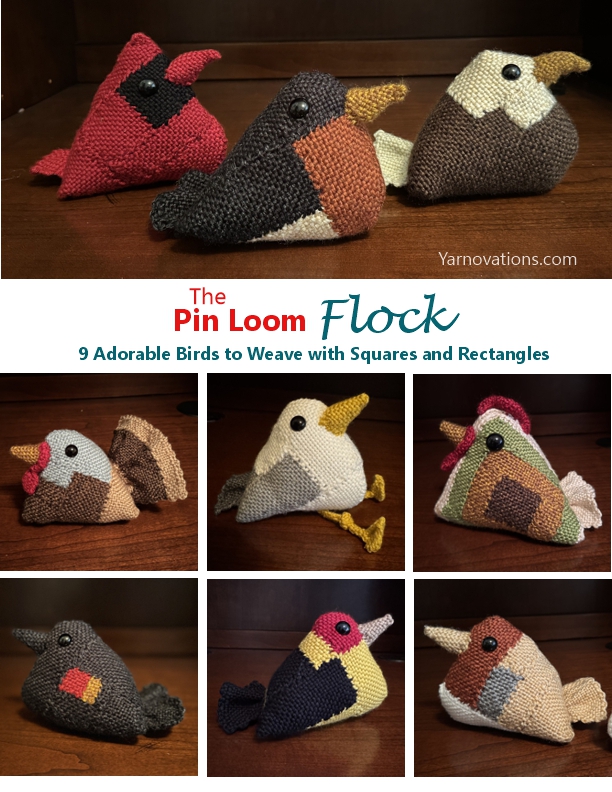
Birds of a Feather: 9 Birds from Granny Squares
Cardinal, Sunflower Chicken, Turkey, Robin and more

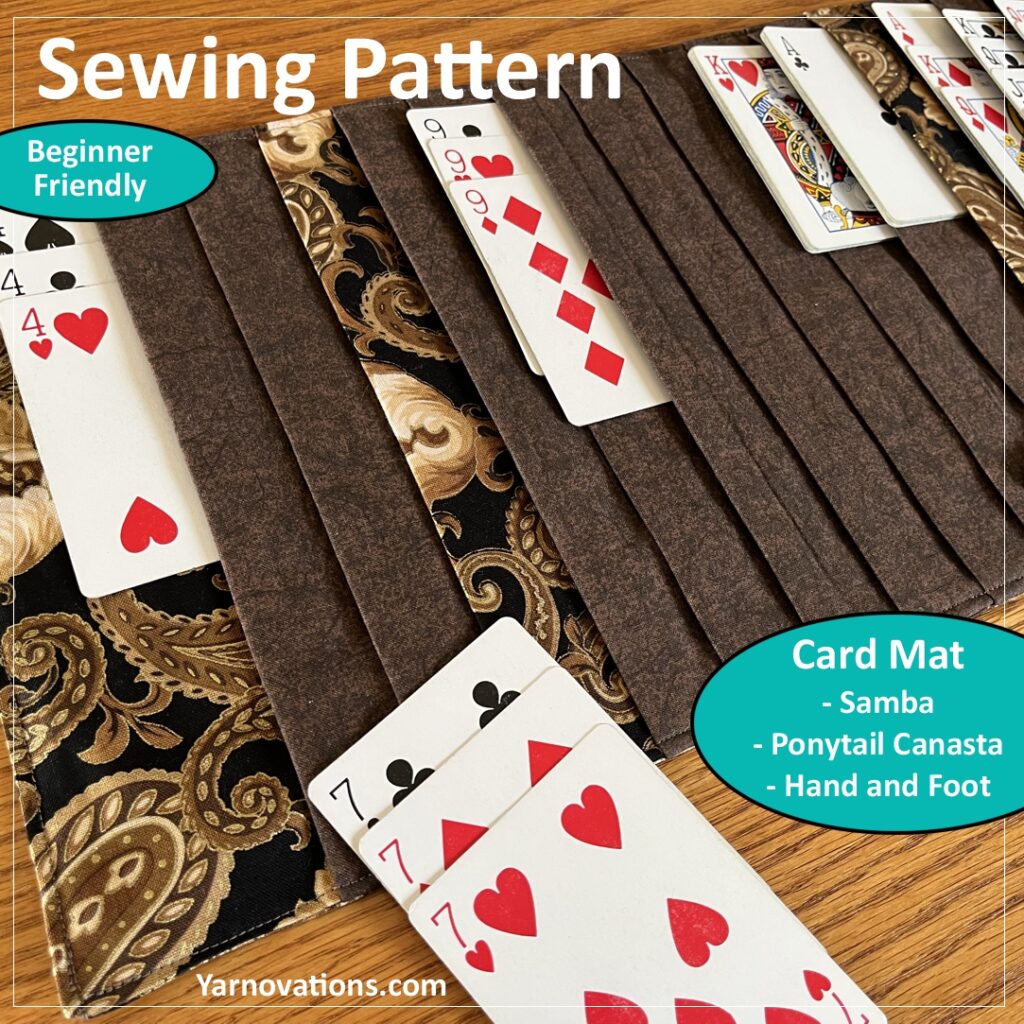
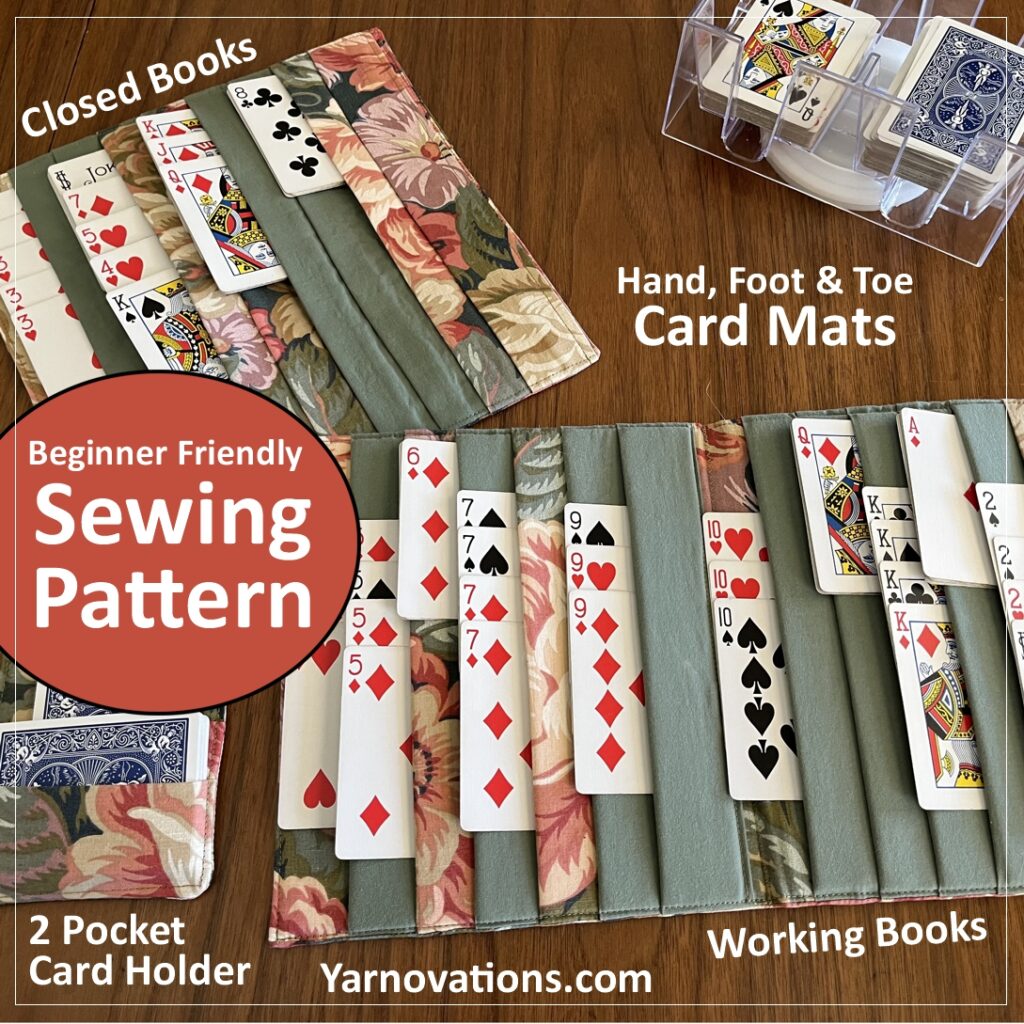
Basket Collection: 6 Styles, Sewing Pattern
Chevron, Strips, Quadrants and more

Raven Pin Loom Weave Along

Love to pin loom weave? Love to see how other people have woven the same pattern? Join us for a pin loom weave along February 16 – March 8, 2026 as we make The Raven. It’s completely free. Here’s how to participate in The Raven weave along:

  • Download The Raven pin loom pattern here or from the Facebook Group: Pin Loom Weaving Support Group files.
  • Weave your raven (or other bird from The Pin Loom Flock).
  • Watch video snippet on The Pin Loom Raven Assembly below or on YouTube.
  • Post pictures on social media with hashtag #PinLoomBird.
  • Email a photo of your bird to us (see pattern for instructions) between February 16 – March 8, 2026.
  • Look for compilation photo of other birds in the Facebook group: Pin Loom Weaving Support Group.

The Raven Assembly Video

The Raven pin loom bird is surprisingly simple to make. Even so, we decided an assembly video would make it even easier to visualize the process. View the Pin Loom Raven Assembly on YouTube or below:

The Raven Supplies

The Raven requires very few supplies. You’ll need a few looms, some yarn, stuffing and safety eyes. The weaving pattern includes this list…but if you want to see if you have them off hand, here’s what you’ll need to make your own raven:

  • Pin Looms Squares: 2” and 6”
  • Pin Loom Rectangle: 2” x 6”
  • Needle: 6” needle for weaving and yarn needle for sewing
  • Stuffing
  • Safety Eyes: 14mm – (2) per bird

The Pin Loom Flock is Part of the Weave Along

The Raven pin loom weave along is open for all the birds in our pin loom collection. We have an ebook with 9 adorable birds called The Pin Loom Flock on Etsy. Learn more about that in our Etsy shop: YarnovationsShop.

Weave the raven or bird of your choice, post it online with hashtag #PinLoomBird, and email us a photo per instructions in the pattern to be included in the compilation photo in the Facebook group.

eBook "The Pin Loom Flock: 9 Adorable Birds to Weave with Squares and Rectangles". Woven birds shown include cardinal, robin, bald eagle, turkey, seagull, chicken, red-winged black bird, western tanager, european robin.

We look forward to seeing everyone’s pin loom birds!

Mushroom Pin Cushion with Basket Crochet Pattern

Mushroom Pin Cushion with Basket is an easy crochet pattern you can make in a weekend. It’s darling to display but even more fun to use. It’s the perfect size for collecting yarn snips (or candy wrapper). If you like to sew or embroider, it’s great for tossing thread snips as well. Or, you could store notions it it for crochet, knitting, weaving, sewing and quilting.

I, Dana, woke up one day with a vision for mushrooms on a grassy knoll. I wasn’t sure if I could recreate my vision…but it came out pretty much as I’d envisioned it. I love that it can be decorated with straight pins. I love that it’s cute…and practical at the same time.

About the Mushroom Pin Cushion and Project Bag Crochet Pattern

The crochet pattern includes everything you need to recreate a mushroom pin cushion with basket of your own. It includes:

  • Mushroom in 2 sizes
  • Basket
  • Connector Piece
  • Tab for holding mini scissors, crochet hook and pencil
  • Step by step written instructions
  • Written in US terms

The size is great for putting on a side table, arm of a chair or at your work table. My mushroom and basket has a permanant home on my desk which doubles as my sewing table. The measurements are approximately:

  • Pin Cushion: 5.75″ wide x 5.75″ deep x 3.5″ tall
  • Basket: 4″ wide x 4″ deep x 5″ tall

The crochet pattern is rated easy because there aren’t lots of stitch patterns. It is made with stitches as small as a slip stitch and as large as a double treble. Pieces are worked in the round and in rows. It’s interesting to note that the same stitch pattern is used on the bean bag (base of pin cushion) and on the basket. But they look different because one is crocheted in rows and the other in the round.

Mushroom Pin Cushion and Basket on Etsy

The Mushroom Pin Cushion and Basket first appeared in Crochet World Summer 2024. We have the rights back to sell direct to you. Find it now in our Etsy Shop.

Buy the pattern on etsy

The Mushroom Pin Cushion and Basket is So Useful!

One of the things I love most about this Mushroom Pin Cushion with Basket is that it’s useful for lots of different hobbies. It has a little tab sewn to the lining with 3 sections to hold small things like pencils, mini scissors and crochet hooks. Here are my favorite ways to use the mushroom pin cushion and basket…and yes, I’ve used it for each of these things:

  • Project bag
  • Yarn snips trash basket (for knitting, crochet and weaving)
  • Thread keeper (trash basket) (for sewing, quilting and embroidery)
  • Notions keeper (sewing clips, stitch markers, etc).

Yarn for Mushroom Pin Cushion and Basket

The yarn used to make the Mushroom Pin Cushion and Basket is Cascade 220 Superwash Sport. It’s a light weight (size 3) superwash merino wool yarn. As of today, it comes in 83 colors! We chose this yarn specifically for color options and yarn weight. It is thin enough to create beautiful stitch definition and sturdy enough to hold the 3D shape of the mushrooms (with fiber-fill stuffing inside).

Get your copy of the Mushroom Pin Cushion and Basket now.

Heartfelt Pillow Crochet Pattern

Vibrant, colorful, and floral, this crochet pillow is lovely not only around Valentine’s Day, but all year long. The rainbow of colors make it a great addition for spring and fall decorating…and summer, too! And placing the flowers in a heart shape captures how we all feel about them…we love them.

This Floral Heart Pillow Crochet Pattern includes lots of helpful photos to make everything you see. The pattern includes:

  • 8 Colorful Flower Patterns – each with Step-by-Step Photos
  • 1 Green Leaf Pattern – with Step-by-Step Photos
  • 1 Shell Stitch Throw Pillow
  • 1 Tassel Instructions

Make the pillow exactly as we did, or mix things up a bit. You can create pillow with a wreath by placing the flowers in a ring. Or, make the flowers individually, glue them to a chop stick and make floral picks. Make the pillow without the flowers for a nice textured accent pillow. Make the flowers for wedding bouquets or home coming corsages. Make flower accent pins, headbands, barrettes and more.

What will you make with your crochet flowers and pillow?

Heartfelt Floral Pillow Crochet Pattern on Etsy

The Heartfelt Floral Pillow Crochet Pattern is now available in our Etsy Shop.

Available now on Etsy.

Buy the pattern on etsy

Crochet Shell Stitch Dishcloth Plus Table Runner Pattern

The crochet shell stitch kicks off our journey to crochet a dishcloth each month using a different crochet stitch. This set, named January Snow, includes a lacy dishcloth and gorgeous table runner both using the crochet shell stitch. We especially love how the shell stitch pop next to solid sections of double crochet on the table runner. And this stitch creates a nice frilly edging, as well.

This crochet shell stitch creates a dishcloth that is simple, elegant and lacy. This open work design is very drapey and flexible. It’s especially well suited for washing cups and glasses and strong enough to handle pots and pans, too.

About the January Snow Crochet Dishcloth Pattern

We’ve rated this pattern easy. It’s very approachable for those who know how to single crochet and double crochet. It’s worked primarily in rows with edging worked in the round.

Dishcloth: 10 ¼” x 10 ¼”; Table Runner: 33 ½” x 11 ½”

Materials used in this crochet dishcloth and table runner include:

  • Yarn: FibraNatura distributed by Universal Yarn: Good Earth ‐ Medium (4)
    color: CRYSTAL ‐ 3 skeins (1 for dishcloth, 2 for table runner)
  • Hook: F/5/3.75mm
  • Needle: Yarn Needle for sewing

Dishcloth+ Series

This shell stitch dishcloth is the 1st in our Dishcloth + series. We’ve consolidated them into a single ebook called Dishcloth+ ebook: 12 Dishcloths & 12 Accessories Crochet Pattern PDF which is available in our Etsy shop: YarnovationsShop.

You’ll learn lots of fun crochet stitches including:

  • V Stitch
  • Berry Stitch
  • Corner to Corner C2C
  • Moss Stitch or Woven Stitch
  • Fantail Stitch
  • Bobble Stitch
  • Fan Stitch
  • Star Stitch
  • Basketweave Stitch
  • Bead Stitch
  • Pentagon Pattern
  • Crochet Cable

It’s full of fun and practical items for the kitchen and home including:

  • Placemat
  • Hot pad
  • Plant Hanger
  • Table Runner
  • Cup Cozies for mug with handle, tapered glass, mason jar
  • Casserole Cover with zipper
  • Tea Towel
  • Tea Towel Dress Topper
  • Apron
  • Market Bag
  • Bread Bowl Liner

Dishcloth+ on Etsy

January Snow and entire Dishcloth+ ebook are available now in our Etsy shop: YarnovationsShop.

If you love making dishcloths, we also have a pattern pack of 7 dishcloths made with the single crochet stitch!

Learn more about each dishcloth pattern set in Etsy shop.

Available now:

February 2026 Classes

I, Dana, am teaching 2 classes in February 2026. Must be a member of Sew-n-Sews to take the classes. It’s a fun guild that offers sewing, quilting and other craft classes, presentations, and meet-ups.

Crochet clutch made with chevron stitch. Shown in cream and teal.

Crochet Chevron Class

No experience necessary to take this crochet chevron class. Students will learn how to chain, single crochet and make a chevron stitch sampler. We will talk about how to read a pattern and students will go home with the pattern for the clutch.

Class is February 18 from 1-5 pm. Message me in Facebook for more information.

No sew notebook cover pattern and pen holder bookmark sewing pattern illustrated with a composition notebook covered in teal fabric with orange flowers and pink pen holder.

Notebook Cover (no sew) and Pen Holder (Sewing) Class

Bring your own fabric and learn how to make a no sew notebook cover. Bring a bit more fabric and make a pen holder bookmark for the notebook. We’ll be covering composition notebooks with gorgeous fabrics to make one-of-a-kind notebooks. This is a beginner friendly class. I can’t wait to see what everyone makes!

Class is February 13 from 1-5 pm. Message me in Facebook for more information.

Notebook and Pen Holder Pattern

Customize and make your own notebook cover (no sew) and pen holder bookmark (sewing) with this fun and easy – beginner friendly – pattern. Find some cute fabric and a composition notebook…and Bam, inspirational notebook.

Create a notebook for guys and gals of all ages. Heck, make a bunch for yourself! Make a journal, or a to-do list, or score pad. Make notebooks for kids for school. Make a notebook for work….and find a possible new side hustle!

Never lose your pen with this elastic bookmark pen holder. Make with or without stabilizer. Fits around a composition notebook from the dollar store or grocery store. Notebooks are 9.75″ x 7.5″ (24.76 cm x 19 cm).

This pattern is quick and easy. It’s a great beginner no sew and sewing pattern.

Notebook Cover and Pen Holder Pattern on Etsy

The Notebook Cover and Pen Holder pattern is available in our Etsy Shop.

Available now on Etsy.

Buy the pattern on etsy

This is a fun pattern because you can customize the notebook for hobbies and interests. You can find some specialty fabrics at craft stores and online. This is also a great stash buster. Have a long skinny strip of fabric? Make a notebook or pen holder!

The no sew Notebook Cover and Pen Holder sewing pattern includes:

  • Lots of photos
  • Step by Step written instructions
  • No sew notebook cover pattern
  • Pen holder sewing pattern
  • Supplies List

Get the Notebook Cover and Pen Holder Bookmark pattern on Etsy.

Weave a Pin Loom Triangle

Pin looms come in lots of shapes and sizes….including the humble triangle. This shape is a powerhouse for weaving fun projects. It extends the boundaries of creativity, making it a must have for your pin loom collection.

As it is with weaving a pin loom square, so it is with the triangle. The process for weaving a triangle is the same no matter the size. We’ll demonstrate how to weave on a 2″ triangle, but keep in mind that a 4″ and 6″ weave the same…they simply have more repeats.

Pin looms can be found at some independent yarn shops, Etsy and Amazon. And you can build your own pin loom. There are 2 different types of pin looms: ones with evenly spaced pins and those with a 3 pin configuration. This post teaches you how to pin loom weave a triangle with a 3 pin configuration.

How to Weave a Pin Loom Triangle VIDEO

Weaving a pin loom triangle is simple, but can be a bit frustrating because warp strands are closer together (especially at the corners). Learn how to weave a triangle with this short video.

Weave a Pin Loom Triangle – Illustrations

Below are several illustrations for weaving a pin loom triangle. It’s accomplished in 4 layers: 3 warp and 1 weave. The pins on the hypotenuse are evenly spaced which makes weaving the triangle different than the square.

Note about the illustrations: The drawings show lines that are cattywampus, but when you weave them, your strands will be nice and straight.

Note about the pin spacing: our pin loom templates intentionally have the top pin slightly out of alignment for easier weaving. The finished woven triangle will look nice and neat.

Layer 1: Warp 1 (Illustrated in Green)

Orient the pin loom so the start arrow is in the bottom left corner. The right angle will be the left corner.

  • Hold the yarn at the start (to the left of the 4 pins), bring it up to the top and wrap it right across the first 2 pins.
  • Bring yarn back down to bottom row of pins and between pin 2 and 3.
  • Wrap yarn to the right across 2 pins (pins 3 and 4).
  • Bring yarn back to top. Skip a pin, wrap yarn across next 2 pins.
  • Bring yarn back down, skip a pin, wrap across next to 2 pins.
  • Repeat previous 2 steps across ending with yarn between last 2 pins at bottom right corner.

Layer 2: Warp 2 (Illustrated in Blue)

This layer will work right to left. Continue where you left off at warp layer 1.

  • Bring yarn to right side.
  • Bring yarn up and wrap across 2 pins.
  • Bring yarn to left side of loom, skip 1 pin, wrap yarn across next 2 pins.
  • Bring yarn to right side of loom, skip 1 pin, wrap across next 2 pins.
  • Repeat previous 2 steps to the top.
  • Finish by bringing yarn to the left between pin 1 and 2 near the top.

Layer 3: Warp 3 (Illustrated in Red)

This layer will work from top to bottom. Continue from where you left off at warp layer 2.

  • Bring yarn to the top around the 1st pin of the hypotenuse.
  • Bring yarn to bottom, skip the 1st pin, wrap yarn across 2 pins.
  • Bring yarn to top, skip 1 pin, wrap yarn across 2 pins.
  • Bring yarn to bottom, skip 1 pin, wrap yarn across 2 pins.
  • Repeat previous 2 steps across.
  • Finish at the bottom, skip 1 pin, place yarn in gap with 2 pins to the right.

Step 4: Weave (Illustrated in Black)

This layer will be worked right to left. Continue from where you left off at warp layer 3.

  • Before starting this layer, you need to measure out a length of yarn for weaving. Wrap the yarn around the outside of the pins (around all 3 sides) 4 to 6 times. This will give you enough yarn to weave and a little extra for joining shapes together.
  • Cut the yarn after the last wrap, unwrap yarn back to end of last warp, and place yarn on weaving needle.
  • Plain weave is the most common pattern. You will bring needle under a strand, then over the next strand, repeating under/over all the way across.
  • Begin at right side of loom. Look for yarn that wraps across 2 pins, which is the first 2 pins on the bottom right. The needle will always go over the loop (See ***Special Weaving Note below if there are 2 strands at the start of your weaving row).
  • Because you are starting in a corner, it may be challenging to see the different yarns to weave under and over. You can tell which to go under because the strand will be lower/recessed. The strand to weave over will be higher/raised. Weave under/over across.
  • Pull yarn all the way through.
  • Now weave left to right (next is weaving between pins 2 and 3). Place yarn over the strand across the pins and weave as normal: under/over across.
  • ***Special weaving note. The next row is woven right to left and you’ll notice there are 2 strands wrapped around these pins (see photo below). YOU MUST WEAVE THEM INDIVIDUALLY as follows:
    • With weaving needle, push top strand to right, exposing the strand below.
    • Now, put your needle under that second/lower strand. This is your 1st under.
    • Weave the remainder of the row as normal: over/under across.
  • Continue weaving the remainder of the rows under/over across. Note that the hypotenuse side will often have 2 strands wrapped across the pins. Weave them as mentioned above.

Photo shows the hypotenuse side of the triangle where some pins have a double wrap. See ***Special Weaving Note above for how to weave those end strands so your triangle looks nice and tidy on this side.

Yarn Size

Traditional pin looms are designed to be woven with light weight (size 3) and medium worsted weight (size 4) yarns. Since the triangle is a little bit trickier to weave than the square, we recommend that you weave your first triangle with cotton thread. That will allow you to see how all the strands interact with the pins.

Yarn Fiber

The type of yarn you use will also impact how easy you triangle is to weave. Yarns with some elasticity will be easier to weave with because they have some stretch and give.

  • Easier yarns: acrylic, wool and other animal fibers.
  • Difficult yarns: cotton, bamboo and other plant fibers.
  • Learn more in our Selecting Yarn to weave post.

Tips for Weaving

We share 11 Tips for Pin Loom Weaving in another post. It was written with the 4″ square in mind, but the concepts will translate well to weaving a triangle. For instance:

  • We recommend that you leave a long tail so you can joins woven shapes together.
  • After weaving a row, you can beat down the strands with your weaving needle or a dinner fork.
  • You will want to use both hands when you weave the pin loom triangle. One moves the needle while the other moves warp strands aside so you can weave more easily. Sometimes I’ve even used a yarn needle to move strands aside so I can find where to place my weaving needle.

Pin Loom Triangle Patterns

What can you make with pin loom triangles? Lots of things, especially if you combine them with squares (and/or rectangles). One of our favorite patterns is the Quilt Diary of Ideas which has chapters devoted to single shapes and other chapters for multiple shapes.

Check out our YarnovationsShop on Etsy for fun and exciting pin loom patterns.

Can’t find a triangle loom? Build your own pin loom triangles (squares and rectangles, too).

Weave a Pin Loom Square or Rectangle

Pin loom weaving is a lot of fun and quite simple. The 4″ square is the most popular size pin loom to weave and the most readily available. It can be found in lots of independent yarn shops as well as Amazon and Etsy. You can build your own pin loom, too.

Weaving a pin loom square is the same no matter the size. A 2″ is woven in the same manner as the 4″. The 4″ will just have more rows to repeat. Likewise, the 6″ loom will have even more rows to repeat. A rectangle is also woven like a square, it’s just wider.

There are 2 main types of pin looms on the market: 3 pin configuration vs evenly spaced pins. This tutorial shows how to weave a square with a 3 pin configuration.

Weave a Pin Loom Square (or rectangle) VIDEO

Weaving a pin loom square is really easy. Learn how with this short video.

Pin Loom Weaving a Square – Illustrations

Don’t have time to watch the video? Below we have several illustrations for weaving a 2″ pin loom square. It’s accomplished in 4 layers: 3 warp and 1 weave.

Layer 1: Warp 1 (Illustrated in Green)

Orient the pin loom so the start arrow is at the bottom left. Most pin looms will have an arrow indicating where weaving should start. In this case, look for a cluster of 4 pins at bottom left corner with no pin at the top left corner. This layer will be worked bottom to top.

  • Hold yarn at start, bring yarn to top row and wrap it across the 2 pins there.
  • Bring yarn back down between pin 2 and 3 and wrap it across pins 3 and 4.
  • Bring yarn back to top, skip 1 pin, wrap it across the next 2 pins.
  • Bring yarn back down to bottom, skip 1 pin, wrap it across the next 2 pins.
  • Repeat previous 2 steps to end.
  • End by bringing yarn back to the bottom between last 2 pins.

Layer 2: Warp 2 (illustrated in Blue)

This layer will work right to left. Continue from where you left off at warp layer 1.

  • Bring yarn to the right side.
  • Bring yarn up and wrap across 2 pins.
  • Bring yarn to left side of loom, skip 1 pin, wrap yarn across next 2 pins.
  • Bring yarn to right side of loom, skip 1 pin, wrap yarn across next 2 pins.
  • Repeat previous 2 steps to top.
  • End on left side between last 2 pins.

Layer 3: Warp 3 (illustrated in Red)

This layer will work from top to bottom. Continue from where you left off at warp layer 2.

  • Bring yarn to top of loom. Wrap it across 1st pin.
  • Bring yarn to bottom of loom. Skip a pin, wrap it across 2 pins.
  • Bring yarn to top of loom. Skip a pin, wrap it across 2 pins.
  • Repeat previous to steps across.
  • End with yarn in the gap to the left of the last 2 pins.

Step 4: Weave (illustrated in Black)

This layer will work left and right. Continue from where you left off at warp layer 3.

  • Before starting this layer, you need to measure out a length of yarn for weaving. Wrap the yarn around the outside of the pins (around all 4 sides) 4 to 6 times. This will give you enough yarn to weave and a little extra for joining shapes together.
  • Cut the yarn after the last wrap, unwrap the yarn back to end of last warp and place yarn on weaving needle.
  • Plain weave is the most common pattern. You will bring needle under a strand, then over the next strand, repeating under, over all the way across.
  • Begin on right side. Look for the yarn that wraps across 2 pins, which is the 1st 2 pins on the bottom right. The yarn always goes over the loop that was wrapped across the pins.
  • Start by weaving the needle under the next strand, then over the next. You can tell which strand to weave under because it will be lower/recessed. The strand to weave over will be higher/raised.
  • Pull yarn needle all the way through.
  • Now weave from left to right (next up is weaving between the 2nd and 3rd pin).
  • Continue weaving back and forth. The last weave will be right next to the pins at the top.

Pin Loom Weaving Tips

Yarn Fiber

Some yarns are easier to weave with than others. Yarns with some elasticity are easier to weave because they can stretch a bit.

Weaving Tension

warping pin loom with acrylic vs cotton

When warping the pin loom, wrap with a light touch. Don’t stretch the warp. It will tighten up with each strand you weave. For cotton yarn, warp extra loose.

Tips for Weaving

Read our post 11 Tips for Pin Loom Weaving for more detail. Here are a few of our favorites:

  • Leave a long tail for joining woven shapes together.
  • Pack or beat the yarn after you weave a row. This will leave a gap for weaving the next row. You can use a kitchen fork for this!
  • It’s ok to use both hands to weave. Use one hand to move the needle and the other to move strands in or out of the way for weaving.

Want another take on how to pin loom weave? Schacht spindle company has granted us permission to share their weaving images from the Zoom Loom. Learn more about How to Weave on a Pin Loom.

So what can you make with pin loom woven shapes? Check out our YarnovationsShop on Etsy for some fun ideas.

Make a Pin Loom – Pattern

Pin loom weaving is fun…and even more so if you have looms of various shapes and sizes! There are several small and independent companies that manufacture pin looms. We highly recommend them. However, it can be hard to find pin looms in stores (other than weaving friendly yarn shops).

In order to get all the pin loom shapes you might need, you can make your own! This pattern includes pin loom templates for squares, rectangles and triangles measuring 1” up to 6”. Not only can you build your own, we show you how to build them with common household items.

You can make a pin loom from items such as cardboard and straight pins. Those work ok for really small looms like the 1″ square and if used lightly. If you weave regularly or like the larger shapes, we recommend that you build a loom from wood like MDF or plywood and brad nails, all found at your local hardware store.

Build a Pin Loom Step-by-Step

The pattern for Making Your Own Pin Loom is awesome! It answers lots of questions you may have and offers step-by-step information for building a pin loom start to finish:

  • Step-by-Step Written Instructions
  • Tons of Photos
  • VIDEO link to Build a Loom from Cardboard or Foam
  • VIDEO link to Build a Loom from Wood
  • VIDEO link to Weaving a Square (or Rectangle)
  • VIDEO link to Weaving a Triangle
  • Links to Where to Buy Ready Made Pin Looms
  • Templates for Squares: 1″, 2″, 4″, 6″
  • Templates for Rectangles: 1″x2″, 1″x3″, 1″x4″, 1″x6″
  • Templates for Rectangles: 2″x4″, 2″x6″
  • Templates for Triangles: 2″, 4″, 6″
  • Materials List for Building Looms on Cardboard, Foam or Wood

Make a Pin Loom Pattern on Etsy

Buy the pattern with templates to Make Your Own Pin Looms in our Etsy shop.

Available now on Etsy.

Buy the pattern on etsy

Pin Loom Weaving Patterns

Pin looms are great for weaving up little fabric shapes. These shapes can be sewn together to create countless woven projects from coasters to blankets, to stuffed animals and decorations. You can make a ton of adorable projects with a simple square…but the possibilities are limitless with additional pin loom shapes like rectangles and triangles.

Visit our Etsy shop for lots of fun and exciting pin loom patterns to weave!

Pin Loom Flock Pattern

Introducing…The Pin Loom Flock: 9 Adorable Birds to Weave with Squares and Rectangles. Inspired by the Birds of a Feather crochet pattern, we’re excited to bring our most popular birds to the pin loom community.

9 Gorgeous Birds included in the pin loom pattern:

  • Bald Eagle
  • Cardinal
  • Chicken
  • European Robin
  • Red-Winged Blackbird
  • Robin (and a mini Robin)
  • Seagull
  • Turkey
  • Western Tanager

Shhh…I have a secret for you. All these birds can be made from 2 pin looms (the Robin can be made from 1!). We used 3 to 5 different looms to make each bird so there would be less tails to weave in, but you can make them with a 2″ square and 1″x4″ rectangle (with folding of the rectangle in some cases).

Pin looms we used to make all the birds include:

  • Squares: 1″, 2″, 4″, 6″
  • Rectangles: 1″x2″, 1″x4″, 2″x4″, 2″x6″

The Pin Loom Flock on Etsy

The pin loom pattern to make the Pin Loom Flock is available now on Etsy.

Available now on Etsy.

More about The Pin Loom Flock Pattern

The Pin Loom Flock is a beginner friendly pattern. Every square and rectangle will be woven in plain weave and joined with a simple overcast or your favorite join method. The birds measure: 5.5” length x 6.5” width x 4.5” height. The Chicken measures 7.75” x 5.75” x 6” because it has a couple rounds of single crochet (it is the only bird with crochet).

The pattern includes written instructions as well as helpful photos for rolling and folding shapes to make feet, beaks, wattles, snoods and combs. There are helpful charts to show yarn and loom sizes used to make each bird.

Materials needed are minimal and include:

  • Yarn: Size 4 medium worsted weight
    (Pattern used: Lion Brand Heartland and Basic Stitch, acrylic)
  • Pin Looms (see list above)
  • Weaving Needle (6″) and Yarn Needle
  • Stuffing
  • Safety Eyes: 14 mm – 2 each bird (chicken 18 mm)
  • Crochet Hook (chicken only): G/4.0mm

Birds for the Holidays and Special Occasions

The birds are fun to make for bird lovers, but they are also fun for several holidays and other special occasions.

  • Christmas Bird: Cardinal
  • Thanksgiving Bird: Turkey
  • Halloween Bird: Blackbird (made in solid black as a Crow/Raven)
  • Wedding Bird: Make the Robin in white as a Dove.
  • Sports Teams: Cardinals, Eagles, Falcons, Ravens

Make one of these birds as a Thinking of You gift and add a little encouragement note:

  • “Fly high, little bird!”
  • “Trust your wings.”
  • “Sing your song.”

These little birds are fun sitting on a shelf or at your desk.

Get your copy of The Pin Loom Flock in our Etsy shop now.