Weaving on a pin loom is easy, enjoyable and relaxing. In this tutorial we’ll be weaving on the Zoom Loom by Schacht Spindle Company. They have graciously provided the images for this tutorial. You can download the complete PDF Zoom Loom Instruction Booklet which has even more illustrations.
Looking for inspiration for pin loom projects? Check out our pin loom patterns on Etsy.
Buying a Pin Loom
Most people begin the pin loom weaving journey by purchasing a 4″ square like the Zoom Loom. But pin looms come in many shapes and sizes including squares, rectangles, triangles, hexagons and more and range in size from 1″ to 6″ and larger.
There are two common configurations for pin looms. Some have little brad nails that are evenly spaced around, while others have a 3 pin configuration where every 4th pin is missing. The Zoom Loom is a 3 pin configuration. Here’s a picture of my zoom loom (yes, I still have the original box) and it includes a weaving needle.

Buying Yarn to Pin Loom Weave
Light (3) and Medium Worsted (4) weight acrylic or wool yarns weave up really nice on the standard pin loom. Because the pins are non-adjustable, you create a drapey or dense fabric by changing the weight of yarn you weave. A lighter weight yarn creates a looser weave while a thicker yarn creates a more dense weave. Avoid yarns that have no elasticity like cotton and bamboo as you learn.
Examples of yarns to use when you learn to weave include:
- Cascade 220 Superwash or 220 Superwash Sport
- Red Heart Soft
- Lion Brand Heartland or Baby Soft
- Caron Simply Soft
We write in more detail about Selecting Yarn for Pin Loom Weaving on our blog because you can use yarns of various weights and fibers.
Let’s Pin Loom Weave!
Below is a photo tutorial on how to weave on a pin loom. If you’d prefer, you can watch this great video: How to Pin Loom Weave on a Zoom Loom by Schacht.
In a nut shell: you set up a pin loom by wrapping yarn around every second pin. In the 3 pin configuration there will be gaps where pins are missing. Just visualize a pin in that gap and wrap yarn in the same fashion. You’ll find that mathematically speaking, that 4th pin isn’t needed.
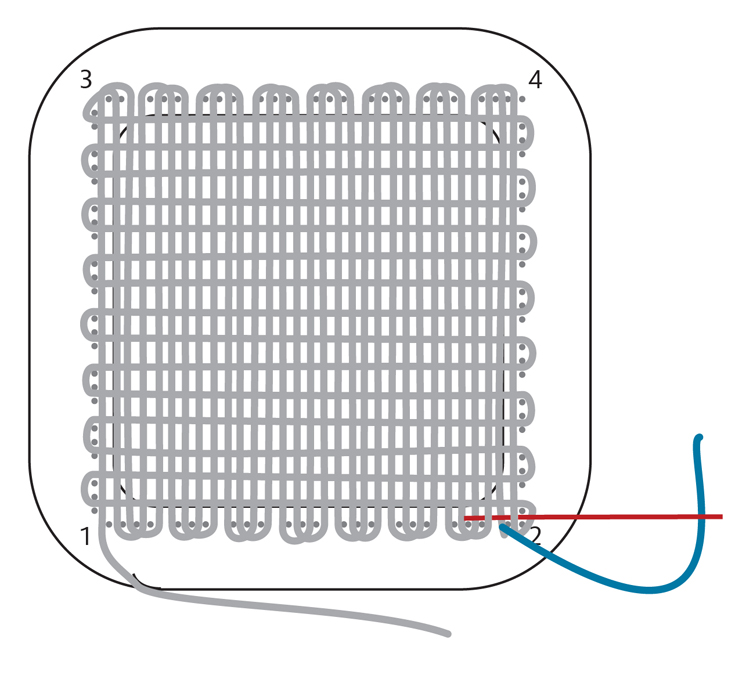
Wrap #1: Orange Threads
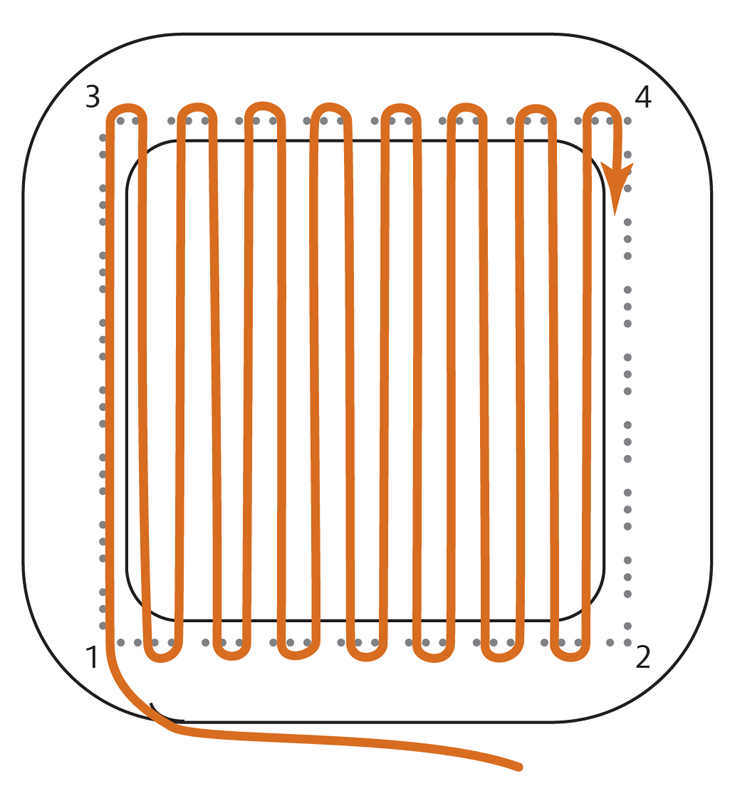
As pictured by the orange threads above, start at Corner 1 and wrap your threads around every second pin on the opposite side continuing back and forth. Not too tightly. Just wrap them around so there is some give when you press on them.
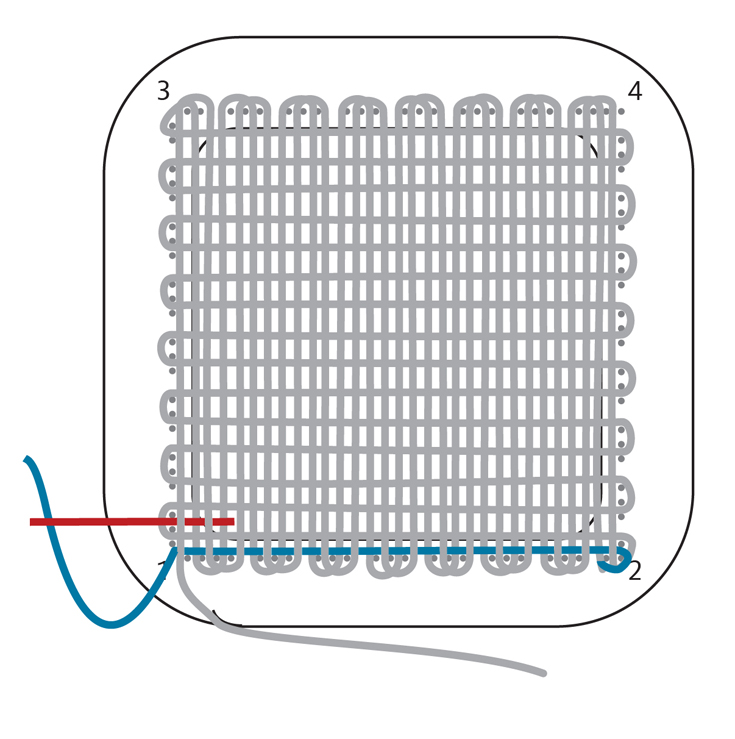
Wrap #2: Green Threads
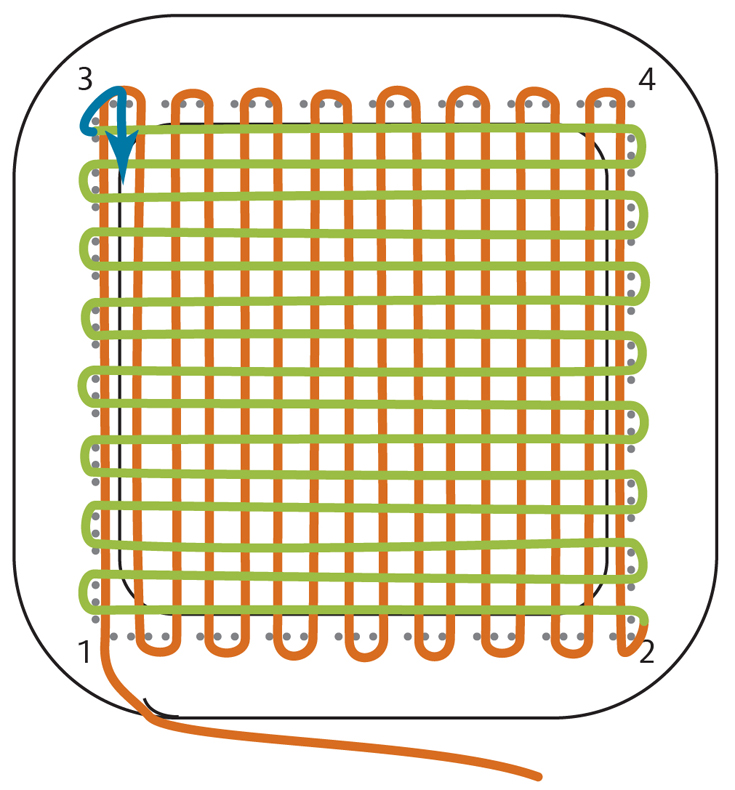
As pictured in the green threads above, begin wrapping the pins at corner 2 in that first gap and continue as before wrapping back and forth around every second pin (real or imagined).
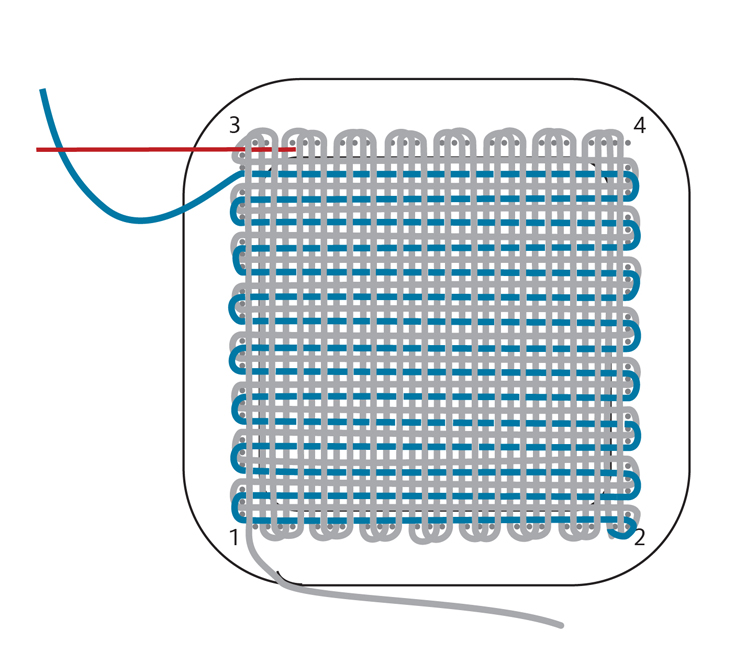
Wrap #3: Blue Threads
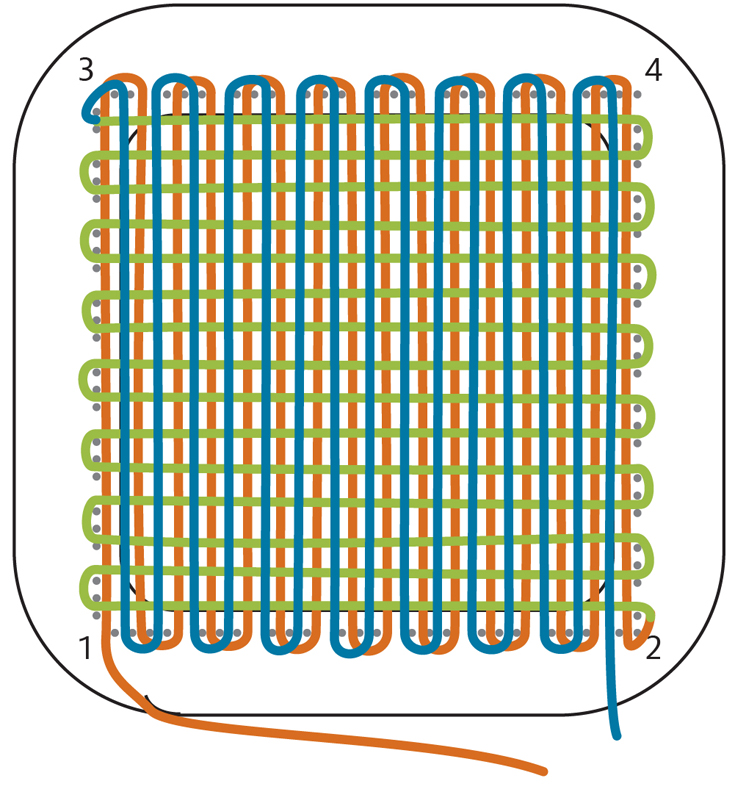
Continuing in the same fashion, start at corner 3 between the first two pins and continue back and forth across the loom wrapping around every second pin (real or imagined).
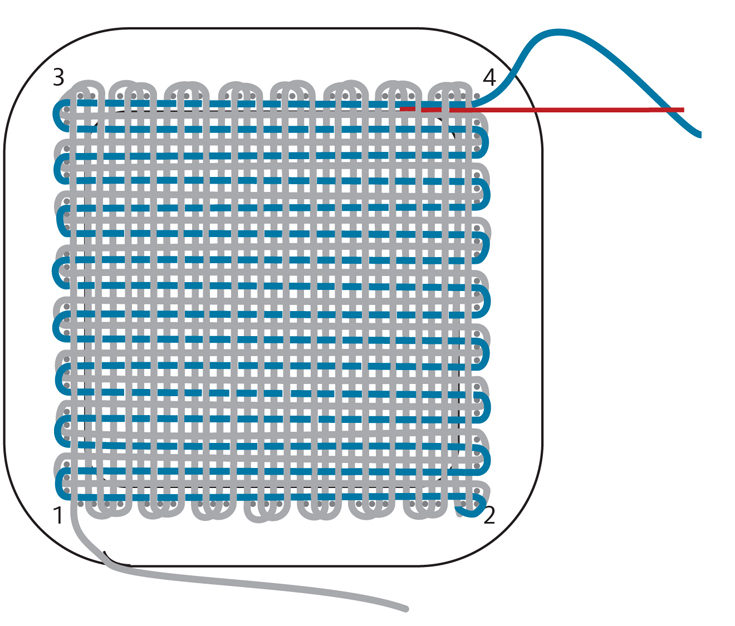
Creating a Strand for Weaving: Blue Threads
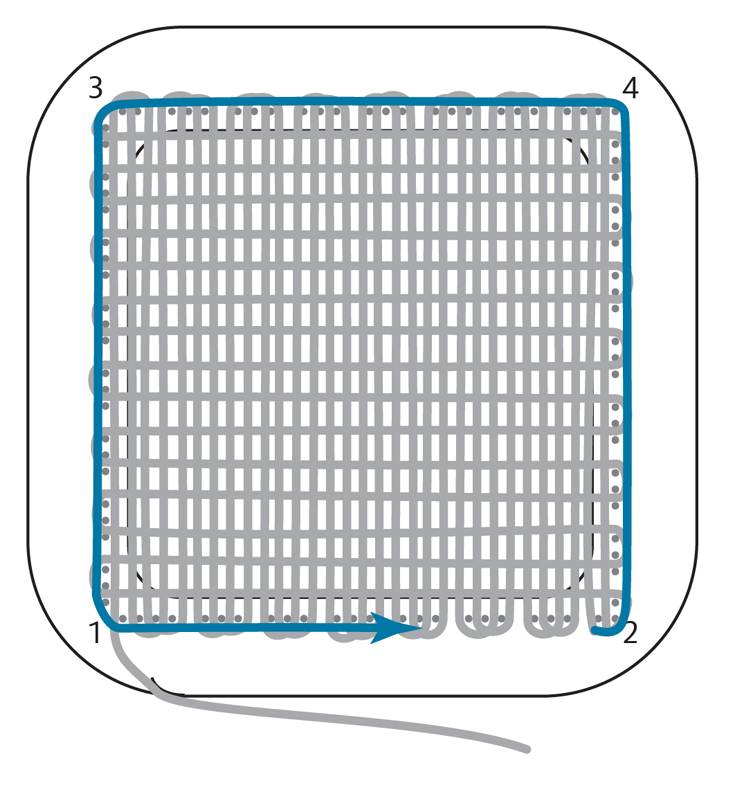
Wrap the yarn around the outside of all the pins 5 times and cut it off the skein. Carefully unwind those 5 wraps and thread the 6″ needle and you’re ready to start weaving.
How to Plain Weave on a Pin Loom
Next we will “Plain Weave” on the pin loom. It is the first weave most people learn and the one we use most often. To plain weave, pass the needle under one thread, over the next thread, continuing under one, then over one thread all the way across. Repeat that pattern every row. Let’s take a closer look.
Weave the 1st Row
Start at corner 2, place needle over the yarn on the outside of the first two pins. Then weave (under the next thread, over the next thread) repeat across.
When you finish, the rows of yarn may be uneven. Use a dinner fork or the weaving needle to comb or “pack” the row you just wove to the bottom of the loom. (See our blog on How to Pack Down Yarn in Pin Loom Weaving to learn more). Pack the next horizontal strand as well. This is one of the strands you wrapped previously. Packing will make it easier to see your next gap to weave.
Weave the 2nd Row
Skip two pins from where your yarn came out and weave back to the other side of the loom in the same fashion. Place needle over the yarn on the outside, then weave (under the next thread, over the next thread) across.
Continue Plain Weave Pattern
Continue to plain weave “every other row” so to speak. Be sure to pack each row as you complete it.
Weave the Last Row
The last row can be tricky because the yarn on the loom is really being stretched from all the previous weaving. The tension is making it more difficult to weave the needle through. Pack down all previous weavings and you should have a nice gap to weave your last row. Weave it as normal.
Weave in the Tail
You did it! You have made your first pin loom woven square. Before you remove it from the loom, let’s weave in the end.
Basically you are going to reweave that last row but make sure that first weave is over the first thread. You want to make sure that you aren’t unweaving the last row. After that, you’ll follow the same weaving pattern as the last weave.

Weave in the beginning tail as you did the finished tail making sure that first weave is opposite so the strand is locked in place.
Note: Sometimes people leave a long tail at either the start of finish so they can join pin loom woven shapes together.
Now you can lift your weaving straight off the loom and you have made your first of many squares.
Good job.
What Can You Make With Pin Loom Squares?
We get asked this question a lot, what can you make with pin loom squares? The answer…almost anything! With just the squares alone you can make 2D items like afghans and shawls and 3D items like bags and toys.
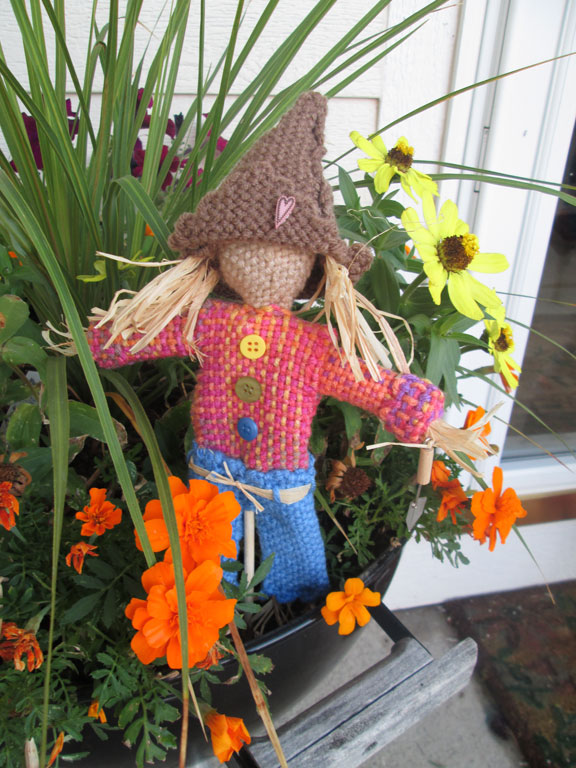
As a quick point of reference, we made an entire collection of Pin Loom Halloween Decorations and bags using 4″ pin loom squares. Below are a couple of items in that collection. You can see the pattern collection on Etsy.

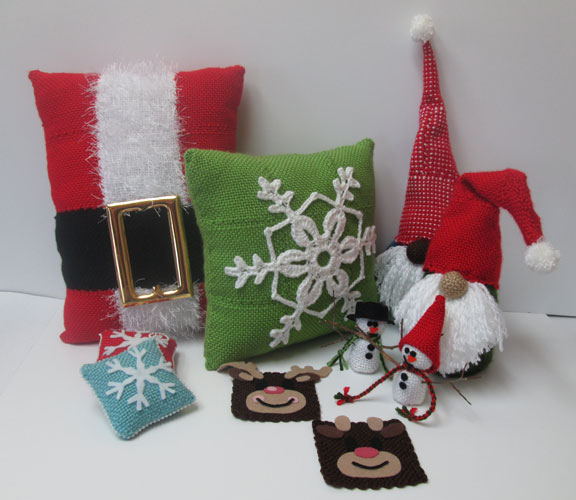
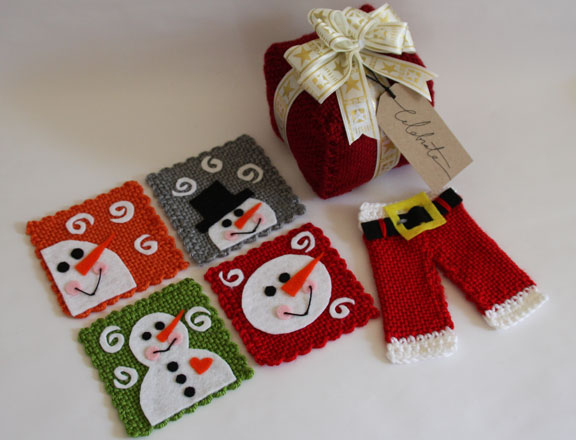
We were so inspired by all the decorations for Halloween that we made a set for Christmas, too! You can learn more about our Christmas Pin Loom Decorations on Etsy. Everything in that pattern also only uses the 4″ pin loom square. Here are a couple pictures of some of the items in that pattern collection.
As you can see, 4″ pin loom squares are easy to weave and a lot of fun to craft with. Check out our other fun Pin Loom Projects in our Etsy shop.

