Pin Loom Chef Gnome

Pin Loom Chef Gnome. Photo Matt Graves

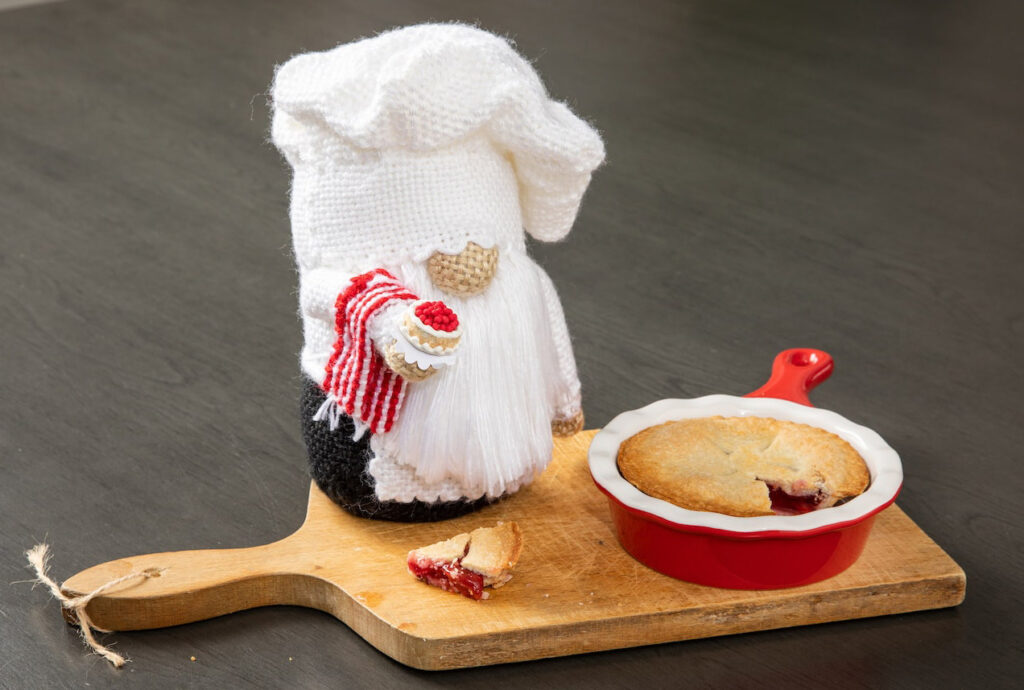
This little pin loom chef gnome has a sweet tooth. Here he is serving up some cherry desserts.

Make your own chef gnome with pin looms. He’s the perfect accessory for the kitchen and makes a great gift for those who love to cook…and eat.

We love the obvious and the subtle details that turn this gnome into an accomplished chef. The toque (hat) is probably the most iconic item. But the gnome is also wearing a white apron and holding a red and white striped serving towel. All of these items were made with pin looms. There are a couple little elements of crochet (we’ll touch on that in a moment). The cherry dessert in his hand was purchased at a craft store in the miniatures/doll department.

Chef Gnome Pattern Available on Little Looms

This particular gnome pattern was designed for Little Looms and is available with All Access membership to their site. Learn more about the online subscription to Little Looms where you can buy access to all past and present patterns from Little Looms magazine.

Materials Used to Make the Chef Gnome

The main items needed to make this chef gnome are pin looms and yarn. But there are a few other items that give the gnome his polished appearance. For instance, the yarn of the beard is combed with a metal pet comb then steam ironed to straighten the threads. Here’s a complete list of what was used to make the chef gnome:

  • Pin Loom – Square: 2” and 4”
  • Pin Loom – Hexagon: 3 ¾“ diameter (2” sides)
  • Pin Loom – Rectangle: 2” x 4” and 2” x 6”
  • Needle: 5” weaving needle, tapestry needle
  • Yarns Red Heart Soft (100% acrylic; 256 yd/4 oz), #E4600 White, 200 yd; #46414 Black, 24 yd; #9274 Biscuit, 8 yd; #9925 Really Red, 5 yd.
  • SUBSTITUTION if needed: Red Heart With Love (100% acrylic, 370 yd/7 oz) #1001 White, 1012 Black, #1308 Tan, #1909 Holly Berry.
  • Stuffing
  • Miniature Cake
  • Crochet Hook Size G/6/4.00mm
  • Small Bag of Bean or Something Heavy to Weigh Down the Gnome
  • Straight Pins
  • White Fabric Marker
  • Steamer
  • Pet Comb
  • Hot Glue.

More about the Chef Gnome

As mentioned earlier, there is a tiny bit of crochet on the gnome. The apron strings are crocheted as are the cuffs at the wrist of each arm. If you don’t know how to crochet, then ribbon could be substituted for the apron strings. And the cuffs could be omitted.

All the shapes are woven in plain weave. So that portion is very beginner friendly. The project my look intimidating, but the pattern will explain step-by-step how to fold, roll, tuck and cinch pin loom woven shapes into a chef worthy of any kitchen.

Bon Appetit!

Wolf Pencil Case Pin Loom Pattern

There’s no need to scratch and claw through the junk drawer looking for a pen. Make your own wolf pencil case with yarn and pin looms to store them in. These are great for holding pens, pencils, crochet hooks, mini scissors and more. And since it’s pin loom woven, you can even weave your needle through the outside of the case when you’re not using it.

The wolf pencil case measures approximately 12” long x 7” tall x 4” wide.

Pin These Pictures to Pinterest.

Share the love, pin this image to Pinterest.

Wolf Pencil Case Available on Etsy

The Wolf Pencil Case Pin Loom Pattern is now in our Etsy Shop.

Available now on Etsy.

Buy Now on Etsy

About the Wolf Pencil Case Pin Loom Pattern

This pencil case was a special request from one of the boys…he wanted a coyote. Both wolves and coyotes are a bit dog like, so sure, it’s not a wolf, it’s a coyote!

The pattern is 5 pages which includes step-by-step written instructions. There are 10+ photos that show the pencil case at different points of construction. Instructions are for the grey wolf, though step-by-step photos are often for the black dog. The shape for the black dog and grey wolf are the same.

Here’s what you’ll need to make the Pin Loom Wolf Pencil Case:

  • Pin Loom Square: 1”, 2”, and 4”
  • Pin Loom Rectangles: 2”x4”, 1”x4”
  • Yarn:   Red Heart: Soft – Medium (4), acrylic, 5 oz/256 yds
  •             Grayscale #9931
  •             Black #4614
  •             White #4600
  • Needle:           6” needle for weaving and yarn needle for sewing
  • Safety eyes: (2) 14mm
  • Safety nose: 2cm
  • Zipper: 9” in color of yarn
  • Fabric for lining: approximately 12” x 12”
  • Can – with 2 5/8” diameter for helping sew the ends to the body of the pencil case (optional)
  • Notions: straight pins, needle and thread

Please note that there are not photos to match each step-by-step written instruction. But there are photos throughout the pattern to help provide clarity.

PDF Instant Download Available

Buy the Wolf Pencil Case Pin Loom Pattern in our Etsy Shop.

Available Now on Etsy.

Buy Now on Etsy

The pattern is for your eyes only. We encourage you to give away or sell your finished work as long as you credit yarnovations.com as the designer.

Scrubby Dishcloths

Pros and Cons of Knit, Crocheted and Woven Dishcloths using Scrubby Yarn.

Though I enjoy using any of the scrubby dishcloths, there are definitely some pros and cons to each type. Let’s take a look at each one separately.

Knit

The Knit dishcloth was the easiest one to make. It was easiest on which to find the stitches. I made mine 25 stitches wide using the garter stitch with size H needles. I did not count the rows, so I’m really not sure how many there are, and it’s nearly impossible to count! It has the nicest drape and is stretchy. It is fairly thin and fits nicely in glasses and pots.

Crochet

The crocheted one was the fastest to work up. I also worked it 25 stitches across and the number of rows needed to make it a square using an H hook. It was very difficult to find the stitches, so I had to count my stitches every row. It was surprisingly not too difficult to pull out stitches if I missed a loop. It is the thickest dishcloth and has a moderate amount of drape. It feels bulky in comparison, but feels very sturdy for washing.

Pin Loom Woven

The pin loom woven dishcloth was the most difficult to make. I sewed four 4″ squares together. I wove the squares on the Zoom Loom, a 3-pin arrangement with 3 warp layers. The weaving needle often caught in the middle of a warp strand and was very difficult to pull through. I tried exaggerating the weaving motion, but that only helped a little. It was also very difficult to sew the squares together as it was hard to see the loops on the edges. The sewing needle often went through the strands and were difficult to pull through. It is the thinnest dishcloth and most static. It does not stretch. Because it is the thinnest, it fits into cups and bottles the easiest. And despite the frustrations to weave, it is fun to use.

*It might be easier to weave a 2-warp square, as there will be fewer layers around which to maneuver, though I’ve not tried this. Some weavers have found it much easier to warp the loom in cotton, and only weave with the Scrubby yarn. That would most certainly take away almost all of the difficulties I mentioned before. Continuous weaving would also be much easier, like on the Turtle Loom or other continuous weaving looms. Speaking of which, now I want to see how a hexagonal dishcloth works up!

All of the dishcloths were made using Red Heart Scrubby yarn. The woven one used the least amount of yarn and will make 11 squares, enough for 2.75 dischloths. The knit dishcloth used slightly more yarn and will easily make two dishcloths. The crocheted dishcloth used the most yarn, but you should still get two scrubbies of 25 stitches wide using an H hook.