Pin Loom Flock Pattern

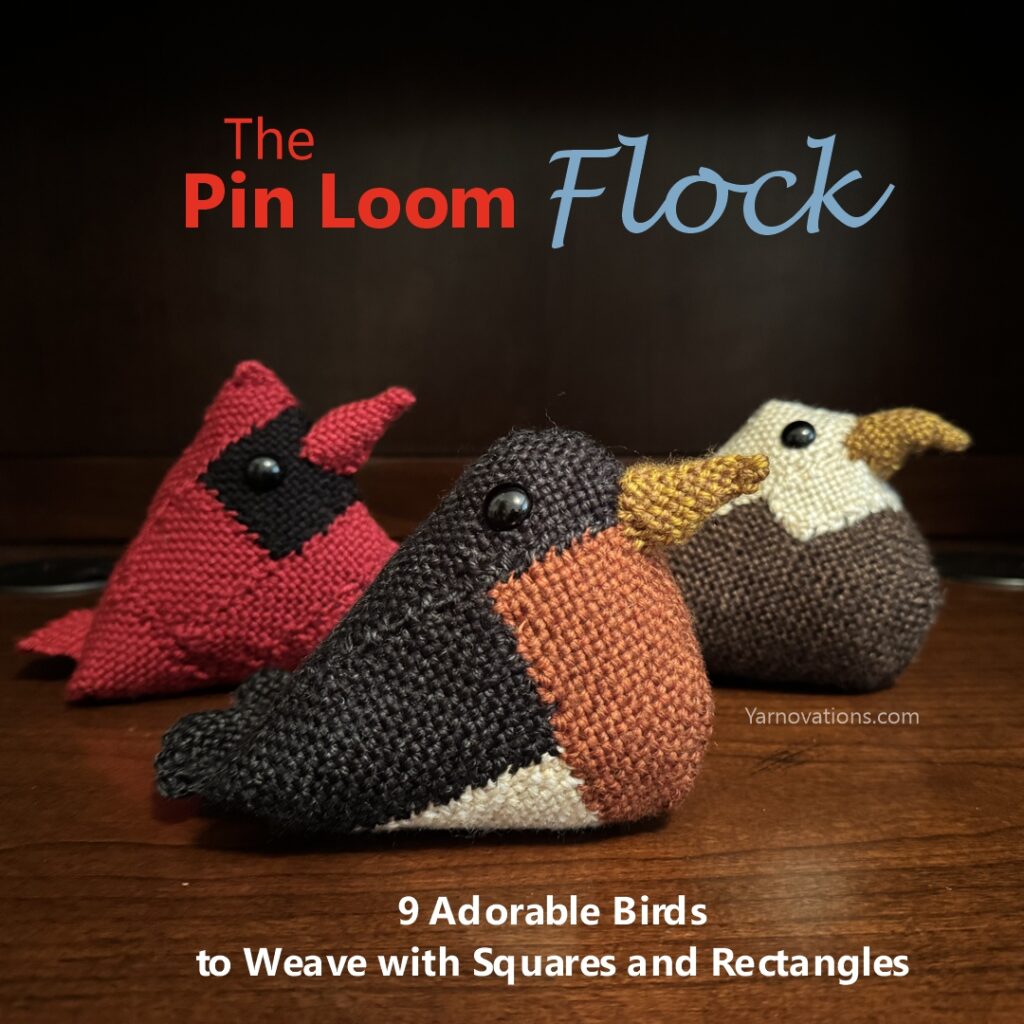
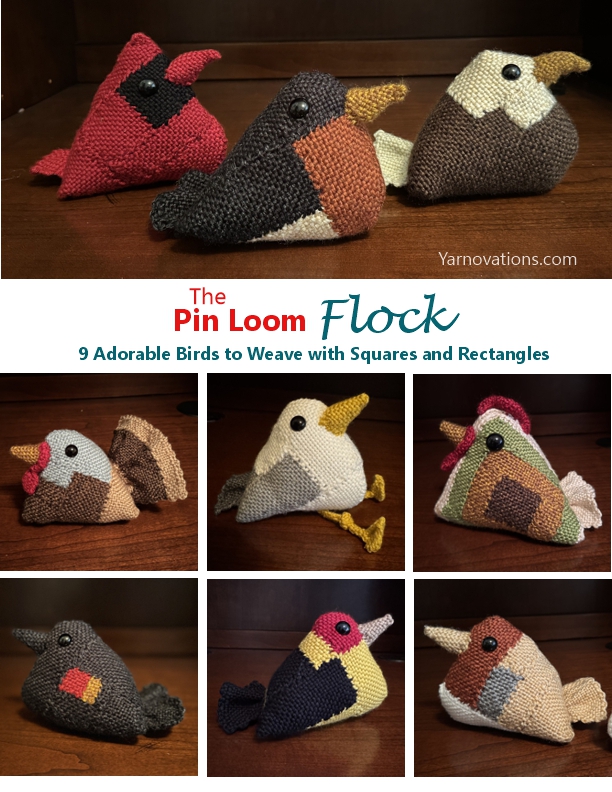
Introducing…The Pin Loom Flock: 9 Adorable Birds to Weave with Squares and Rectangles. Inspired by the Birds of a Feather crochet pattern, we’re excited to bring our most popular birds to the pin loom community.

9 Gorgeous Birds included in the pin loom pattern:

  • Bald Eagle
  • Cardinal
  • Chicken
  • European Robin
  • Red-Winged Blackbird
  • Robin (and a mini Robin)
  • Seagull
  • Turkey
  • Western Tanager

Shhh…I have a secret for you. All these birds can be made from 2 pin looms (the Robin can be made from 1!). We used 3 to 5 different looms to make each bird so there would be less tails to weave in, but you can make them with a 2″ square and 1″x4″ rectangle (with folding of the rectangle in some cases).

Pin looms we used to make all the birds include:

  • Squares: 1″, 2″, 4″, 6″
  • Rectangles: 1″x2″, 1″x4″, 2″x4″, 2″x6″

The Pin Loom Flock on Etsy

The pin loom pattern to make the Pin Loom Flock is available now on Etsy.

Available now on Etsy.

More about The Pin Loom Flock Pattern

The Pin Loom Flock is a beginner friendly pattern. Every square and rectangle will be woven in plain weave and joined with a simple overcast or your favorite join method. The birds measure: 5.5” length x 6.5” width x 4.5” height. The Chicken measures 7.75” x 5.75” x 6” because it has a couple rounds of single crochet (it is the only bird with crochet).

The pattern includes written instructions as well as helpful photos for rolling and folding shapes to make feet, beaks, wattles, snoods and combs. There are helpful charts to show yarn and loom sizes used to make each bird.

Materials needed are minimal and include:

  • Yarn: Size 4 medium worsted weight
    (Pattern used: Lion Brand Heartland and Basic Stitch, acrylic)
  • Pin Looms (see list above)
  • Weaving Needle (6″) and Yarn Needle
  • Stuffing
  • Safety Eyes: 14 mm – 2 each bird (chicken 18 mm)
  • Crochet Hook (chicken only): G/4.0mm

Birds for the Holidays and Special Occasions

The birds are fun to make for bird lovers, but they are also fun for several holidays and other special occasions.

  • Christmas Bird: Cardinal
  • Thanksgiving Bird: Turkey
  • Halloween Bird: Blackbird (made in solid black as a Crow/Raven)
  • Wedding Bird: Make the Robin in white as a Dove.
  • Sports Teams: Cardinals, Eagles, Falcons, Ravens

Make one of these birds as a Thinking of You gift and add a little encouragement note:

  • “Fly high, little bird!”
  • “Trust your wings.”
  • “Sing your song.”

These little birds are fun sitting on a shelf or at your desk.

Get your copy of The Pin Loom Flock in our Etsy shop now.

Bones the fish Pin Loom Pattern

Weave your own fish skeleton with pin loom squares!

Bones, the fish, is a stuffed animal made from pin loom squares. Make your own with either a 4″ or 2″ square pin loom. Only 1 pin loom is needed!

Beginner friendly, this pin loom weaving pattern includes step-by-step instructions with photos. It will teach you how to fold, roll and sew together shapes to create a stuffed animal that’s just a little fishy.

Bones, the fish, on Etsy

Bones the fish Pin Loom Pattern is now available in our Etsy shop.

Available now on Etsy.

Buy the pattern on etsy

We’ve owned several fish. Some have lived long healthy lives, others not so long. The orange bone fish skeleton stuffed animal reminds us of those poor little gold fish we won at the county fair when we were little. We were full of excitement and looked forward to caring for them for the rest of our lives! All too soon did we learn that pets live shorter lives than us, and carnival won gold fish lived the shortest!

Share the Love

We’d be thrill to have you share this pin loom pattern on social media. Post one of our pictures to pinterest, facebook, instagram or wherever you love to browse for pin loom projects.

Thank you!

Reviews of our Pin Loom Patterns

We receive lots of 5 star reviews for our patterns. Here’s what a few people have said about our other pin loom patterns:

  • “Great pattern! I’m looking forward to making one…” – Linda
  • “Very well organized pattern. Instructions are easy to follow. Would recommend.” – Elven
  • “Just started! So far easy to understand!” – Rita

Stuffed animals that look like fish bones are really funny and surprisingly fun to gift and decorate with.

  • Add bones to your Halloween decorations. It would be particularly fun next to any other skeletons you decorate with.
  • Add catnip and make it a cat toy (do NOT use safety eyes on toys for animals or babies).
  • Give as a gag gift to friends and family that love to fish.
  • Pair this fish with the cat from Zoo Crew (see picture below).

Be a Toy Maker

Be a toy maker! We have lots of stuffed animals you can make with a single square pin loom. Use a 4″ pin loom for traditional sized toys…or for miniatures, use a 2″ square pin loom!

  • Bones the Fish Skeleton – is available as a separate pattern.
  • Ginny the Cat – is available in Zoo Crew ebook which features 12 loveable stuffed animals.
Zoo Crew ebook 12 animals to pin loom weave on 4" or 2" pin loom. Pictured with penguins, dogs, elephants, bunny rabbits.

Which little fishy will you make?

Get Bones, the fish, Pin Loom Pattern on Etsy.

Mini Market Bag – Gift Card Holder

So tiny, so sweet, this little project is the perfect gift for raiding your fabric stash.

These mini market bags are reversible and can hold a bit of candy, a gift card or little notions. You can sew a gift card holder in 30-60 minutes…yes, we timed it. And the sewing pattern is really easy, too.

Mini Market Bag Sewing Pattern on Etsy

The reversible miniature market bag gift card holder sewing pattern is available now in our Etsy shop.

Available now on Etsy.

Buy the pattern on etsy

Last minute gifts…for all special occasions

Last minute gifts aren’t just something that happens at Christmas time…it happens all year long! This reversible miniature market bag gift card holder sewing pattern works for last minute gifts such as birthday, thinking of you, Halloween, Valentine’s Day, Secret Santa, St. Patty’s Day and so many more.

3 Market Bag Styles in this Sewing Pattern

The mini market bag sewing pattern has tracing templates and step-by-step written instructions for 3 different style market bags.

  • Solid Fabric Market Bag: Of the three market bags, this one is the quickest bag to sew. There are no pockets nor color changes on the outside.
  • Accented Top Market Bag: This design features a separate panel at the top to mix and match fabrics. It does not have a pocket. It’s easy, but does have an extra step.
  • Pocket Front and Back: This mini market bag has a main pouch and gift card size pocket on the front and back. This is also a great sewing project for mixing and matching fabric.

Miniature Market Bag Sewing Pattern

The mini market bag is also a great size for dolls like the American Girl Doll. Sew several for various playtime fun. Sew a shopping bag, beach bag or bag for using in a doll house.

The materials needed to make a miniature market bag are very minimal…making this a great stash buster for your fabric.

Materials needed to make a mini market bag:

  • Fabric:  Solid Bag: 6“ x 10” (2 fabrics)
  • Fabric: Pocket Bag: 7” x 10” (pocket), 6” x 10” (bag)
  • Fabric: Two Toned Bag: 8” x 10” (lining and top), 6” x 10” (bottom)
  • Stabilizer (optional): the size of bag fabric
  • Needle and Thread: matching or coordinating
  • Straight Pins
  • Scissors,
  • Sewing Machine
  • Pencil or Washable Marker

Mini Market Bag Sewing Pattern on Etsy

Get the Miniature Market Bag Sewing Pattern on Etsy.

Available now on Etsy.

Buy the pattern on etsy

Secret Santa Mini Gift Baskets Sewing Pattern

Miniature Gift Baskets Sewing Pattern, reversible and 6 sizes step-by-step instructions

This beginner friendly sewing pattern will show you step-by-step how to make a miniature basket as little as 1.5″. The pattern includes tracing templates to make miniature baskets in 6 tiny sizes.

We’ve used fabric scraps, old linens, discarded denim jeans and more to create adorable miniature gift baskets. They are super adorable with a print on one side and solid on the other. Pictured above, the winter fabric is a felt print and cotton solid.

Reversible Miniature Sewing Pattern includes:

  • 3 basket patterns each with 2 height options
    (small: 1 1/2″ w x 1 1/2″ d x 3″ h with handle)
    (medium: 2″ w x 2″ d x 3 1/2″ h with handle)
    (large: 2 1/2″ w x 2 1/2″ d x 4″ h with handle)
  • one or two handle option
  • traceable templates
  • 17 pages
  • 20 photos
  • Beginner friendly
  • Step-by-Step Written Instructions
  • BONUS Template: Frankenstein’s Monster Hair for a Halloween Basket!

Miniature Basket Sewing Pattern on Etsy

The reversible miniature baskets sewing pattern is available in our Etsy shop.

Now available on Etsy.

Buy the pattern on etsy

Just a Bit of Fabric to Make a Miniature Gift Basket

These miniatures are quick and easy to make and require very little fabric. This is the perfect project to raid your closet, dig through the rag pile or take a quick trip to the second hand store.

  • Small Basket: 6″ x 7″ of two different fabrics
  • Medium Basket: 7 1/2″ x 8 1/2″ of two different fabrics
  • Large Basket: 9″ x 10″ of two different fabrics
  • Stabilizer optional to match the size of basket

Pin on Pinterest

Share the love, pin a photo or two to Pinterest.

Thank you.

Miniature Baskets for Every Occasion

This is a sewing pattern you can use all year long making gifts for so many special occasions. Wedding gift, bridal shower gifts, teacher gifts, Secret Santa. Great for Birthday, Thinking of You, Get Well Soon, Graduation and more. They make super adorable Halloween treat baskets, too. Check out our Frankenstein’s Monster bag…which is included in the sewing pattern.

Miniature Baskets for Guy Gifts

Miniature gift baskets are fun for guy gifts, too. We’ve upcycled old button down shirts into stylish mini gift baskets. The tracing templates make it really easy to line up your fabric with striped and plaid prints. Should you use your hubby’s old shirts, like we did, you should probably get his permission first. Having said that, this is also a great way to create special gifts for loved ones. We’ve made and gifted mini baskets as memory gifts when a father-in-law passed away.

Get the Mini Gift Basket Sewing Pattern on Etsy

Get your copy of the Miniature Basket Sewing Pattern on Etsy.

Available now on Etsy.

Buy the pattern on etsy

The pattern is for your eyes only. We encourage you to sell or give away your finished projects with credit to yarnovations.com as the original designer.

Positive Potato’s Cousin: Sassy Spud with 10 Hats

Positive Potato has a cousin and her name is Sassy Spud. She has lots of hats for various special occasions and several hats just for fun. All total, Sassy Spud has 10 hats and 75+ printable signs. You can attach a permanent sign or create one with elastic so you can change out her greeting.

As an added bonus, there are instructions for putting walking feet on Sassy Spud.

Sassy Spud is quick and easy to make. She measures only 2.75” tall x 1.75” wide x 1.5” deep without a hat. She definitely qualifies as amigurumi…which basically means crochet toy. We designed her with basic stiches and basic techniques. There will be some increases by working 2 single crochet in the same stitch and decreases by single crocheting 2 together. On occasion there will be working in front loop only. The dragon tail has a double crochet cluster. But for the most part, basic crochet skills are all you need to make the crochet potato and hats.

The Sassy Spud Crochet Pattern PDF Download

There are 10 hats for Sassy Spud. And they are all interchangeable. You could sew them on permanently, but they are designed to be changed out. The crochet hats for Sassy Spud include:

  • Birthday Cap
  • Christmas Santa Cap
  • Halloween Witch Hat
  • Easter Bunny Spring Bonnet
  • Pirate / Tricorn Hat
  • Valentine Pom Pom Beanie with Heart
  • Unicorn Beanie
  • Dragon Beanie
  • Straw Hat with Bow
  • Pom Pom Beanie

The pattern for Sassy Spud and her 10 crochet hats are available in our Etsy Shop.

Available now on Etsy.

Buy the pattern on etsy

Materials Needed to Make Sassy Spud the Crochet Potato

The materials needed to make Positive Potato’s cousin, Sassy Spud, are pretty minimal: yarn, crochet hook, safety eyes and stuffing. The hats take a extra colors, of course. And since the unicorn hat has a rainbow of colors for it’s mane, you’ll need even more colors when making that crochet hat.

  • Cascade Yarns 220 Superwash Sport, 100% superwash merino wool, 50 g/1.75 oz, 136.5 yds/125 m
    Potato: Extra Crème Café #873, Chocolate #819, Black #815
  • Crochet Hook: F/5/3.75 mm – for 90% of the pattern
  • Crochet Hook: C/2/2.75 mm
  • Crochet Hook: B/1/2.25 mm
  • Navy Beans or Fiber Fill / Stuffing
  • 6 mm safety eyes: 2
  • Stitch Markers: 3
  • 1 mm elastic in white: 12” (optional)
  • Small beads for pirate hat (optional)
  • Fishing wire for beading strand for pirate hat. (optional)
  • Pet comb (optional) for pirate hair
  • Walking Feet Toy (optional) on Amazon

As noted above, we used Cascade Yarns 220 Superwash Sport. We love this yarn because it’s thinner than medium worsted weight yarn and it comes in a wide variety of colors. You can usually find this yarn at independent yarn shops across the USA.

Sassy Spud is Nice and Spicy Nice

Sassy Spud has a tendency to reflect our own personality. Sometimes she can be very nice with sayings such as:

  • YUKON Do It.
  • You’re SPUDtacular.
  • I YAM proud of you.
  • Be Kind.

Sometimes Sassy Spud can be spicy nice. You know…a bit more saucy with sayings such as:

  • Watch This, Hold My Beer.
  • It Could Be Worse.
  • No…You…Didn’t.
  • I Don’t Think So.
  • Whatever
  • Per My Last Email

Because Sassy Spud has hats for various special occasions, she also has seasonal greetings such as:

  • They Say It’s Your Birthday.
  • Happy Halloween to My Favorite Ghoul.
  • Merry Christmas.
  • Happy Festivus.

There are over 75 printable greetings in this Sassy Spud crochet pattern. There are also a couple of blank signs so you can write your own greeting. All printable greetings are rated G and are appropriate for all audience.

Pin Pictures to Pinterest

Positive Potato is fairly reserved and shy. But Sassy Spud is full of personality. She loves to show of her hats. Pin her pictures on Pinterest and share her image on Instagram and Facebook so she can have her moment of fame. She’ll love it!

Buy Sassy Spud Crochet Pattern PDF

Sassy Spud Crochet Pattern PDF is only available as an instant downloadable PDF in one place, Etsy. Get your copy today.

Now available on Etsy.

Buy the pattern on etsy

The pattern is for your eyes only but we encourage you to give away or sell your finished work with credit to Yarnovations.com as the designer.

Monster Pin Loom Pattern

Make a monster with a 4″ pin loom square following this tutorial with photos.

Pin Loom Monsters Pattern for 4″ Squares

These cute and cuddly monsters were made with only a 4″ pin loom square. They are super easy and really fun to make. Learn to make textured squares and how to tuck and fold squares to make ears, arms and feet.

  • Pajama Keeper – the mouth is left open so kids can tuck their PJ’s inside.
  • Pillow Pal – the monster is stuffed with fiberfill and the mouth is sewn closed.
  • Purse – sew a zipper in place of the mouth and use this monster as a purse. Pattern includes instructions for a crocheted shoulder strap.

Monster Pin Loom Pattern Available on Etsy

Get your copy of the monster pin loom pattern pdf from our Etsy Shop.

Available now on Etsy.

Shop our Etsy Shop

Monster Pattern: What’s Included

This is a tutorial with photos to make the trio of monsters pictured here. The pattern includes:

  • Step-by-by-Step Instructions
  • Pattern for 2 textured woven squares with photos
  • Step-by-Step Photos for shaping the ears and arms
  • Crochet instructions for eyes, teeth and purse handles (or use felt)
  • 20+ photos
  • 14 pages

Share the Love, Pin a Picture to Pinterest

Share the love of pin loom projects by pinning the above photo to pinterest.

More about the Monsters Pin Loom Pattern PDF

As we mentioned, the monsters are made with only one loom: a 4″ pin loom square. We used medium worsted weight yarn, specifically: Red Heart Soft and eyelash yarn. The textured squares use two colors on each square. The furry head also uses two different kinds of yarn. The ears, arms and legs are woven in plain weave with one color yarn.

The pattern is surprisingly easy to make. We include step-by-step photos for several steps…like the ears and how we warped the loom for the special squares. And of course, each step is written out from start to finish.

There is a tiny bit of crochet. But you can make the eyes and teeth with felt if you prefer.

Monster Pin Loom Pattern Available on Etsy

Get your copy of the monster pin loom pattern pdf from our Etsy Shop.

Available now on Etsy.

Shop our Etsy Shop

Frankenstein’s Monster Clutch

We’re celebrating Halloween all month long with this Frankenstein’s Monster clutch.

Designed to stand on it’s own, this blue eyed green monster bag has a zippered top to hold all your valuables safe inside. It can be used as a purse, pencil case, make-up bag and more. The gusset is narrow at the top by the zipper and wide at the base which allows it to stand. Make with or without a purse strap.

The Frankenstein’s Monster zipper pouch also features a bolt zipper pull. The sides and bottom are reinforced with heavy duty stabilizer so it flexible yet maintains it’s clutch shape.

Measurements: Approximately 9 ½” wide x 5 ½” tall x 2 ½” deep at base

Frankenstein’s Monster Crochet Pattern on Etsy

The Frankenstein’s Monster crochet pattern is available in our etsy shop.

Available now on Etsy.

Buy the pattern on etsy

More About The Frankenstein’s Monster Clutch

We call it Frankenstein’s Monster because of the scar on the forehead and bolt on the zipper pull. But we’ve also had people call it the Incredible Hulk or a Zombie. We can go with that, too.

The Frankenstein’s Monster Purse Crochet Pattern includes:

  • Written Instructions
  • 10 Pages
  • 10 Photos

The bag is made with 2 eyeball granny squares on the front panel and 2 plain granny squares on the back. A gusset is crocheted separately and joined to the front and back panels. The hair is crocheted at the end with regular crochet and spike stitches. Stabilizer, zipper, lining and optional handle give it a nice crisp look and make it super practical.

Share the Love, Pin to Pinterest

Share the love of Halloween by pinning one of our pictures to Pinterest.

Materials List for Frankenstein’s Monster Purse

We used Vanna’s choice yarn. But any medium worsted weight yarn should work. For the lining, you’ll want to measure your own bag as you may need more or less fabric and stabilizer.

  • Yarn:   Lion Brand Yarns: Vanna’s Choice – Medium Worsted Weight (4)
  • 100% acrylic (170 yds/156 m; 3.5 oz/100 g) 1 ball each:
  • #860 153 Black, C1
  • #860 108 Dusty Blue, C2
  • #860 100 White, C3
  • #860 171 Fern, C4
  • #860 113 Scarlet, C5
  • #860-149 Silver Grey, C6
  • Fabric: black for lining 15”x14” or size needed for your finished bag.
  • Stabilizer: Extra Firm 15”x14” or size needed for your finished bag.
  • Crochet Hook: H/8/5.00mm
  • Needle:  yarn needle for sewing
  • Needle and Thread: black
  • Stitch Markers
  • Straight Pins
  • Zipper: 10” black

Frankenstein’s Monster Crochet Pattern on Etsy

The Frankenstein’s Monster crochet pattern is available in our etsy shop.

Available now on Etsy.

Buy the pattern on etsy

Miniature Pumpkins Revsied

Way back in 2015 we created a pattern for miniature crochet and knit pumpkins. We dubbed them “My First Pumpkin“. Since that time, we’ve added pin loom weaving and sewing to our crafting routine. Therefore, we’ve revised the pattern to include those as well.

Yep, this is a 4 in 1 pattern: crochet, knit, sewing, pin loom weaving.

pumpkin pattern for knit, crochet, sewing and pin loom weaving

Aren’t they gorgeous? I really can’t decide which is my favorite. I love the distinct look of each pumpkin…and they were all truly a joy to create.

And…drum roll please…there is a step-by-step tutorial available as well! Yep, there are pictures and written instructions for all four crafts: sewing, knit, crochet, and pin loom weaving.

Check out the updated and revised My First Pumpkin Pattern blog. Make one or all four or an entire pumpkin patch! These are fun to decorate your home and work place. They are also fun gifts because they are quick to make and so darn cute.

The blog has a free version of all 4 mini pumpkins. The printer friendly version has a TON of photos and lots and lots of tips; it’s available on our Etsy shop.

Head over to our blog to learn more: My First Pumpkin Patch.

Frankenstein’s Monster Gnome Pattern

Frankenstein’s Monster just got a whole lot cuter. And now you can pin loom weave your own gnome. Here he is sporting a Frankenstein’s Monster hat and a trick or treat bag. He’s all ready for Halloween and a spooky night of trick or treating.

The PDF pattern is a step-by-step guide to pin loom weaving your own Frankenstein’s Monster and Pumpkin Trick or Treat Bag. Every shape is woven in plain weave. He measures 10″ tall x 7″ wide x 4 1/2″ deep.

Here’s what’s included in the Frankenstein’s Monster Gnome Pin Loom Pattern:

  • Gnome with Frankenstein’s Monster Hat
  • Pumpkin Trick or Treat Bag
  • 14 Pages
  • 35+ Color Photos and Charts
  • Detail Written Step-by-Step Instructions
  • Complete Materials List

Purchase Frankenstein’s Monster Pin Loom Pattern

Frankenstein’s Monster Pin Loom Pattern is now available to purchase in our Etsy Shop.

Available Now on Etsy.

Mary Shelley introduced Frankenstein’s Monster in her novel Frankenstein in 1818. The concept of electricity to spark life into Frankenstein’s monster was introduced later in James Whale’s 1931 film. The main plot remains consistent, but modifications are made with each adaptation of the story…and now he’s been changed once again. This time Frankenstein’s Monster is a Halloween costume and this gnome is hoping to gather a ton of candy in his oversize pumpkin trick or treat bag.

Pin These Frankenstein’s Monster Photos To Pinterest

Share the Love, pin one of these Photos to Pinterest

The Step-by-Step tutorial makes this gnome really easy to make. If you can pin loom weave, then you can make this gnome. He makes for a great handmade Halloween decoration. But…he’s also fantastic gift for those friends and family members who are fans of horror books and films.

Here’s what we used to construct our own pin loom woven Frankenstein’s Monster:

  • Pin Loom Squares: 4” and 1”
  • Pin Loom Rectangle: 2” x 4”
  • Pin Loom Triangle: 2”
  • Yarn:   Red Heart: Soft – Medium (4)
  •             GRAPE #3729 – 100 yds
  •             BLACK #4614 – 40 yds
  •             WHEAT #9388 – 25 yds
  •             GUACAMOLE #4420 – 20 yds
  •             LIGHT GREY HEATHER #9440 – 10 yds
  •             CORAL #9251 – 16 yds
  •             WHITE #4600 – 120 yds
  • Needle:  6” needle for weaving and yarn needle for sewing
  • Stuffing
  • Felt: Black, remnant
  • Button: (2) 5/8”
  • Beans: to weigh the gnome down
  • Fabric Marker/Chalk: – white, dark
  • Straight Pins – (optional)
  • Tacky or Fabric Glue
  • Pet Comb – metal (optional)
  • Steamer (optional)

Buy the PDF Pattern for Frankenstein’s Monster

Instant download for Frankenstein’s Monster Gnome Pin Loom Pattern is available in our Etsy Shop.

Available Now on Etsy.

Buy Now on Etsy

Pin Loom Corn

Corn

The scarecrow may have a hard time keeping the birds away with this delicious corn ready for the picking!  The corn itself is made from texture 4” squares, while the husk is made from 2” x 6” rectangles (which could easily be substituted with 4” squares folded in half.)   

SUPPLIES:

Loom: Schacht Zoom Loom – 4″ pin loom, Wunderwag 2” x 6” rectangle pin loom

Yarn: Red Heart Super Saver: Lemon; Lion Brand Vanna’s Choice: Kelly Green

Yarn Needle

Scissors

Stuffing

Chopstick

Textured Weave:

All odd rows: Plain weave

All even rows: *Under 3, over one* across ending with under 3

CORN

  1. Plain weave four 2” x 6” rectangles in Kelly Green.
  2. Texture weave four 4” squares in Lemon using the texture weave.
  3. Sew the 4 textured Lemon squares together to make a 2 x 2 square.
  4. Fold the square in half with the wrong side facing and sew along 8” side to make a cylinder.
  5. With Lemon, cinch the top of the corn by passing the needle and yarn through each loop along the top, then pulling tightly to close.
  6. Turn right side out. Tuck the top right and top left corners in about 1 cm and use whip stitches to create a tapered top. See photo.
  7. Stuff. (I add a foam ball in the middle so I can stick the chopstick/skewer into it to make a yard pick.)
  8. With Lemon, cinch the bottom of the corn by passing the needle and yarn through each loop along the bottom, then pulling tightly to close. Weave in ends.
  9. For each husk/leaf, tri-fold just the top 2”. Use Kelly Green and make small stitches to sew the folded area down to the husk/leaf on both sides. This is just to create a more tapered end of the husk/leaves. Make 4.
  10. Sew all four husks/leaves together along the bottom half to make a 1 x 4 rectangle.
  11. Fold in half so that the unsewn ends are all in the same direction. Sew along the bottom 3”.
  12. With Kelly Green, cinch the bottom of the husks together by passing the needle and yarn through each loop on the bottom of each leaf, then pull tightly to close.
  13. Place the corn in the husk as far as it will go and tack into place with Kelly Green.
  14. To make a yard pick, insert a chopstick/skewer/wire approximately 2/3 the way up.

Patterns for the Scarecrow, Pumpkins, and Ghost are available in the Shop here. They are also available in my Etsy shop here.