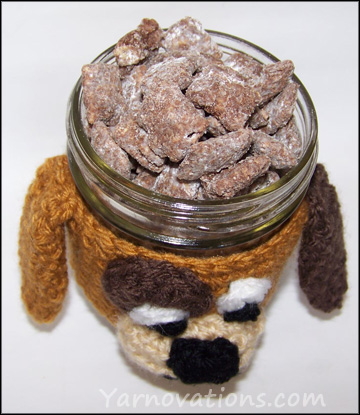
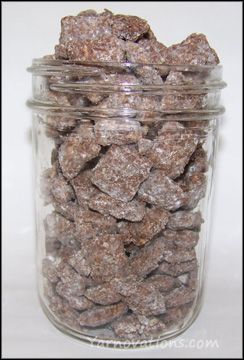
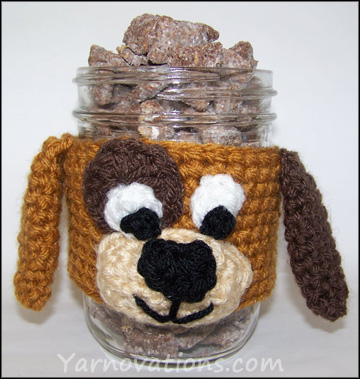
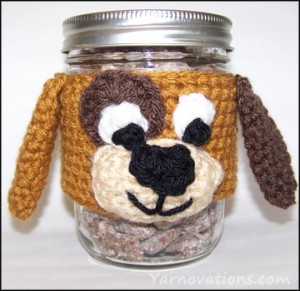
Puppy Chow Recipe & Crochet Dog Cozy for Boss’s Day (October 16, 2013)
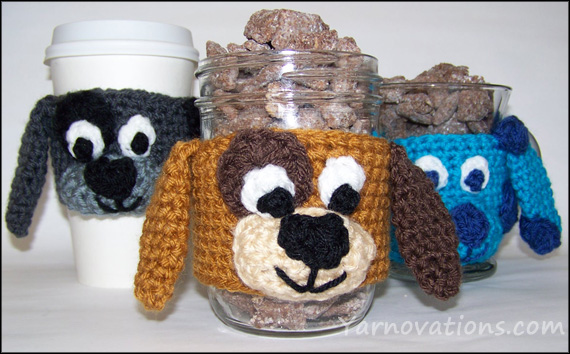
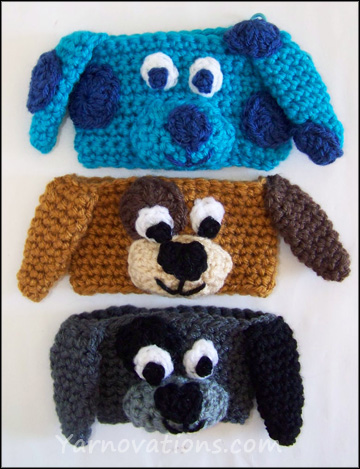
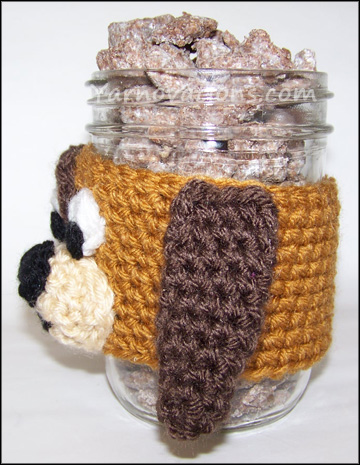
Need a fun gift idea for Boss’s Day. Show the big dog how much you appreciate him (or her) with this puppy chow recipe and a crochet dog cozy. Gobble up the left over chocolate goodness yourself or share this treat with your coworkers and watch them drool in delight.
Let’s start with the puppy chow recipe…that way you can nibble on it while you make the crochet dog cozy!
Puppy Chow Recipe
You’ll have the boss eating out of your hand (or mason jar) with this puppy chow recipe! He will lap it up and return begging for more. (PS: if you don’t bring a doggie bag to refill his jar, you can always share the recipe with him instead).
INGREDIENTS:
14.25 oz Chocolate Chex cereal (9 cups)
1 ¼ cup dark chocolate chips
½ cup + 2 Tablespoons creamy peanut butter
½ teaspoon vanilla extract
1 ½ cup powdered sugar
DIRECTIONS:
Place cereal in large pot. Set aside.
Melt chocolate chips in small pot on medium low heat stirring constantly. Remove from heat.
Stir peanut butter and vanilla into chocolate until smooth.
Pour chocolate mixture over cereal. Stir until evenly coated. Allow chocolate to cool for 5 – 10 minutes.
Pour powdered sugar over cereal and stir until evenly coated.
Techniques Used: Crochet in Rows, Crochet in the Round, Increase, Decrease
SUPPLIES:
Mason Jar
Vanna’s Choice Yarn: Wosted Weight (4)
HONEY, CHOCOLATE, BEIGE, BLACK, WHITE
(Grey: Charcoal Grey, Silver Grey, Black, White)
(Blue: Aqua, Colonial Blue, White)
Crochet Hook: H
Yarn Needle for sewing
Stuffing
COZY INSTRUCTIONS
Honey
Hook: H
Ch 34, join with a sl st.
Rnd 1-10: Sc around. (34)
Sl St. Finish off. Weave in end.
SNOUT INSTRUCTIONS
Beige
Hook: H
Ch 9
Row 1: Sc in 2nd ch from hook, sc across. (8)
Row 2: Ch 1, turn. Sc across. (8)
Row 3: Ch 1, turn, sc dec, 4 sc, sc dec. (6)
Row 4: Repeat Row 2. (6)
Row 5: Ch 1, turn. sc dec, 2 sc, sc dec. (4)
Row 6: Repeat Row 2. (4)
Rnd 7: Turn to sides of Rows 1-6. Work sc across (a sc on the end of each row). Turn to foundation chain, sc across. Turn to sides of Rows 1-7. Work sc across (a sc on the end of each row). Join with a sl st. (20))
Finish off leaving a long tail for sewing.
NOSE INSTRUCTIONS
Black
Hook: H
Ch 3
Rnd 1: In the 3rd ch from hook work 2 hdc, dc, 2 hdc, ch 2, sl st to same st as all other sts. (7)
Finish off leaving a long tail for sewing.
SPOT INSTRUCTIONS
Chocolate
Hook: H
Ch 3
Rnd 1: 12 dc in 3rd ch from hook. Join with a sl st. (12)
Finish off leaving a long tail for sewing.
EYE INSTRUCTIONS (make 2)
White
Hook: H
Ch 2
Rnd 1: 5 sc in 2nd ch from hook. Join with a sl st. (5)
Finish off leaving a long tail for sewing.
PUPIL INSTRUCTIONS (make 2)
Black
Hook: H
Ch 2
Rnd 1: Work sc and sl st in 2nd ch from hook. (2)
Finish off leaving a long tail for sewing.
EAR INSTRUCTIONS (make 2)
Make one Honey and one Chocolate
Hook: H
Ch 2
Rnd 1: 6 sc in 2nd ch from hook. (6)
Rnd 2-3: Sc around. (6)
Rnd 4: *sc, sc inc* around. (9)
Rnd 5-10: Sc around. (9)
Rnd 11: Sc dec. Pinch ear closed so there are 4 sts across. Work sc through loops of two sts opposite each other to close the ear. (5)
Finish off leaving a long tail. Whip st from inside to outside of all front loops and cinch closed.
ASSEMBLY INSTRUCTIONS
Pin Snout to Rnds 1-5 of the cozy. Stuff lightly and sew. Weave in ends.
Pin then sew Nose to center of Snout.
Embroider a mouth on Snout below the Nose. Weave in ends.
Sew Spot to cozy above Snout with right edge of Spot about centered. Weave in ends.
Sew Pupils to Eyes. Weave in ends.
Sew reflective spot to each Pupil with tails of Eyes If desired.
Pin then sew Eyes just above Snout – one to be sewn on the Spot. Weave in ends.
Sew Ears to the sides at Row 10.
More Cozies in Store
Love this dog cozy? There are more seasonal, holiday and just for fun cozies in our Cup Cozy Crochet Patterns eBook. We’ve created an entire collection with 28 designs one ebook.
Looking for the cup and mug version? They’re in the ebook.
Each design in the ebook has instructions to fit Mugs, Cups and Mason Jars. Every design has a delicious recipe or fun craft.
All 3 dogs pictured at the beginning of this post are in this ebook! AND the ebook includes 4 new designs – Dracula, Vampire, Mummy and Blue Jeans.
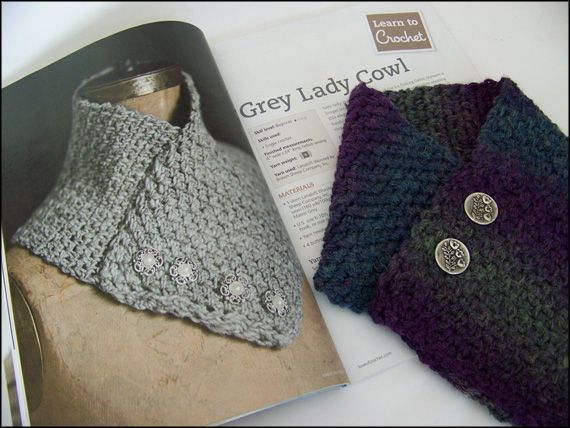
We have another scarf / cowl featured in Love of Crochet Magazine. The Fall Issue 2013 is available in stores until October 21.
This Crimson Cowl is a great 1 skein project! We’ve used Boutique Changes by Red Heart. There are 6 different yarn fabrics in one skein.
For anyone learning how to do broomstick lace, this is a great first project. This stunning cowl looks more complicated than it is because of the yarn changes.
Update 5-15-2014
Magazine Errata: On Row 3, the ch 1 is only done at the beginning in order to lock your yarn at the top of the loops. Here’s the correction:
Row 3: (broomstick lace row) insert hook in 5 loops, yo, pull through loops, ch 1, work 5 sc in same group of loops. *work 5 sc in each set of 5 loops* across.
Please also note that the tassels are just one strand of yarn folded in half and attached with a lark’s head knot.
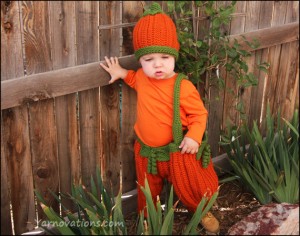
Lil’ Pumpkin Halloween Outfit Crochet Pattern – Pumpkin Hats, Pants and Trick or Treat Bag
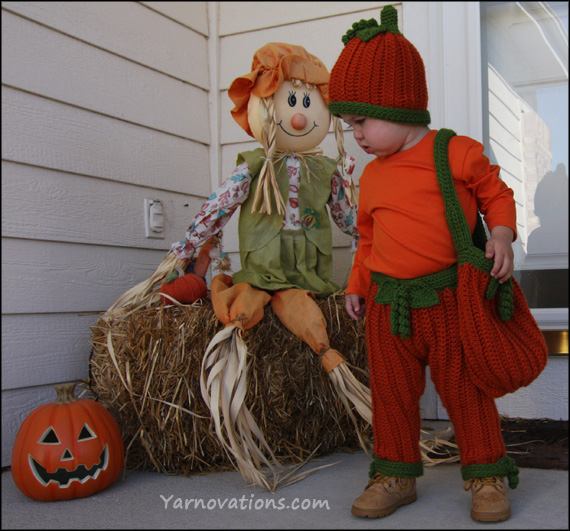
Dress up your Lil’ Pumpkin this fall in this adorable pumpkin set. It’s perfect for cool fall weather and special occasions like Thanksgiving, Harvest Parties, Halloween and trips to the pumpkin patch!
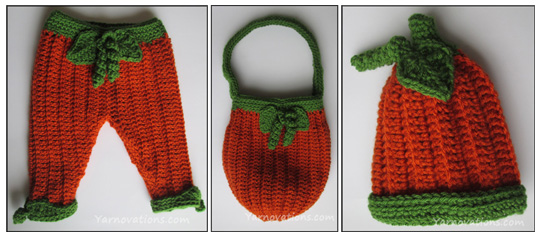
We’ve got the whole family covered with pants for babies and hats for everyone in the family. The bag is one size fits all…perfect for trick or treating.
Pumpkin Pattern Includes:
Pumpkin Hats: 6 sizes (newborn to men)
Pumpkin Pants: 3 sizes (up to 24 mos)
Pumpkin Bag: One size fits all – trick or treat size
Skill Level: Intermediate
Stitches Used: Chain, Slip Stitch, Single Crochet, Half Double Crochet, Double Crochet, Treble Crochet, No Chain Foundation Single Crochet, No Chain Foundation Double Crochet
Techniques Used: Crochet in Rows, Crochet in the Round, Crochet in Back Loop, Increase, Decrease
Crochet this design for a fun photo prop or as a cute outfit for taking the Lil’ Pumpkin to a party.
I Love Yarn Day (October 11) – Heart Cozy and Yarn Keeper Jar
Yes, I have “I love yarn day” on my calendar. A few years ago I would have scoffed at such a “silly” day. Not so any more. This is an important day to celebrate!
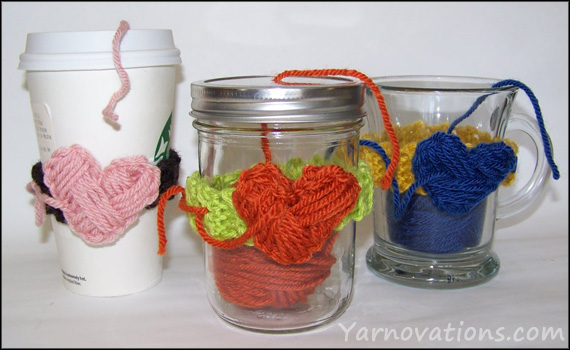
In support of this momentous day, I’ve created a special mason jar cozy and yarn keeper. Let’s get started with the mason jar then work our way to the cozy.
Mason Jar Yarn Keeper
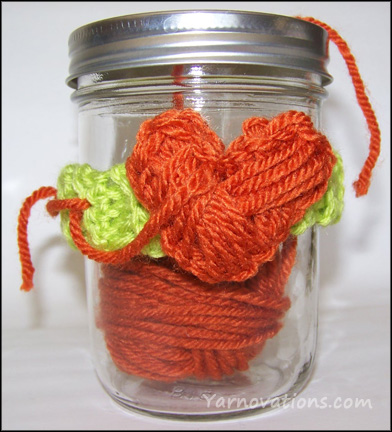
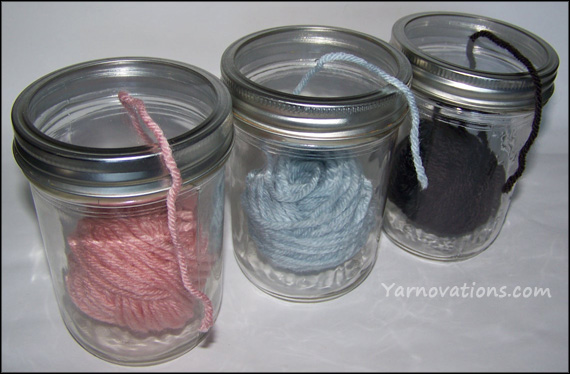
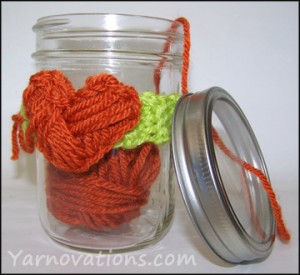
This mason jar yarn keeper is similar to yarn bowls and yarn keeper bags. The mason jar version has the added benefit of looking adorable on a shelf stuffed with yarn in a kaleidoscope of colors.
Benefits: A mason jar yarn keeper helps keep remnants of yarn clean and tangle free. It can hold a small ball of yarn that has either a center pull or is pulled from the outside. The biggest benefit is that the ball of yarn won’t roll away while you work. The tail is fed through a hole in the lid which helps it unwind smoothly which will help with consistent tension.
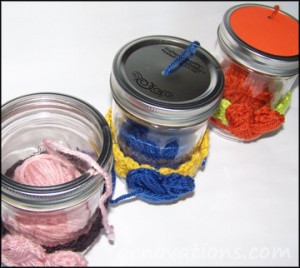
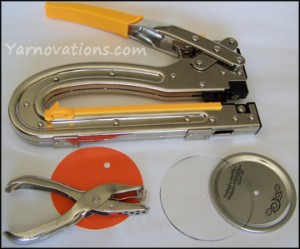
There are three options for the lid. Supplies and directions for all three are listed below.
SUPPLIES:
Wide Mouth Mason Jar
Wide Mouth Lid
Option 1:
Crop-A-Dile Big Bite
Option 2:
Crop-A-Dile Big Bite or Hole Punch
Plastic Packaging
Marker
Scissors
Option 3:
Cardstock
Hole Punch
Pencil
Scissors
INSTRUCTIONS:
Option 1:
This is the quickest method. It works great for papercrafters who already own the Crop-A-Dile, a special hole punch and grommet setter that can reach 6”.
Set the Crop-A-Dile to the 3/16 setting and punch a hole in the lid (either in the center or where desired).
Option 2:
This is a fun option if you want a transparent lid. You can us use the fancy Crop-A-Dile tool or a single hole punch.
Trace the wide mouth lid on a piece of plastic packaging with a marker.
Cut out the shape with scissors. For a better fit, cut off (cut on the inside of) the traced circle.
Use Crop-A-Dile or hole punch to punch a hole.
Option 3:
This is a cute option for coordinating the lid with elements inside the jar. This also uses common elements you’ll find around the house.
Trace the wide mouth lid on a piece of cardstock with a pencil.
Cut out the shape with scissors. For a better fit, cut off (cut on the inside of) the traced circle.
Use a hole punch to punch a hole.
Feed the yarn through the hole, place lid on jar and screw the lid to lock it in place.
I Love Yarn Day Cozy
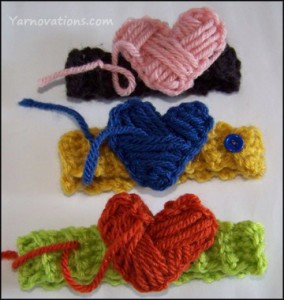
I couldn’t resist creating a heart shaped yarn ball for I Love Yarn Day. This quick cozy will help you flaunt your love of yarn.
Though we’ve used Vanna’s Choice for this project, this is an awesome stash buster. If you love yarn, then no doubt you’ve got a stash!
Techniques Used: Crochet in Rows, Crochet in the Round, Crochet in Both Loops, Crochet in Back Loops Only, Embroidery
COZY SUPPLIES:
Vanna’s Choice: Worsted Weight (4)
RADIANT LIME, TERRACOTTA
(Mug: Colonial Blue, Mustard)
(Cup: Chocolate, Pink)
Crochet Hook: H/8/5.00 mm
Yarn Needle for Sewing
COZY INSTRUCTIONS:
Radiant Lime
Hook: H
Ch 5
Row 1:Sc in 2nd ch from hook. Sc across. (4)
Row 2-28:Working in the back loops only, sc across. (4)
Finish off leaving a long tail for sewing.
Sew ends of cozy together with whip st across.
HEART INSTRUCTIONS
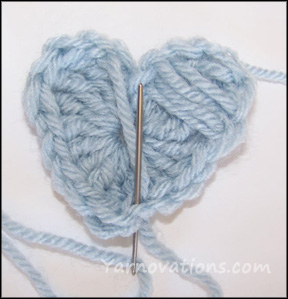
Terracotta (shown here in Silver Blue)
Hook: H
Leaving a long tail: Ch 5
Rnd 1:In the 5th ch from hook work: 3 trc, 4 dc, 1 trc, 4 dc, 3 trc, ch 3, sl st into the same stitch. Pull tail tightly to close the hole. Finish off leaving a long tail for to drape across cozy. (17)
With tail from beginning ch, sew yarn ball looking stripes (sewn in groups of four or as desired). Finish off leaving a long tail for sewing.
Sew heart to cozy covering up the whip st join. Weave in ends.
With tail left over from Rnd 1, create a curl in the yarn and sew to cozy as desired.
More Cozies in Store
Love this heart cozy? There are more seasonal, holiday and just for fun cozies in our Etsy shop in the Crochet Cup Cozy Patterns eBook. We’ve created an entire collection with 28 designs one ebook.
Looking for the cup and mug version? They’re in the ebook.
Each design in the ebook has instructions to fit Mugs, Cups and Mason Jars. Every design has a delicious recipe or fun craft.
The ebook includes 3 new designs – Dracula, Vampire and Blue Jeans.
We’ll show you how to make a center pull ball of yarn by hand…no tools or special gadgets required. This simple technique will keep your yarn stash neat and your yarn tangle free.
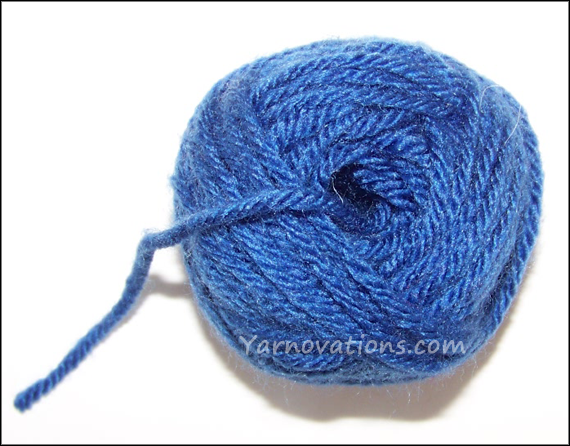
A center pull means that the yarn can be pulled from the center of the ball or skein. The ball stays stationary and does not flop around like it does when yarn is pulled from the outside of the skein.
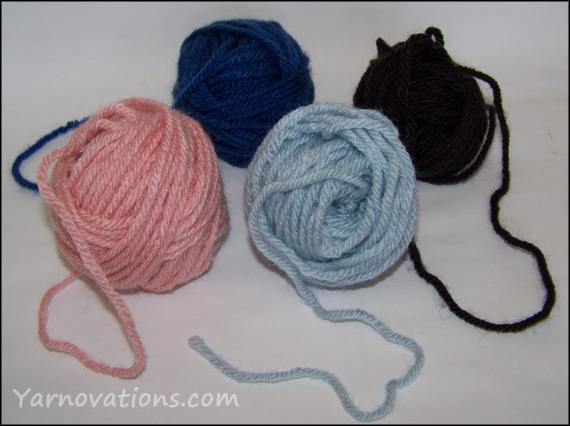
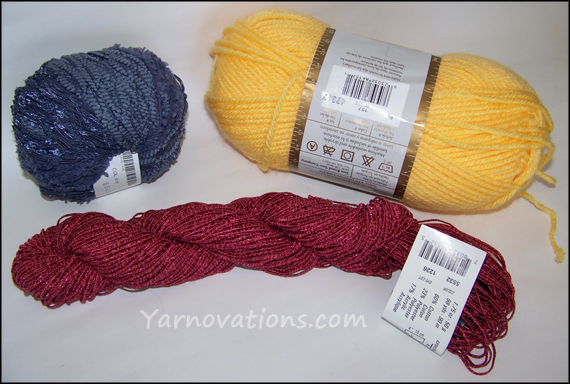
Yarn comes packaged in several different ways.
Ball – Yarn wound in a round shape that has a center pull (purple ball top left in photo above). Hank – A loose coil of yarn wound in a large circle with no center pull (red hank bottom in photo above). Skein – An oblong ball of yarn with a center pull (yellow skein top right in photo above).
There are several reasons for making a ball of yarn:
The skein is 3/4 used up and its shape is floppy and starting to turn into a tangled mess.
The hank is easier to work with as a ball of yarn.
A project has been frogged (ripped out) and needs to be turned into a ball.
A previous ball of yarn is starting to unravel.
How to Make a Center Pull Ball of Yarn by Hand
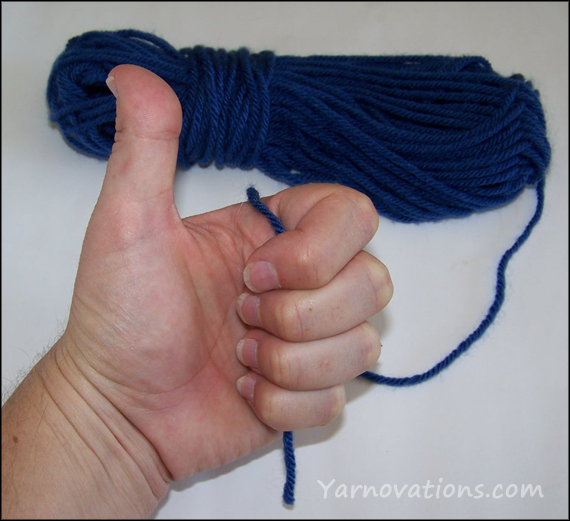
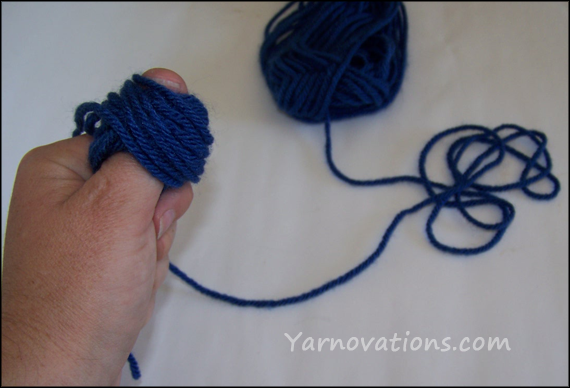
1. Lay a yarn tail across your fingers with your thumb pointed up and the tail of the yarn dangling below your little finger. Close your fingers around the yarn. You’ve now got a thumbs up to go ahead with the yarn ball.
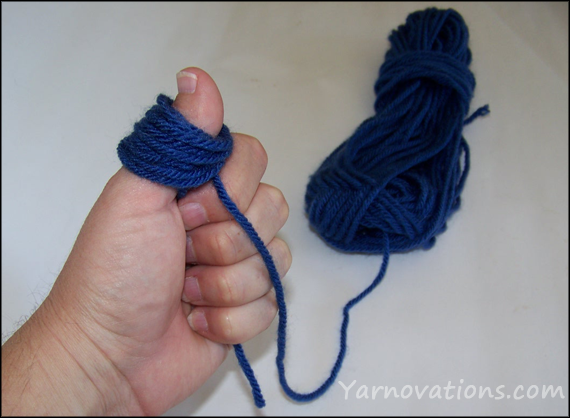
2. Wrap yarn around your thumb at and angle…I usually wrap it on an \ angle. Wrap the yarn around approximately 10 times.
3. Twist that group of yarn about 1/4 turn to the left (clockwise).
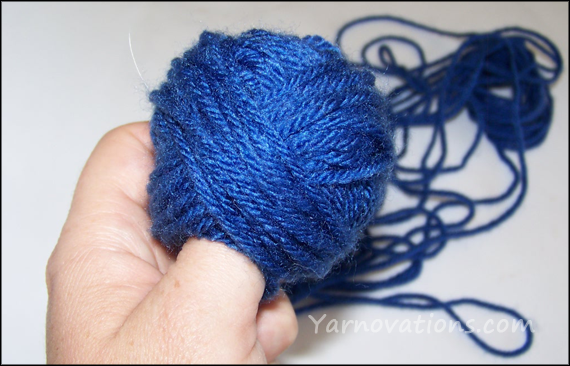
4. Wrap yarn around your thumb at the same angle \ as you did in step 2, again wrapping the yarn around your thumb about 10 times.
5. Repeat steps 3 and 2 alternately until your ball of yarn is made.
6. Remove your thumb from the center of the ball and that is where your center pull is.
Note: There are a lot of alternatives for this method of making a center pull ball of yarn.
You can wrap around two or three fingers instead of your thumb.
You can wrap around a knitting needle or crochet hook instead of your fingers or thumb.
You can twist your hand/thumb instead of twisting the yarn.
You can wrap the yarn around a piece of cardboard or plastic bobbin.
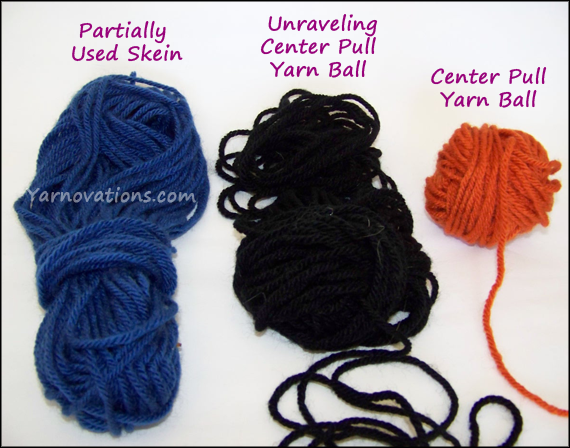
We use this center pull ball of yarn method ALL the time. We often find that after the center pull ball of yarn has been used a while, we will need to remake it. The partially used center pull ball tends to collapse and tangle (as seen in the black ball in the photo above).
Strawberry Lemonade Recipe and Crochet Pirate Cozy for Talk Like a Pirate Day – September 19
Ahoy, mateys. For Talk Like a Pirate Day (September 19), we’ve got a fun crochet pirate mason jar cozy and Strawberry Lemonade Recipe. If ye don’t want to get scurvy on this voyage…you’ll need lots of Vitamin C!
Let’s make some grog before we get to the crochetin’.
Strawberry Lemonade Recipe
Aye, a pirate’s diet is sorely lacking in fresh fruits and veggies when long out to sea. We’ll keep scurvy at bay with this recipe of fresh squeezed lemonade.
Strawberry Lemonade Ingredients:
4 cups water
2 cups fresh strawberries
1 cup agave nectar
1 cup fresh lemon juice (4 to 5 lemons)
Strawberry Lemonade Directions:
Mix 1 cup water with ¾ cup agave nectar in a 2 qt pitcher.
Hull strawberries (cut off top and fiber from core).
Juice lemons (best if they are room temperature) and strain to remove seeds.
Blend 3 cups water, ¼ cup agave nectar and strawberries until smooth.
Pour strawberry mixture into pitcher. Stir.
Add more of any ingredient as needed to desired taste.
Keep refrigerated. Serve over crushed ice.
Bottoms up!
Crochet Pirate Cozy
Avast ye scallywags, it’s time to grab yer crochet hooks before we make ye walk the plank!
We’ll be drinkin’ this lemon booty from mason jars and crocheting with Vanna’s Choice Yarn. Though this be a great stash busting project, Vanna’s rich and vibrant colors are a treasure to be sure.
Technique Used: Crochet in rows, crochet in the round, increase
Pirate Cozy Supplies:
Vanna’s Choice Yarn: worsted weight (4)
Red Cozy: BEIGE, CRANBERRY, BLACK, CHOCOLATE, WHITE, COLONIAL BLUE
(Green Cozy: Kelly Green, Beige, Black, Chocolate, White)
(Blue Cozy: Colonial Blue, Beige, Black, Chocolate, White, Kelly Green)
Crochet Hooks:
H/8/5.00 mm
F/5/3.75 mm
C/2/2.75 mm
Yarn needle for sewing
Pirate Cozy Instructions
Beige
Hook: H
Ch 17
Row 1: Sc in 2nd ch from hook. Sc across. (16)
Row 2-3: Ch 1, turn. Sc across. (16)
Row 4: Ch 1, turn. Sc dec, 12 sc, sc dec. (14)
Row 5-6: Ch 1, turn. Sc across. (14)
Row 7: Ch 1, turn. Sc dec, 10 sc, sc dec. (12)
Row 8-9: Ch 1, turn. Sc across. (12)
Row 10: Ch 1, turn. Sc dec, 8 sc, sc dec. Finish off and weave in ends. (10)
Attach Cranberry to bottom right corner (the 1st ch from foundation ch).
Row 11: work 9 sc across the sides of Rows 1-9. Work a sc inc into the corner. Turn to Row 10, sc across. Work a sc inc into the corner. Turn to sides of Rows 1-10. Work 9 sc across. (32)
Row 34: *Ch 6. Sc in 2nd ch from hook. Sc, 2 hdc, sc* twice. Join with sl st through center of tails to end of Row 33. (10)
Finish off leaving a long tail for sewing.
Join Row 33 to 12 with whip st across.
Eye Instructions
Black
Hook: C
Ch 2
Rnd 1: 5 sc in 2nd ch from hook. Join with a sl st. Finish off and weave in ends. (5)
Attach Colonial Blue to any stitch.
Rnd 2: Sc inc around. Join with a sl st. Finish off and weave in ends. (10)
Attach White to any st.
Rnd 3: Working in the back loop only, *sc, sc inc* around. Finish off leaving a long tail for sewing. (15)
Sew a reflective spot on eye if desired.
Patch Instructions
Black
Hook: F
Ch 2
Row 1: 6 sc in 2nd ch from hook. (6)
Row 2: Ch 1, turn. Sc inc across. (12)
Row 3: Ch 1, turn. *Sc, sc inc* across. Ch 26. Finish off leaving a long tail for sewing. (44)
Mustache Instructions
Chocolate
Hook: F
Ch 18
Row 1: Sl st in 2nd ch from hook. Sc, hdc, 2 dc, hdc, sc inc, sc, sl st, sc, sc inc, hdc, 2 dc, hdc, sc, sl st. Finish off leaving a long tail for sewing. (17)
Assembly Instructions
Pin then sew Eye, Patch and Mustache to cozy. Weave in ends.
Shiver me timbers, we’re done! Let’s grab us some black jacks (mason jars) and drink to yer health.
Talk Like a Pirate:
Just for fun, here are some pirate words and phrases:
Ahoy – Hello Arrr (Aargh) – An expression Avast – Stop or Pay attention Aye – Yes Black Spot – Death Threat Blimey – An expression of surprise Blow the man down down – A command to kill someone Feed the fishes – Someone will die Heave Ho – Put some muscle into it Hornswaggle – To cheat Landlubber – Person who doesn’t know how to sail Loaded to the gunwalls – a drunk person Scalleywag – Mild insult Scurvy – Vitamin C deficency that causes swollen gums and tooth loss Shiver me tinbers – An expression of surprise Son of a buiscuit eater – An insult Thar she blows! – Sighting of a whale Walk the plank – Death by walking off the ship and drowning Yo Ho Ho – An expression of cheer
More Cozies in Store
Love this pirate cozy? There are more seasonal, holiday and just for fun cozies in our Crochet Cup Cozy Patterns eBook. We’ve created an entire collection with 28 designs one ebook.
Looking for the cup and mug version? They’re in the ebook.
Each design in the ebook has instructions to fit Mugs, Cups and Mason Jars. Every design has a delicious recipe or fun craft.
All 3 pirates pictured at the beginning of this post are in this ebook! AND the ebook includes 4 new designs – Dracula, Vampire, Mummy and Blue Jeans.
If you’re looking for a quick and cute costume to crochet for Halloween, we’d suggest the Miner Set. Miner Set crochet pattern on Etsy.
With just a hard hat and a stick of dynamite, your crocheting is done. The hard hat has an adjustable band making it one-size-fits-all. The rest of the costume is pretty easy, too. Grab a pair of overalls or jeans, a flannel shirt and some boots and you’re good to go. Oh…and don’t forget to smear a bit of dirt on your cheeks!
Here are more pictures of my nephew with the Miner Set. He’s about 15 months old in these photos. Miner Set crochet pattern on Etsy.
Here he is playing with the blasting box. It has a handle that moves up and down.
Fire in the hole…here’s the little guy tossing a stick of dynamite.
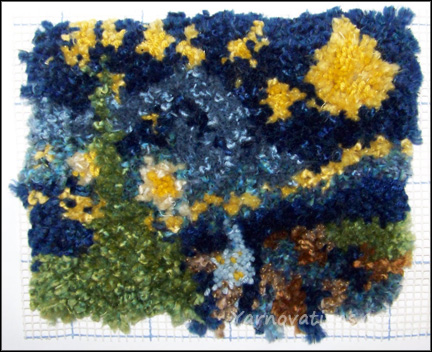
This skull pattern was our first attempt to hook rug with the easyloop fauxchet tool.
We haven’t hook rugged for years….maybe even decades (that makes us sound old)! But it brings back fond memories of craft times with our mom and special pillows she made for us.
Skull Pattern
This skull and cross bone image we charted for this pattern would make a fun “keep out” sign for a child’s door or a fun pillow for his or her room. We considered creating a rug for a high traffic area.
Supplies:
Easyloop fauxchet tool
Latch Rug Canvas
Yarn – 2 skeins
(Pictured: Red Heart Super Saver – Light Raspberry, Tea Leaf)
Referring to the skull chart, color all the “BL” bars with a marker. You now have two tones drawn out on your canvas.
Select your yarn color and start hooking! If you are using the easyloop tool, start at the top left corner (for right handed). With traditional hook rugging, you’ll start at the bottom.
Optional: cut loops and trim to desired length.
NOTE: If using the larger mesh and worsted weight yarn, try double stranded hooking with the easyloop tool to create a fuller rug.
Our Thoughts on Hook Rugging with the easyloop tool
Hook rugging is super easy with the easyloop tool. Since the technique uses a skein of yarn instead of individually cut lengths of yarn, hook rugging goes a lot faster! I love crafting…but I’m all about finishing projects quickly so I can start the next one!
The technique is very similar to fauxchet, but instead of going through loops, you are fauxcheting around the bar in the canvas.
Pros of hook rugging with the easyloop tool
Easy to learn
Fast
Less mess with using skeins instead of cut yarn
Creates loops instead of cut ends
More color choices available since skeins are used instead of cut yarn
Can create a mix of loops and cut yarn as desired
Cons of hook rugging with the easyloop tool
Creates loops instead of cut ends
Can knot up if tool is wrapped around bar wrong
Challenging to create loops of consistent sizes
I’m already dreaming about my next hook rug project. I’m definitely going to be using the easyloop tool. If you love to hook rug, you’ve got to try this tool!
Dish clothes are great projects for learning how to Fauxchet. In fact, these were some of the first projects we made.
As we mentioned in our product review of the easyloop fauxchet tool, any pattern that uses a chain, slip stitch or single crochet can be made with the easyloop tool. The patterns below will list the abbreviation for both crochet and fauxchet.
The dishies in these fauxchet patterns measure approximately 6”x6”. We love the smaller size for getting into cups and such.
Skill Level: Easy
Stitches Used: Chain (ch), slip stitch (sl st), single fauxchet (sf), single crochet (sc)
Techniques Used: fauxchet/crochet in rows, fauxceht/crochet in the round
FAUXCHET PATTERN 1: V-Stitch Dishie
The v-stitch is widely used in crochet…and is easy to fauxchet as well.
Crochet Bear Cozy and Chocolate Covered Graham Crackers
This crochet bear mason jar cozy is not only super cute, but it will keep an eye on the snacks you store like these chocolate covered graham crackers. This bear will keep lookout for any hungry critters in your household that might snatch a treat when you aren’t looking.
This is a beary sweet gift idea. We’ve made a list of fun “beary” greetings below.
Chocolate Covered Graham Crackers Recipe
We’ll get to the crochet bear in a minute. First, let’s make this super easy chocolate covered graham cracker recipe.
This is a wonderful last minute dessert idea. Perfect for gatherings where finger foods are on the menu.
Ingredients & Supplies:
8 graham crackers
4 oz. melting chocolate
1 Tablespoon peanut butter
2 oz. white melting chocolate
Aluminum foil lined cookie sheet
2 mason jars for storing
Directions:
Break graham crackers into pieces (4 pieces per graham) and lay out on a cookie sheet.
Melt 4 oz. of chocolate in microwave stirring every 30 seconds. Do not over heat. When chocolate is mostly melted and a little lumpy, stir until smooth.
Stir peanut butter into chocolate.
Dip 2/3 of each graham into chocolate/peanut butter mixture. Scrape off excess and lay on aluminum foil to cool and harden.
Melt 2 oz. of white melting chocolate in microwave stirring every 30 seconds. Do not over heat. When chocolate is mostly melted and a little lumpy, stir until smooth.
Drizzle white chocolate over grahams. Allow to cool and harden.
When chocolates are hardened, remove from foil and scrape off excess drizzle.
Store in mason jar.
Crochet Bear Cozy
This crochet bear cozy makes a great gift. Fill a mason jar with snacks and trickets and you’ve got a beary special gift. Here are a few fun greetings for special occasions:
I Love You Beary Much
You’re Beary Special
For a Beary Special Son (or daughter or other relation)
Techniques Used: crochet in rows, crochet in the round, increase, deacrease
Crochet Bear Cozy Supplies:
Vanna’s Choice Yarn: worsted weight (4)
Brown Bear: CHOCOLATE, HONEY, BLACK, BEIGE
(Golden Bear: HONEY, BEIGE, BLACK)
(Black Bear: ESPRESSO, CHOCOLATE, BLACK, BEIGE)
Hook: H/8/5.00mm
Yarn Needle for Sewing
Stuffing
Crochet Bear Cozy Instructions
Chocolate
Hook: H
Ch 34, join with a sl st.
Rnd 1-10: Sc around. (34)
Sl St. Finish off. Weave in end.
Snout Instructions
Honey
Hook: H
Ch 9
Row 1: Hdc in 3rd ch from hook (count the first two chains as a hdc), 6 hdc. (8)
Row 2: Ch 1, turn, hdc dec, 4 hdc, hdc dec. (6)
Row 3: Ch 1, turn. Hdc dec, 2 hdc, hdc dec. (4)
Rnd 4: Sc all the way around the snout (a sc in each st and on the end of each Row). Join with a sl st. (16)
Finish off leaving a long tail for sewing.
Nose Instructions
Black
Hook: H
Ch 2
Rnd 1: In the 2nd ch from hook work 2 sc, 2 dc, 2 sc, 2 dc. Join with a sl st. (8)
Finish off leaving a long tail for sewing.
EYES INSTRUCTIONS (Make 2)
Black
Hook: H
Ch 2
Rnd 1: 10 sc in 2nd ch from hook. Join with a sl st. (10)
Finish of leaving a long tail for sewing.
EAR INSTRUCTIONS (Make 2)
Chocolate
Hook: H
Ch 2
Rnd 1: 6 sc in 2nd ch from hook. (6)
Rnd 2: Sc inc around. (12)
Rnd 3: *3 sc, sc inc* around. (15)
Rnd 4-5: Sc around. (15)
Rnd 6: *3 sc, sc dec* around. (12)
Rnd 7: *1 sc, sc dec* around. (8)
Finish off leaving a long tail for sewing.
Assembly Instructions
Pin Snout to bottom of the cozy. Stuff lightly. Sew. Weave in ends.
Pin then sew Nose to center of Snout. Weave in ends.
Embroider a mouth below Nose. Weave in ends.
Embroider reflective spots on the Eyes with the beige yarn. Weave in ends.
Pin then sew Eyes above the Snout. Weave in ends.
Pin then sew Ears to the sides. Weave in ends.
More Cozies in Store
Love this bear cozy? There are more seasonal, holiday and just for fun cozies in our Crochet Cup Cozy Patterns eBook. We’ve created an entire collection with 28 designs one ebook.
Looking for the cup and mug version? They’re in the ebook.
Each design in the ebook has instructions to fit Mugs, Cups and Mason Jars. Every design has a delicious recipe or fun craft.
All 3 bears pictured at the beginning of this post are in this ebook! AND the ebook includes 4 new designs – Dracula, Vampire, Mummy and Blue Jeans.
All patterns are written in US terms.
*****9/15/23 Great news! We are moving our store to Etsy. Some of our links will redirect you there for your convenience.
Dana (left) with Deborah (right) and her two boys.
Yarnivores have incredible appetites. But we should always remember our manners as we consume our fiber arts patterns.
YARNOVATIONS POLICY:
PURCHASED patterns may NOT be copied or distributed. They are for your eyes only.
FREE patterns MAY be copied and distributed as long as you credit the author and Yarnovations.com. Copyright information is in the footer of all the documents, so that should be pretty easy to do.
ALL items made following one of our patterns are yours to do with as you wish. You may give away and sell your handiwork. Share the art of crochet and yarn art with the world by sharing your hand made items.