Frankenstein’s Monster Clutch

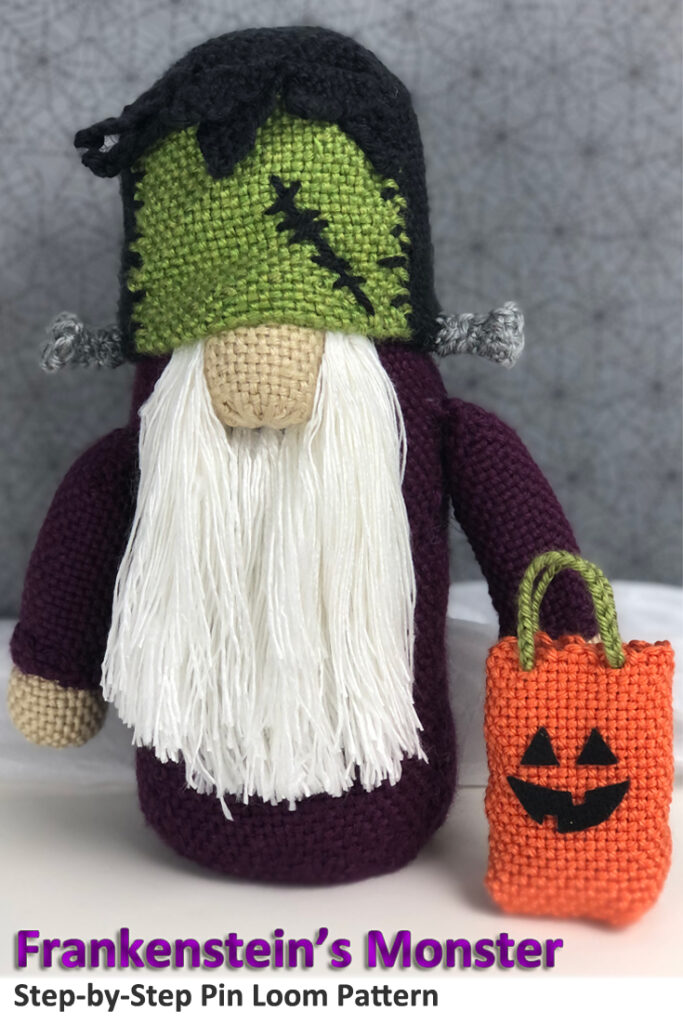
We’re celebrating Halloween all month long with this Frankenstein’s Monster clutch.

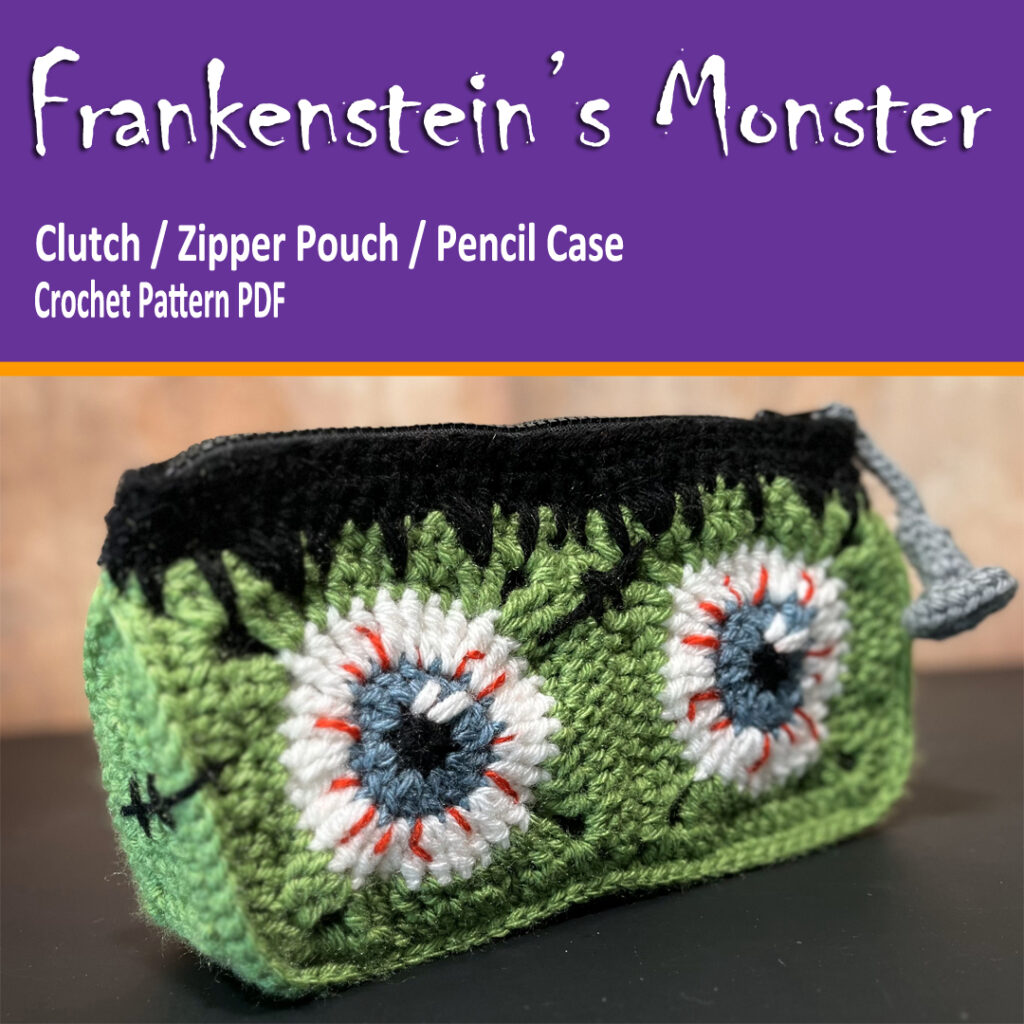
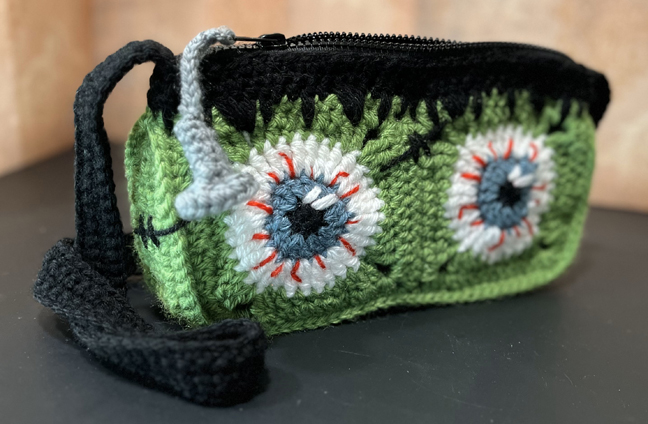
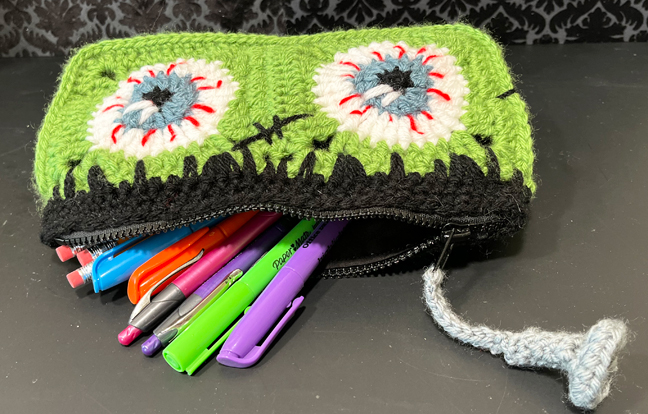
Designed to stand on it’s own, this blue eyed green monster bag has a zippered top to hold all your valuables safe inside. It can be used as a purse, pencil case, make-up bag and more. The gusset is narrow at the top by the zipper and wide at the base which allows it to stand. Make with or without a purse strap.

The Frankenstein’s Monster zipper pouch also features a bolt zipper pull. The sides and bottom are reinforced with heavy duty stabilizer so it flexible yet maintains it’s clutch shape.

Measurements: Approximately 9 ½” wide x 5 ½” tall x 2 ½” deep at base

Frankenstein’s Monster Crochet Pattern on Etsy

The Frankenstein’s Monster crochet pattern is available in our etsy shop.

Available now on Etsy.

Buy the pattern on etsy

More About The Frankenstein’s Monster Clutch

We call it Frankenstein’s Monster because of the scar on the forehead and bolt on the zipper pull. But we’ve also had people call it the Incredible Hulk or a Zombie. We can go with that, too.

The Frankenstein’s Monster Purse Crochet Pattern includes:

  • Written Instructions
  • 10 Pages
  • 10 Photos

The bag is made with 2 eyeball granny squares on the front panel and 2 plain granny squares on the back. A gusset is crocheted separately and joined to the front and back panels. The hair is crocheted at the end with regular crochet and spike stitches. Stabilizer, zipper, lining and optional handle give it a nice crisp look and make it super practical.

Share the Love, Pin to Pinterest

Share the love of Halloween by pinning one of our pictures to Pinterest.

Materials List for Frankenstein’s Monster Purse

We used Vanna’s choice yarn. But any medium worsted weight yarn should work. For the lining, you’ll want to measure your own bag as you may need more or less fabric and stabilizer.

  • Yarn:   Lion Brand Yarns: Vanna’s Choice – Medium Worsted Weight (4)
  • 100% acrylic (170 yds/156 m; 3.5 oz/100 g) 1 ball each:
  • #860 153 Black, C1
  • #860 108 Dusty Blue, C2
  • #860 100 White, C3
  • #860 171 Fern, C4
  • #860 113 Scarlet, C5
  • #860-149 Silver Grey, C6
  • Fabric: black for lining 15”x14” or size needed for your finished bag.
  • Stabilizer: Extra Firm 15”x14” or size needed for your finished bag.
  • Crochet Hook: H/8/5.00mm
  • Needle:  yarn needle for sewing
  • Needle and Thread: black
  • Stitch Markers
  • Straight Pins
  • Zipper: 10” black

Frankenstein’s Monster Crochet Pattern on Etsy

The Frankenstein’s Monster crochet pattern is available in our etsy shop.

Available now on Etsy.

Buy the pattern on etsy

Frankenstein’s Monster Gnome Pattern

Frankenstein’s Monster just got a whole lot cuter. And now you can pin loom weave your own gnome. Here he is sporting a Frankenstein’s Monster hat and a trick or treat bag. He’s all ready for Halloween and a spooky night of trick or treating.

The PDF pattern is a step-by-step guide to pin loom weaving your own Frankenstein’s Monster and Pumpkin Trick or Treat Bag. Every shape is woven in plain weave. He measures 10″ tall x 7″ wide x 4 1/2″ deep.

Here’s what’s included in the Frankenstein’s Monster Gnome Pin Loom Pattern:

  • Gnome with Frankenstein’s Monster Hat
  • Pumpkin Trick or Treat Bag
  • 14 Pages
  • 35+ Color Photos and Charts
  • Detail Written Step-by-Step Instructions
  • Complete Materials List

Purchase Frankenstein’s Monster Pin Loom Pattern

Frankenstein’s Monster Pin Loom Pattern is now available to purchase in our Etsy Shop.

Available Now on Etsy.

Mary Shelley introduced Frankenstein’s Monster in her novel Frankenstein in 1818. The concept of electricity to spark life into Frankenstein’s monster was introduced later in James Whale’s 1931 film. The main plot remains consistent, but modifications are made with each adaptation of the story…and now he’s been changed once again. This time Frankenstein’s Monster is a Halloween costume and this gnome is hoping to gather a ton of candy in his oversize pumpkin trick or treat bag.

Pin These Frankenstein’s Monster Photos To Pinterest

Share the Love, pin one of these Photos to Pinterest

The Step-by-Step tutorial makes this gnome really easy to make. If you can pin loom weave, then you can make this gnome. He makes for a great handmade Halloween decoration. But…he’s also fantastic gift for those friends and family members who are fans of horror books and films.

Here’s what we used to construct our own pin loom woven Frankenstein’s Monster:

  • Pin Loom Squares: 4” and 1”
  • Pin Loom Rectangle: 2” x 4”
  • Pin Loom Triangle: 2”
  • Yarn:   Red Heart: Soft – Medium (4)
  •             GRAPE #3729 – 100 yds
  •             BLACK #4614 – 40 yds
  •             WHEAT #9388 – 25 yds
  •             GUACAMOLE #4420 – 20 yds
  •             LIGHT GREY HEATHER #9440 – 10 yds
  •             CORAL #9251 – 16 yds
  •             WHITE #4600 – 120 yds
  • Needle:  6” needle for weaving and yarn needle for sewing
  • Stuffing
  • Felt: Black, remnant
  • Button: (2) 5/8”
  • Beans: to weigh the gnome down
  • Fabric Marker/Chalk: – white, dark
  • Straight Pins – (optional)
  • Tacky or Fabric Glue
  • Pet Comb – metal (optional)
  • Steamer (optional)

Buy the PDF Pattern for Frankenstein’s Monster

Instant download for Frankenstein’s Monster Gnome Pin Loom Pattern is available in our Etsy Shop.

Available Now on Etsy.

Buy Now on Etsy

My First Pumpkin Patch Pattern

4 in 1 Pattern: Crochet, Knit, Sewing, Pin Loom Weaving

These aren’t the first pumpkins we’ve ever made. But maybe they are yours. And what better way to celebrate fall, harvest and Halloween than to make miniature squash? 

If you or someone you know are learning to knit, crochet, sew or pin loom weave, then these are the perfect projects. Each pumpkin is made from a rectangle that’s joined to create a cylinder which is shaped into a stunning miniature pumpkin.

These are fun and quick little projects and great stash busters. We used worsted weight (4) acrylic yarn for the knit, crochet and pin loom pumpkins. They would look equally adorable in most any yarn type. The fabric pumpkin was made with a 5″ x 10″ piece of material.

Each miniature pumpkin measures about 3 1/2″ wide by 3 1/2″ tall including stem (or there abouts).

Printer Friendly Version on Etsy

The printer friendly My First Pumpkin Patch Pattern is available in our Etsy Shop and includes a TON of extra helpful information and photos for beginner crafters.

Available now on Etsy.

Buy the pattern on etsy

My First Pumpkin Pattern Information

Below we’ll share with you a lot of information. You may be tempted to skip right over that and go right to the pattern…but take a quick second to review. I’m positive it will be helpful.

Supplies List for Beginner Pumpkin Pattern

The supplies you need are really minimal which makes this a great first project for new crocheters and knitters.

ALL PUMPKINS

  • Stuffing
  • Yarn Needle for sewing
  • Tree Branch 2″ long
  • Scissors
  • Pencil (optional for making curly q’s)
  • Spray Starch (optional for making curly q’s)

CROCHET PUMPKIN

  • Yarn: Worsted Weight (4)
  • Crochet Hook: H/8/5.00mm or size recommended on yarn label

KNIT PUMPKIN

  • Yarn: Worsted Weight (4)
  • Knitting Needles: 5.00mm or size recommended on yarn label

PIN LOOM WEAVING PUMPKIN

  • Yarn: Worsted Weight (4)
  • Pin Loom: 4” Square
  • Weaving Needle: 5”

SEWING PUMPKIN

  • Fabric: 10” x 5”
  • Thread & Needle
  • Sewing Machine (optional)

Share the Love

Share the Love, Pin one of these photos to Pinterest.

knit, crochet, sew, pin loom weave a pumpkin

Printable Version Packed Full of Photos

There’s just too much information to put on the blog. For just a couple bucks, you can print the step-by-step tutorial from Etsy. Here’s what’s included in the My First Pumpkin Patch Tutorial on Etsy:

We love bringing you fun and festive designs. Consider purchasing this or other patterns as a way to help us keep you in stitches.

Get the Pumpkin Patch Pattern on Etsy.

Buy the pattern on etsy

How to Read a Knit or Crochet Pattern

Patterns can get rather long, because pattern writers want to be clear and concise. But sometimes using more words rather than less can make reading a pattern more challenging. So, abbreviations are used. A lot of information can be given in a small amount of space. Here are the abbreviations you’ll see in the patterns below.

Crochet Pattern Abbreviations

  • blo = back loop only
  • ch = chain
  • sc = single crochet

Knit Pattern Abbreviations

  • k = knit
  • kfb = knit front and back (for Curly Q only)
  • p = purl

Pattern Notes

  • You will crochet or knit a rectangle then join the first and last rows. Then cinch the sides to create your pumpkin shape.

My First Crochet Pumpkin Pattern

With Orange or color desired

Ch 16

Row 1: Sc in 2nd ch from hook and each ch across. (15)

Rows 2-34: Ch 1, turn. Work in blo: sc across.

Finish off, cut yarn and leave a long tail for sewing.

Fold project in half so Row 34 is aligned with the foundation chain. Join with whip st through the back loop of row 34 and both loops of the foundation chain, repeat across to form a cylinder.

With an 8” length of orange yarn, sew a running stitch through the ends of Rows 1-34 on one end of the pumpkin and cinch tight. Tie a knot and weave in ends. This creates the bottom.

These are just a few of the photos you’ll find in the Step-by-Step Pumpkin Patch Tutorial in our Etsy Shop.

Stuff pumpkin lightly.

With 20″ length of orange yarn, sew a running stitch through the other ends of Rows 1-34 and cinch tight (insert a twig before closing). Tie a knot. Do not cut yarn. This creates the top.

The pumpkin may look like a round ball. To squish it into more of a pumpkin shape, use the tail from cinching and run the needle down the center of the pumpkin near the stem to the center of the bottom of the pumpkin. Pull tightly. This should force the center of the pumpkin to shorten. Insert the needle a few millimeters away, and pass the needle back up from the bottom to the top in the middle near the stem. You may need to do this a couple of times near the stem. Weave in ends.

More Halloween Patterns

Before you begin stitching your pumpkins, we want to invite you to check out these fun Halloween patterns to crochet and pin loom weave. Stitch costumes, treat bags, cup cozies and more.

Halloween Patterns on our Etsy Shop.

Buy the pattern on etsy

Crochet Curly Q Pattern

Green (Make 2)

Ch 13
Row 1: 2 Sc in 2nd ch from hook and 2 sc in each ch across. (Working 2 sts in each ch will cause the ch to curl.) Finish off, cut yarn leaving a tail for sewing (24). You may need to twist the cord a little to help the stitches all line up and curl correctly.

Sew to top of pumpkin near stem. Weave in ends.

My First Knit Pumpkin Pattern

With Orange or color desired

Cast on 20

Rows 1, 3 & 4: K across, turn. (20)

Row 2: P across, turn.

Repeat Rows 1‐4 until piece measures 9 inches (approx 17 repeats).

Bind Off

Fold project in half so last row is aligned with the cast on row. Join with whip st across.

Using an 8” strand of orange yarn, sew a running stitch through the ends of the Rows 1-68 and cinch tight. Tie a knot and weave in ends. This creates the bottom.

Stuff pumpkin lightly.

These are just a few of the photos you’ll see in the Step-by-Step Pumpkin Patch Pattern in our Etsy Shop.

With a 20″ length of orange yarn, sew a running stitch through the other ends of Rows 1-68 and cinch tight (insert a twig before closing). Tie a knot but do not cut yarn. This creates the top.

The pumpkin may look like a round ball. To squish it into more of a pumpkin shape, use the tail from cinching and run the needle down the center of the pumpkin near the stem to the center of the bottom of the pumpkin. Pull tightly. This should force the center of the pumpkin to shorten. Insert the needle a few millimeters away, and pass the needle back up from the bottom to the top in the middle. You may need to do this a couple of times near the stem. Weave in ends.

Ready for Christmas?

More holiday fun awaits. Crochet, pin loom and sew fun items for Christmas, too. We have ornaments, pillows, home decor, gift bags and more.

Check out these Christmas Patterns in our Etsy Shop.

Buy the pattern on etsy

Knit Curly Q Pattern

Green (Make 2)
Cast on 16
Row 1: K across, turn. (16)
Row 2: Kfb of each st across. (32)
Bind Off
Sew to top of pumpkin near stem. Weave in ends.

My First Sewing Pumpkin Pattern

Cut fabric on the bias 5” tall x 10” wide.

Fold fabric in half with right sides together so it’s 5” x 5”. Sew the side opposite the fold with a straight stitch (on sewing machine) or running stitch (hand sewing).

With needle and thread and fabric still folded in half, hand sew a running stitch along one of the open ends through both layers. Cut thread leaving a long tail at beginning and end. Repeat about 1/8” from the first sewn line so you have two parallel lines of running stitch.

Pull the tails to cinch closed. Knot the thread. This is the bottom of the pumpkin.

Turn work right side out. Stuff pumpkin lightly.

These are just a few photos you find in the My First Pumpkin Patch Pattern on our Etsy Shop.

As before, sew running stitches around the unfolded fabric on the other opening sewing through one layer. Pull the strands adding a stem before cinching closed completely.

With needle and thread (and additional strands as needed), create ribs along sides of Pumpkin. Knot thread to bottom of pumpkin. Run thread outside the pumpkin from center bottom to center top then pass needle down through center of pumpkin back to bottom. Pull to desired tightness to create a rib. Do this where fabric is joined to help hide the join. Then repeat several times around to create additional ribs.

Beginner Friendly Sewing Patterns

beginner friendly sewing patterns

If you are new to sewing, here are some really fun step-by-step sewing patterns with traceable templates! You read that right. All of these patterns are step-by-step tutorials with pictures. The bear pillows make great memory bears…they are so cute and huggable. If you want something with a bit of attitude, the snake and hammerhead are sure to intimidate.

Check out the beginner friendly sewing patterns in our Etsy Shop.

Buy the pattern on etsy

No Sew Curly Q

With Green yarn

  1. Wrap a pencil with yarn leaving a tail on both ends for attaching to the pumpkin later.
  2. Spray liberally with spray starch so the yarn is soaked through. Turn pencil to spray both sides. Allow to dry completely.
  3. Remove from pencil. Cut in half.
  4. Use a yarn needle to sew to pumpkin near stem. Weave in ends.

My First Pin Loom Pumpkin Pattern

Orange

  1. Plain weave (3) 4″ squares.
  2. Lay them out to be 1 square tall by 3 squares wide. Join with whip stitch.
  3. Join the 4” ends together with whip stitches so you have a ring that’s 1 square tall x 3 squares around.
  4. Cut a strand of yarn to 8″ length. Sew a running stitch through each of the loops along one end making sure to go through all the loops on all three squares. Cinch closed. Tie a knot and weave in ends. This is the bottom of the pumpkin.
  5. Stuff pumpkin lightly.
  6. Repeat step 4 on the top with a strand of yarn that’s 24” long, cinch tightly (insert a twig before closing). Do not cut yarn.
  7. Using tails from step 6 and additional strands of yarn as needed, create ribs along sides of Pumpkin. Run yarn outside the pumpkin from center bottom to center top then pass needle down through center of pumpkin back to bottom. Pull to desired tightness to create a rib. Do this where each pin loom square is joined to help hide the joins. Then repeat in between each join to create additional ribs.

These are just a few of the photos you see in the My First Pumpkin Patch Pattern in our Etsy Shop.

Gnomes to Pin Loom Weave

Gnomes for every occasion…pin loom them all! These are ALL step-by-step tutorials with pictures and written instruction. These are great for fans of football, sharks, Halloween, and the Nutcracker! More are coming so be sure to visit the Etsy Shop.

Learn more about Pin Loom Gnomes on our Etsy Shop.

Buy the pattern on etsy

Pin Loom Curly Q

Follow directions above for No Sew Curly Q.

Get the Pumpkin Patch Pattern on Etsy

Get the print friendly version of the 4 in 1 Pumpkin Patch Pattern on our Etsy Shop. It encourages us to keep producing fun and festive patterns for crochet, knit, sewing and pin loom weaving.

My First Pumpkin Patch Pattern on Etsy.

Buy the pattern on etsy

Lil Pumpkin Halloween Outfit Crochet Pattern

Lil’ Pumpkin Halloween Outfit Crochet Pattern – Pumpkin Hats, Pants and Trick or Treat Bag

Dress up your Lil’ Pumpkin this fall in this adorable pumpkin set. It’s perfect for cool fall weather and special occasions like Thanksgiving, Harvest Parties, Halloween and trips to the pumpkin patch!

Lil-Pumpkin-looking-at-pumpkin

We’ve got the whole family covered with pants for babies and hats for everyone in the family. The bag is one size fits all…perfect for trick or treating.

Pumpkin Pattern Includes:

  • Pumpkin Hats: 6 sizes (newborn to men)
  • Pumpkin Pants: 3 sizes (up to 24 mos)
  • Pumpkin Bag: One size fits all – trick or treat size

pumpkin outfit

Skill Level: Intermediate

Stitches Used: Chain, Slip Stitch, Single Crochet, Half Double Crochet, Double Crochet, Treble Crochet, No Chain Foundation Single Crochet, No Chain Foundation Double Crochet

Lil-Pumpkin-wth-VineTechniques Used: Crochet in Rows, Crochet in the Round, Crochet in Back Loop, Increase, Decrease

Crochet this design for a fun photo prop or as a cute outfit for taking the Lil’ Pumpkin to a party.

The pattern is available in the store! Learn more about the Lil Pumpkin crochet pattern.

Lil Pumpkin Set pattern on Etsy.

Miner for Halloween

Miner for Halloween

Miner Trick or Treating

If you’re looking for a quick and cute costume to crochet for Halloween, we’d suggest the Miner Set. Miner Set pattern on Etsy.

With just a hard hat and a stick of dynamite, your crocheting is done. The hard hat has an adjustable band making it one-size-fits-all. The rest of the costume is pretty easy, too. Grab a pair of overalls or jeans, a flannel shirt and some boots and you’re good to go. Oh…and don’t forget to smear a bit of dirt on your cheeks!

Here are more pictures of my nephew with the Miner Set. He’s about 15 months old in these photos. Miner Set on Etsy.

Blasting the Box

Here he is playing with the blasting box.

throwing dynamite

Fire in the hole…here’s the little guy tossing a stick of dynamite.

Mother and Son Miners

Mom gets into the Halloween spirit, too. Here they are holding the Mummy Trick or Treat Bag.

Learn more about these crochet patterns:

Crochet Cup Cozy Patterns

Crochet Cup Cozy Patterns – Something for Everyone & Every Season

We decided to make a crochet cup cozy or two. But once we got started, we couldn’t stop! As you can see, we made animals, holidays and seasons, not to mention wild, crazy and elegant. There’s literally something here for everyone and something for most every season!

Cup Cozies

28 crochet cup cozy patterns with recipe or craft included!

Every design we came up has modifications to fit cups, mugs and mason jars….cause you never know when you want the design for tappered cups or mugs with handles.

As we were creating our designs we thought it would be fun to create cute gifts in mason jars. So, every other week for one year, we created a mason jar cozy gift. We’ve consolidated all the cozies, included all three sizes (mugs, cups and jars), added the gift idea (recipe or craft) and created an 80+ page ebook!

Includes 3 NEW patterns, too! We have a vampire, dracula and blue jeans cozy not seen in the Mason Jar Series.

The ebook is now available in the store:

Available in the Store

Skill Level: Easy (with a few intermediate stitches)

Vanna’s Choice yarn – worsted weight (4) – was used for our cup cozies. We love the color options in this line. Most cozies were made using a H or J crochet hook, but we used hooks as small as a C and as large as L.

animals
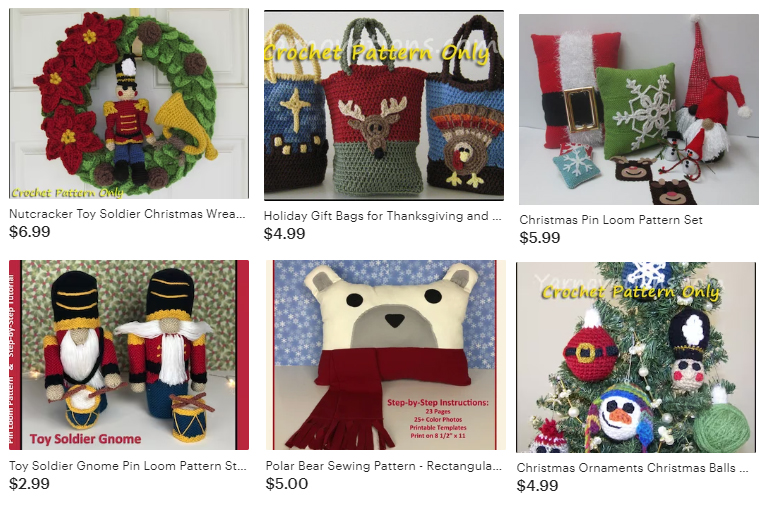
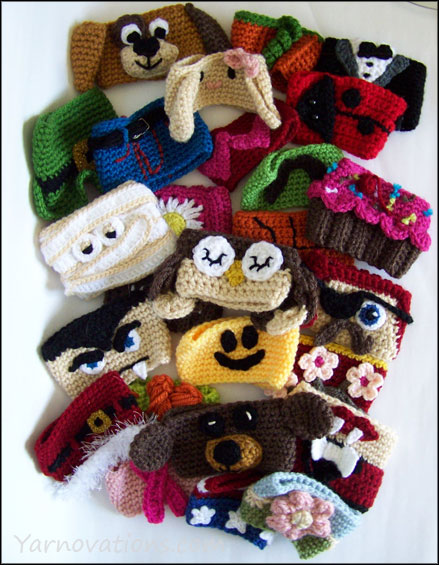
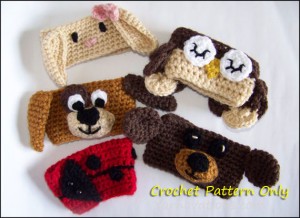
Crochet Cup Cozy Patterns – Animals

When you make one animal crochet cup cozy…more are sure to follow. That was true for us, anyway. These are fun for Easter, Bosses Day, Summer, Thinking of You and Just Because

Here are the designs and their recipe or craft:

  • OWL – Soap Dispenser
  • BUNNY – Robin Eggs Candy
  • DOG – Puppy Chow
  • BEAR – Chocolate Covered Graham
  • LADY BUG – Greek Salad Dressing

Crochet Cup Cozy Patterns – Holidays

holiday-cozies
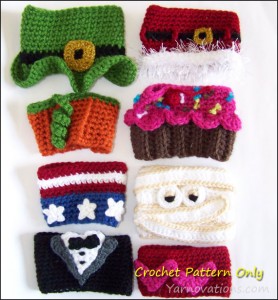
Some holidays are super fun to crochet into a cozy. We’ll be decorating for several special occasions with these cozies. These are fun for traditional holidays like Christmas, Halloween, Birthday, 4th of July, Memorial Day, St. Patrick’s Day, Valentine’s Day and Thanksgiving.

Here are the designs and their recipe or craft:

  • HEARTS – Chocolate Peppermint Cookies
  • LEPRECHAUN – Sweet / Sour Grapes
  • AMERICAN FLAG – Apple Pie
  • CUPCAKE – Turtle Cake
  • PUMPKIN – Spicy Pumpkin Seeds
  • MUMMY – Mummy Pretzel
  • SANTA – Peppermint Bark
  • TUXEDO – Chocolate Covered Almonds

Crochet Cup Cozy Patterns –Seasons & More Holidays

cup cozies
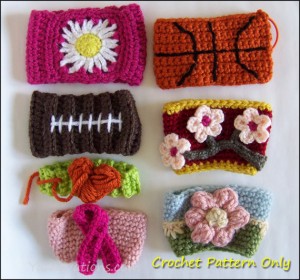
It’s fun to get into the spirit of the seasons, even sports seasons. With these cozies we’re celebrating Spring, Mother’s Day, Earth Day, Football (Baseball and Basketball) Season, I {heart} Yarn Day, Administrative Professionals Day, Chinese New Year and more!

Here are the designs and their recipe or craft:

  • DAISY – Planter
  • BASKETBALL –Caramel Corn
  • FOOTBALL – Party Mix
  • PLUM BLOSSOM – Fortune Cookie
  • FLOWER – Bath Salts
  • HEART – Yarn Ball Bowl
  • CAUSE RIBBON – Potato Soup

Crochet Cup Cozy Patterns – Wacky and Crazy

faces
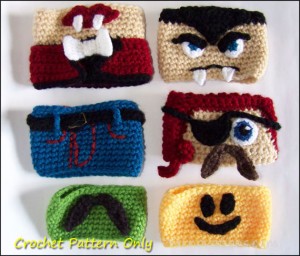
We had so much fun creating cozies that we couldn’t resist making some quirky designs as well. Some of these designs are season and just for fun like Halloween, Talk Like a Pirate Day, Father’s Day, Casual Friday’s and Just Because.

Here are the designs and their recipe or craft:

  • SMILE – Sugar Cookies
  • MUSTACHE – Beef Rub
  • JEANS / PANTS – Smores
  • PIRATE – Strawberry Lemonade
  • VAMPIRE – Red Velvet Truffle
  • DRACULA – Goulish Popcorn

Crochet Cup Cozy Patterns –Available in the Store

This crochet cup cozy ebook is now available in the store. All the patterns mentioned above are included plus Fall Leaf (dirt and worms) and Radioactive (spiced tea) cozies not pictured! What a screaming deal!

The mason jar versions of these patterns are highlight free on this blog in our Mason Jar Series (except Dracula, Vampire, Mummy and blue jeans which are only available in the ebook). You can get your copy of the ebook in the store.

Available in the Store

Ebook includes 28 Designs.

  • includes Cup cozy directions
  • includes Mug cozy directions
  • includes Mason Jar cozy directions
  • includes a delicious recipe or fun craft for each design
  • 3 New designs not seen in Mason Jar Series – Dracula, Vampire and blue jeans
  • 80+ pages in ebook with step-by-step instructions

Trick or Treat Bags

Trick or Treat Bags – The Monsters of the Stash

These classic monster trick or treat bags are great for sprucing up a costume and holding a sizable stash of candy. They are sure to be coveted by all the little ghouls and goblins this Halloween. And they make handy little treat bags for your home or office!

Make them friendly or little scary with the stitching of the mouth and the placement of the eyes. Though they are watching you, they won’t tell how many sweet treats you’ve eaten today!

Trick or Treat Bags – Crochet Pattern

The crochet pattern for each of these monster treat bags features a famous monster in history. Crocheted two strands at a time, these bags work up quickly for a ghoulish surprise.

Suck the candy from your friends and neighbors with a Dracula bag. Complete with a cape, bow tie, and fangs, you can count on the Count with your Halloween candy. He measures

The Frankenstein monster will keep things safe in this shaggy headed bag. Crocheted with Fun Fur, this fun treat bag will hold quite a stash.

Wrap up your treats in Mummy’s bandages. Crocheted as a solid bag, a separate crocheted bandage allows you to wrap it up tight, just the way you like it. The mummy measures 7″ tall  x 6 1/2″ wide by 21″ around.

Each treat bag is crocheted as a solid unit with the facial features crocheted separately and sewn on. Each bag requires color changes. The mummy has color changes at the ends of rounds while the Frankenstein and Dracula bags have changes in the middle of rounds as well as at the ends of some rounds. Directions for changing colors is included in the pattern.

Trick or Treat Bags – Available in the Store

Friendly or scary, make these bags to fit your trick or treating style. Order your pattern from the store for a monster sized good time.

Trick or Treat Bags pattern on Etsy.