11 Tips and Tricks for Pin Loom Weaving

Pin loom weaving is really quite simple. There aren’t a lot “secrets” to the perfect weave, but there are a few things you may find helpful. Here are some of our favorite weaving tip and tricks, in no particular order.

1. Leave A Tail For Weaving

Weaving in tails can be a pain. To keep them to a minimum, consider keeping only one tail, either the starting or ending tail. Use this tail for joining woven shapes. The length of the tail will vary depending on the project you are making. If you are just joining two shapes, then you’ll want a shorter tail – maybe 8″. If you are weaving a large project and joining lots of shapes, you’ll want a longer tail – maybe 12″.

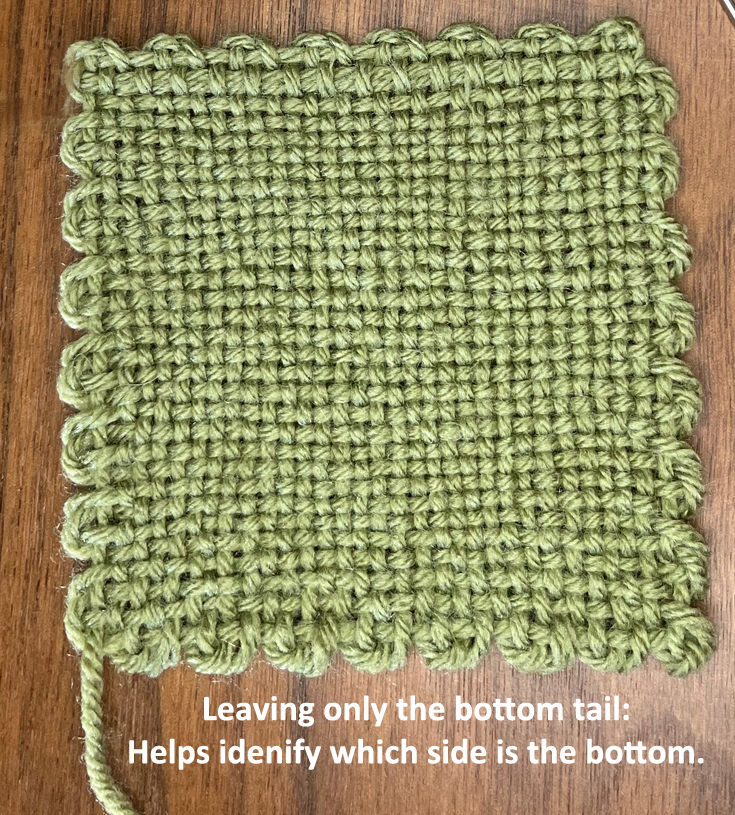
2. Leave A Tail To Identify The Top/Bottom

It can be challenging to identify which side is the top of your shape and which is the bottom. Consistently only leave one tail on your projects to make it easy to identify. If you always weave in your finished tail, then the starting tail helps to identify the bottom of the shape.

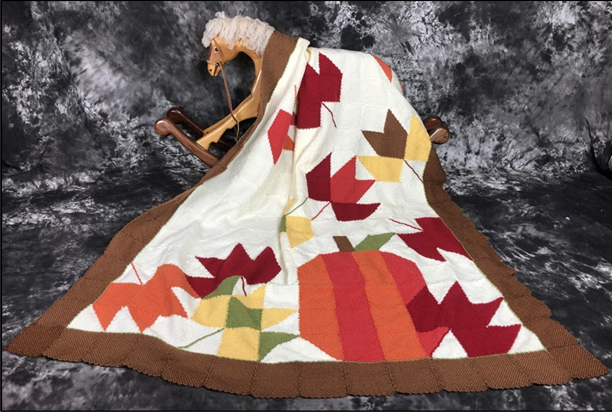
Following the advise of Trick #1 and #2, we were able to lay out the squares in the Falling into Autumn afghan so the bottoms where always down. The top of one square was joined to the bottom of the next. This made joining easier and consistent since the bumps/loops on the outer edge of the pin loom shapes are different on each side. Some woven shapes did need to be turned to make the design, but wherever possible, we tried to lay out and join shapes with the bottom always down.

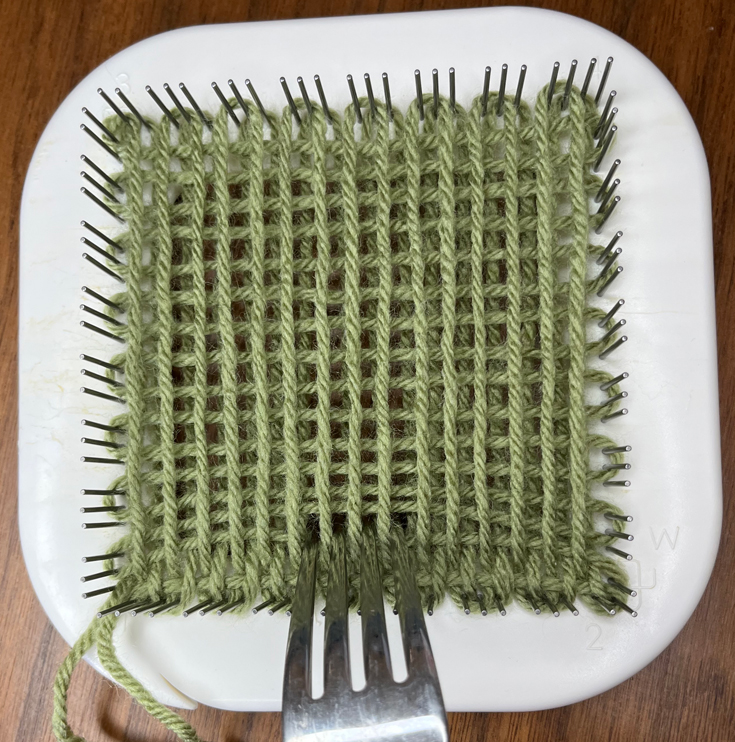
3. Packing Yarn With or Without a Comb

After the first row (and each row) of weaving you’ll notice that the next couple of strands are out of alignment. The horizonal strands are wavy and uneven making it difficult to find you next weaving path. To straighten the strands, you use a packing comb to comb the strand you just wove and the next strand to the bottom of the loom. Don’t have a packing comb? No problem. You can pack with a dinner fork, hair pick or even your weaving needle. Learn how to pack down yarn and why on our blog: How to Pack Down Yarn in Pin Loom Weaving.

4. Looms Aren’t All The Exact Same Size

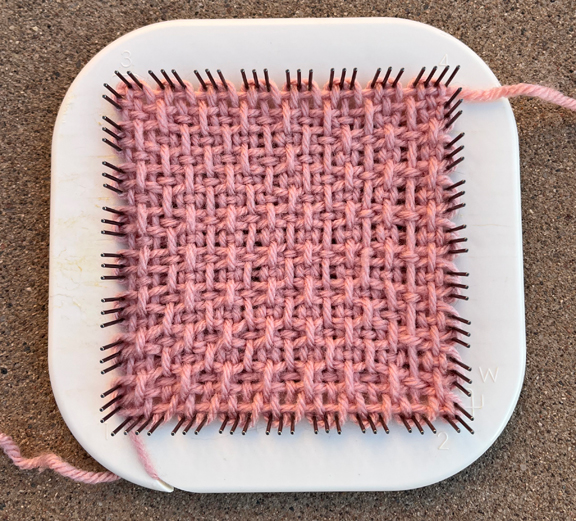
Looms can be slightly larger or smaller than their labeled size. Let’s consider the 4″ square loom. Some manufacturers will place the pins so the yarn is woven at 4″ where others will place the pins at 4″, therefore the weaving is slightly larger than 4″. Neither is better, neither is wrong.

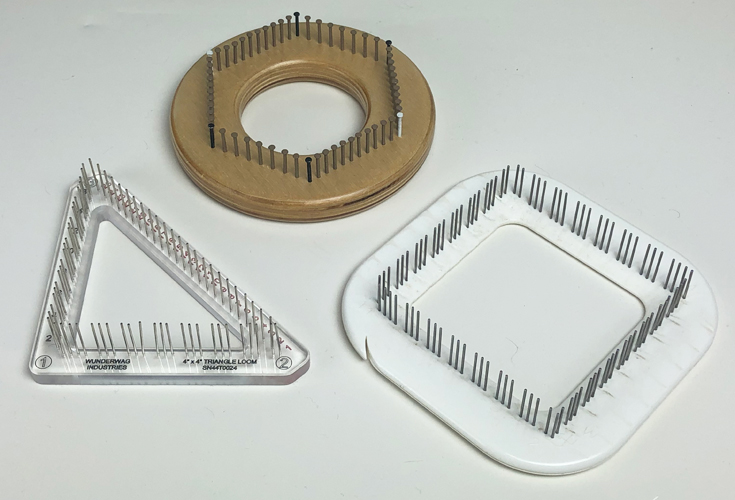
You’ll notice this difference when you join shapes together using looms from different manufacturers. You’ll find that some shapes are slightly larger than others. The Zoom Loom (bottom right) and Wunderwag (bottom left) looms have very similar pin placement and work well together. Bluebonnet Crafters (middle top) looms create shapes that are slightly larger.

For the most part, it’s really not a problem to have a collection of looms from various manufacturers. You may find that there is a little bit of pulling or pooling of fabric as you join them. That’s most noticeable on projects like afghans. We use looms from all three of the manufacturers listed previously as well as looms we’ve made ourselves. We mix and match looms all the time.

5. How To Identify The Strand To Weave Over or Under

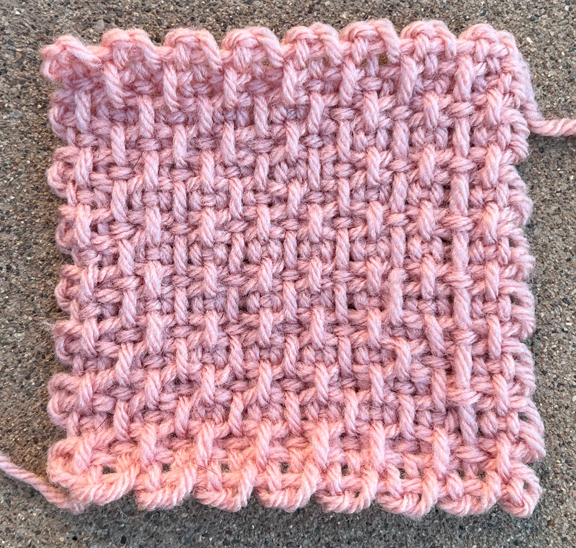
Sometimes it can be challenging to find the next strand to weave under or over, especially on the first few rows. When you are weaving “Plain Weave” (under one, over one), you’ll know you found the right strand because it will have a little resistance to it.

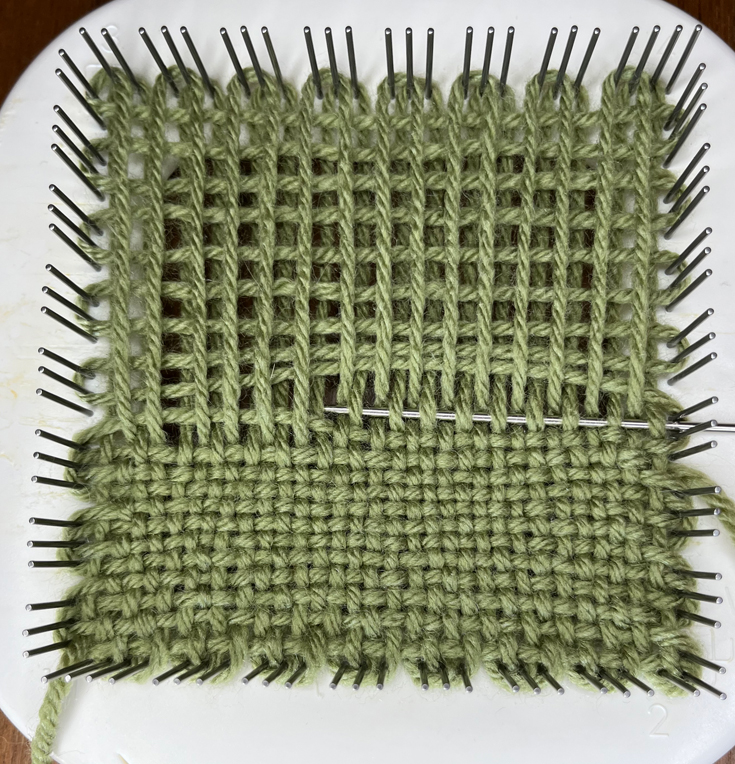
In the photo above, the needle is grabbing the yarn that’s lower. It would be easier to weave over it, but in plain weave, that’s the one the needle needs to go under. After that’s picked up, the next strand is the opposite. It’s higher so it would be easier to weave under it. So therefore, it’s the strand that you will weave over.

6. Use Both Hands To Weave

Whether you hold the loom in your hands, in your lap or lay it on a table, you may find it helpful to use both hands to weave. One hand will hold the weaving needle and the other will gently press on your yarn to help move strands to the right or left so it’s easier to weave.

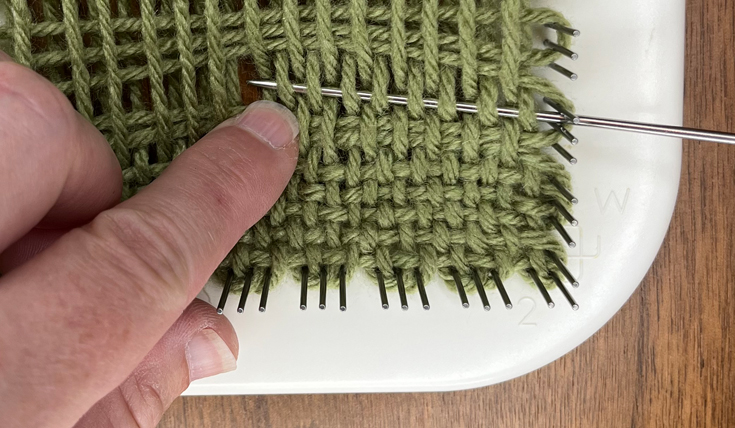
In the photo above you can see that I’m pushing the higher strand to the right which allows me to see the next lower strand that I need to pass the needle under.

Sometimes you may find that it’s helpful to move yarn from on top and other times from below. You may also find that you turn the loom a quarter turn to make weaving easier.

7. Turn The Loom For Comfort

One of the perks of pin loom weaving is that it’s small and portable. That means you can turn it any which way you want to make your weaving experience more enjoyable.

The most obvious would be to turn the loom 180 degrees so you weave in the direction that’s most comfortable. If you’re right handed, then you will most likely weave from right to left. So, turn the loom so that you always start your weave on the right.

Sometimes, however, you may find that you want to turn the loom 45 or 90 degrees. Or maybe you want to tilt it up or down because a strand is being tricky to weave over or under. Or you want to get your hand above or below your work.

Great! You can. We lay the loom on our lap for most of our weaving but often pick it up and twist and turn it as we weave.

8. The Needle Gets Stuck On The Pins

You may find that your weaving needle is too wide to fit through the pins. After you’ve woven under and over strands all the way across, you find that the needle gets stuck. The pins are too close together.

More likely than not, the needle is not too big, but you need to twist it a quarter turn so the eye is not as wide. The eye of the needle has a wide side and a narrow side and you just need to give it a turn.

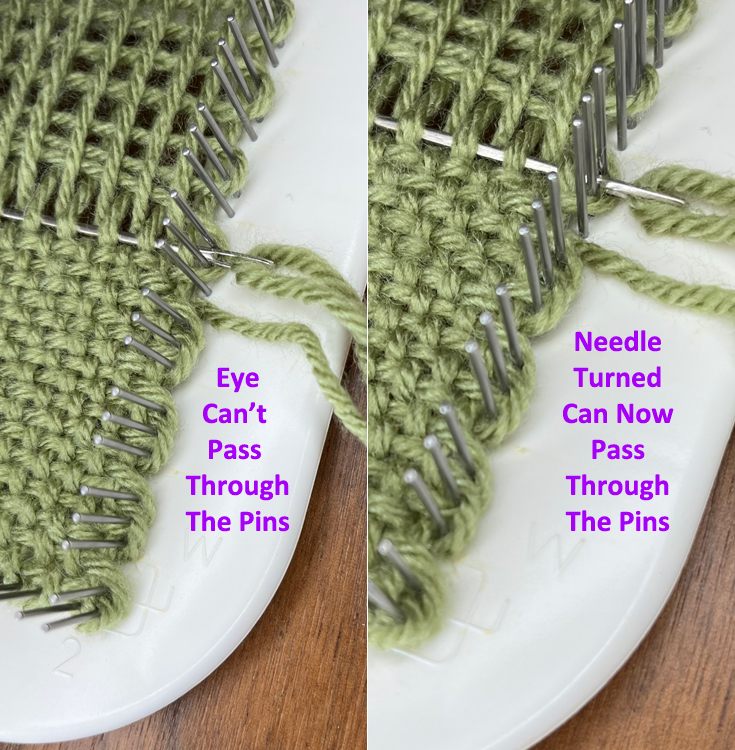
You can create a bit of muscle memory where you naturally turn the needle at the end of your weaving. Your fingers will feel that the needle needs to be turned just as you start to pull it through. It’s something to practice.

9. Snagged Or Split Yarn

It is really easy to snag or split the yarn as we weave. Meaning the needle went through a strand of yarn instead of completely under or over it. Hopefully you catch that mistake as soon as it happens and you can pull the needle out and reweave the strand. But sometimes you don’t notice.

The problem with snagging and splitting yarn is two fold. First, the yarn is trapped in the middle of a strand and will make packing your weave more difficult and may hinder it from packing tight enough. Second, it will show on the back side and look like you missed weaving a strand; it will look like you wove under 3 and have a long strand.

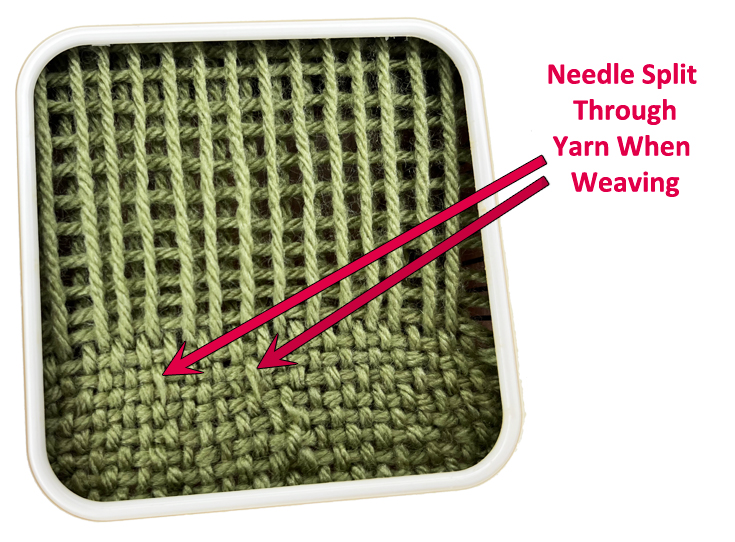
It’s best to pull out the row and reweave it. If you notice it before you finish weaving your shape, you can try to pull out each row and reweave it. But sometimes we don’t notice until the weaving is complete. In those instances, you can choose to go with it or send the shape to timeout. You may find a use for it in a future project.

10: What Yarn To Use

Because the pins are fixed on a pin loom, the yarn is the only variable you can change. There are a few thing to consider when choosing yarn: yarn weight, fiber content and yarn structure. Below is a VERY brief overview of yarns. Check out the post Selecting Yarns for Pin Loom Weaving for a more details look at yarns and pin loom weaving.

You need 8 yards of yarn to make a 4″ square. We wrote a blog post on What Can You Make With 8 Yards of Yarn and compared pin loom to crochet and knitting.

Yarn Weight

Most people use a light weight (3) or medium worsted weight (4) because the fabric of a pin loom woven shape has some drape yet the holes are small. If you use a thin yarn, you may want to double it up.

Yarn Fiber Content

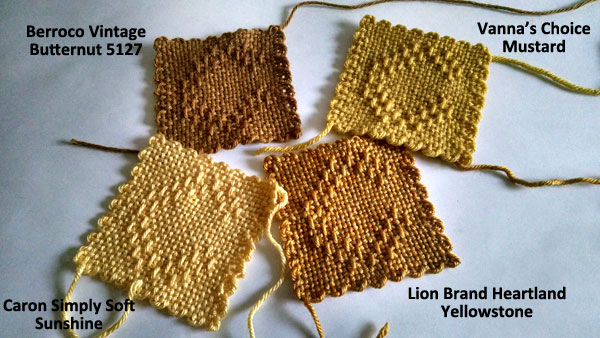
You can use any yarn but those with some elasticity are easier to weave. When you pull on the strand, does the yarn stretch? Then it has some elasticity. Wool and acrylics are easier to weave on a pin loom than cotton and bamboo yarns.

Yarn Structure

Smooth yarns are the the easiest to work with, and most yarns fit into this category. Yarns with bumps, halos and eyelash yarns are very challenging to weave with.

So, if you’re new to weaving or wanting to work on a relaxing project our recommendations. You only need 8 yards to make a square. Try using one of these:

  • Cascade 220 Superwash or 220 Superwash Sport
  • Lion Brand Heartland or Baby Soft
  • Red Heart Soft
  • Caron Simply Soft

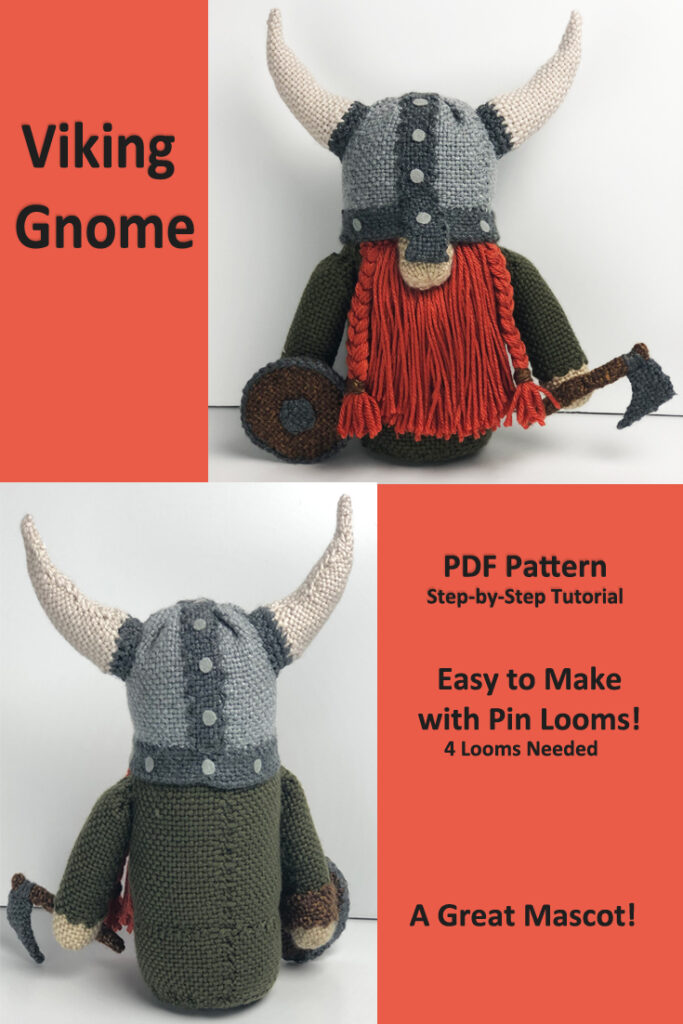
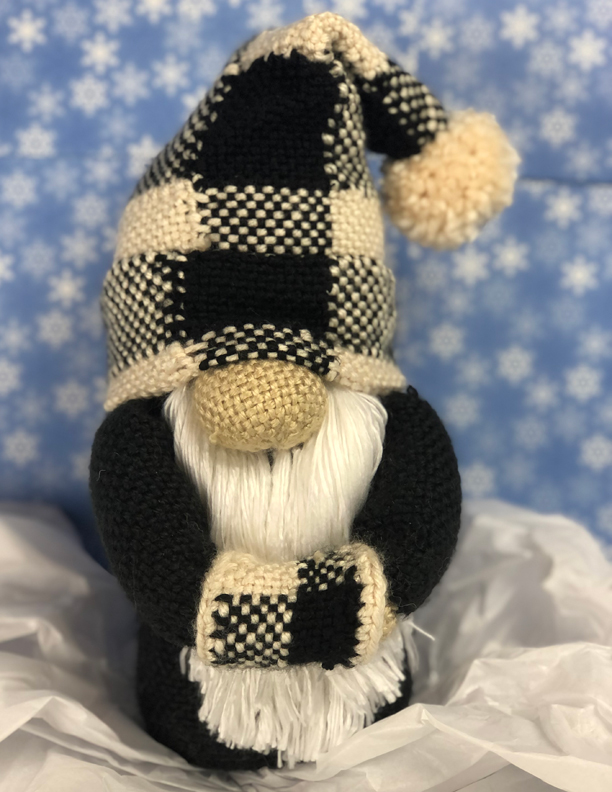
The Gingham Gnome pictured below is an example of a project pin loom woven in Red Heart Soft.

11. Warp The Loom: Loose and Looser

If the yarn has some elasticity (like wool and acrylic), then you want to warp (wrap the loom) loosely. If the yarn has no elasticity (like cotton and bamboo), then you want to warp the loom very loosely. Why? Because as you weave, the warp straights get tighter. By the time you weave the last few rows, the warp strands are very tight.

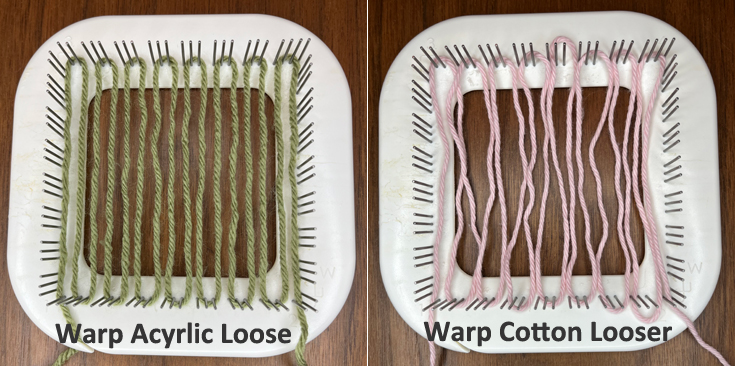
The photo above is the first warp using acrylic yarn (left) and cotton yarn (right).

For the acrylic yarn, you want to be able to press on the strands and feel it flex. The cotton is warped so loose that it lays on the table and looks really sloppy. We’d say they are both just about right. So definitely pay attention to the fiber content.

Conclusion

Phew, that’s quite a lot of information. As with anything, these are things we learned as we’ve spent time weaving. Your experience may be similar…or not. You may be nodding your head in agreement or may have found something that stopped to make you think.

Wishing you an enjoyable pin loom weaving experience.

Loomette Weave #1 Pin Loom Pattern

Loomette Weave #1 is one of our favorite weaves. It’s easy to memorize and adds just a little bit of texture that can really add depth to a fabric. It’s fun to weave because you are skipping more strands. But the floats aren’t too long so they won’t get out of hand.

Below is Loomette Weave #1 woven with Vanna’s Choice yarn on a 4″ loom.

How to Weave Loomette Weave #1 on a Pin Loom

This pin loom weaving pattern begins and ends with plain weave which helps the fabric hold it’s structure. Here’s how to weave it:

Key: U = Under, O = Over

Row 1: Plain Weave (U1, O1) across finishing with U1.

Row 2: (U3, O1) 7 times, U3.

Row 3: U1, O1, (U3, O1) 7 times, U1

Rows 4-15: Repeat Rows 2 and 3. Use Row 2 for all the even rows, and Row 3 for all the odd rows.

Row 16: Plain weave.

Below is a photo of how your Loomette Weave 1 should look when you have woven all 16 rows and before you remove it from the pin loom.

Taking Loomette Weave #1 to the Next Level

Once you’ve tried Loomette Weave #1, you can incorporate it into most any project. And once you’ve got the technique mastered, you can modify it to create other really fun designs. eLoomaNation.com has vintage weaving booklets available for download that show Loomette Weave #1 and lots of other really fun designs.

Below is a photo of pin loom woven squares with the letter C woven into them. They were created with a bit of plain weave and a bit of (U3, O1) like Loomette #1. Here we demonstrate how different yarns impact the texture.

pin loom woven squares with alphabet

We’ve create a pattern collection of the entire alphabet A-Z plus numbers 0-9 and turned it into a fun and whimsical baby blanket. Learn more about the Pin Looms Alphabet Set and Numbers Baby Blanket on Etsy.

This baby blanket illustrates the textures you can create when you weave (U3, O1) in strategic places in your weaving. The blanket is made entirely of 4″ pin loom squares and edged in crochet.

Toy Soldier Gnome Pin Loom Pattern

Make your own little drummer boy with this Toy Soldier Pin Loom Pattern. We’ll show step-by-step how easy it is to turn yarn into a nutcracker gnome with this PDF download. The toy was made with only 4 pin looms.

It’s quite adorable at 11 1/2″ tall. The finished measurements are approximately 6 1/2″ wide x 4 1/2″ deep x 11 1/2″ tall.

When you look closely at the drummer boy, you’ll notice extra little scallops on the sleeves and shoulders, etc. Lucky for us, this is a natural feature if pin loom shapes. It’s little “cheats” like that which give the illusion of grandeur to the toy soldier.

What’s in the Toy Soldier Gnome Pin Loom Pattern

This step-by-step tutorial for the Toy Soldier Gnome includes all of the following:

  • Toy Soldier Gnome Instructions
  • Drum Instructions
  • Step-by-Step Written Instructions
  • 17 Pages
  • 50+ Color Photos and Charts
  • Complete Materials List
  • Helpful Tips

Toy Soldier Gnome Pattern Available on Etsy

The Toy Soldier Gnome Pin Loom Pattern is available in our Etsy Shop.

Available now on Etsy.

Buy Now on Etsy

Pin the Toy Soldier Gnome to Pinterest

Share the love, pin these pictures to Pinterest.

More about the Toy Soldier Gnome Pin Loom Pattern

We rate the Toy Soldier Gnome as intermediate, but it’s very doable by the confident beginner. This gnome is made by folding, rolling and tucking woven shapes. The photos will show you step-by-step how to do that.

Here are the supplies you’ll need to make your own Nutcracker Gnome.

  • Pin Loom Squares: 2” and 4”
  • Pin Loom Rectangles:  1”x4” and 2”x4”
  • Yarn:   Caron Simply Soft –
  • Medium Worsted Weight (4)
  •             BLACK #727 – 55 yds
  •             WHITE #701 – 55 yds
  •             BONE #9388 – 15 yds
  •             HARVEST RED #763 – 75 yds
  •             OCEAN #759 – 40 yds
  •             GOLD #782 – 50 yds
  •             TAUPE #783 – 8 yds
  • Needle:  6” needle for weaving and yarn needle for sewing
  • Stuffing
  • Fringe Twister or premade gold cord – 14”
  • Beans: to weigh the gnome down
  • Fabric Marker: – white, dark, or chalk
  • Pet comb: – metal
  • Steamer (optional)
  • Starch or Hair Spray (optional)

We’ve added a little bonus at the end for turning the drum into a Christmas ornament. This little drummer boy would make a great decoration for a table or fireplace mantel. He’s also a great gift to make for your friends and family who love the Nutcracker ballet or have a passion for drums.

Get your copy of the Toy Soldier Gnome Pin Loom Pattern today.

Buy Now on Etsy

Bear Pillow Sewing Pattern

Looking for a bear sewing pattern? Look no further. This step-by-step tutorial will guide you through each step of turning fabric into a cute and cuddly bear pillow. Mix and match your fabric to make your own one of a kind bear.

This sewing project is so much fun, and easy, that we kept coming up with more bears to make. This tutorial is great for making all kinds of bears such as: Asiatic black bear (moon bear), brown bear (including grizzly), giant panda, North American black bear, polar bear, sloth bear, Andean bear (spectacled), and sun bear!

Not only that, this bear pillow is festive, too. One can be made for various holidays by changing out the fabric on the scarf. These are great for new baby, nursery and baby shower gifts, Christmas, Halloween, and going away to college gifts. They also make great gifts for boys and gifts for girls, memory bears, gifts for bear enthusiasts and bears for those who love to cuddle.

They can also be a heartfelt and thoughtful gift for someone that has lost a loved one. Sew the bear with a shirt that belonged to their special person and they can hug it in times of sorrow.

The bear sewing pattern includes:

  • Bear Pillow Pal Rectangular Pillow Pattern
  • Panda Bear Instructions
  • Bamboo Instructions
  • Step-by-Step Written Instructions
  • 25+ Color Photos
  • 10 Printable Template Pages (8.5″x11″)
  • Complete Materials List
  • Helpful Tips
  • Information About Sewing Machine Settings
  • Links to helpful videos

The finished measurements of the bear pillow are approximately 16″ wide x 3 1/2″ deep x 12″ tall. The templates are drawn at 100% and can be printed on 8.5″ x 11″ paper. So you’ll need to cut out the templates and tape pieces together.

Bear Pillow Available on Etsy

Our bear pillow sewing pattern is available in our Etsy Shop.

Available now on Etsy.

Buy Now on Etsy

More About the Bear Pillow Pattern

Bonus: Panda and Bamboo are included!

This bear pillow pattern can be sewn in an afternoon if you have all the supplies. Here’s what you’ll need to sew your own bear pillow:

  • Pattern Pieces: Template included with pattern
  • Fabric: Head Color: 20” x 10”
  • Snout Color: 12” x 5”
  • Scarf Color: 25” x 12”
  • Bamboo: 25” x 4” per stalk
  • Felt: Black – 1 sheet (10” x 5”)
  • Thread: To match felt and fabric
  • Straight Pins and Needle
  • Stuffing: Approximately 8-10 oz of Poly-fil or 12”x16” pillow form
  • Scissors
  • Sewing Machine
  • Pencil, Pen or Chaulk

Pin a Picture to Pinterest

Share the love, pin these pictures to Pinterest.

Even More about the Bear Sewing Pattern

This is a great pattern for sewists of all abilities from the brand new to the seasoned enthusiast. The tutorial includes information about how to set up your sewing machine and different stitches to use. Three different stitches were used on the bear because sometimes the fabric is sewn on the right side and sometimes on the wrong side.

The pattern will take you step-by-step with written instructions and helpful color photos. Helpful tips and included as well as links to videos that will show you different sewing techniques.

So, pick out your fabric and head over to Etsy for your copy of the Bear Pillow Sewing Pattern.

This pattern is for your eyes only. We encourage you to give away or sell your finished projects and ask that you mention Yarnovations.com as designer. Thanks.

Get your copy of the Bear Pillow Sewing Pattern on Etsy.

Buy Now on Etsy

Viking Gnome Pin Loom Pattern

Make a Viking Gnome stuffed toy with yarn and pin looms! This little plushie is 12″ tall to the top of the horns. He’s surprisingly easy to make. The step-by-step tutorial will show you how to tuck, roll, pinch and cinch pin loom woven squares and rectangles to create this iconic Viking gnome.

There are a lot of little details that transform a simple gnome into a Viking. Most notable is the horned hat. What makes the “ironwork” so realistic is the two colors of “metal” yarn as well as the rivets that are made from felt. The bright orange braided beard is also a can’t-miss detail that makes this tough little Viking so adorable. The axe and shield complete the iconic image of a Viking.

Here’s what’s in the Viking Gnome Pin Loom Pattern:

  • 45+ Color Photos and Charts
  • 14 Pages
  • Step-by-Step written instructions
  • Complete materials list
  • Helpful tips

Viking Gnome Pattern Available on Etsy

This Viking Gnome Pin Loom Pattern is available for purchase in our Etsy Shop.

Available on Etsy.

Buy Now on Etsy

Pin This Viking Gnome to Pinterest

Share the love; pin one of these photos to Pinterest.

More About the Viking Gnome Pin Loom Pattern

This Viking Gnome Pattern, like our other gnome patterns, begins with a helpful chart listing the total number of pin loom shapes you’ll need for the project. This allows you to sit and weave all the squares and rectangles before you begin. Of course, you can weave them as you need them, or weave them all prior to beginning assembly.

There are two very small sections of crochet in this project. Single crochet (US terms) is used in both areas. The grey at the ends of the horns are crocheted, this is where the horn meets the helmet. The edge of the shield is also crocheted. This joins two pieces together and creates and “ironwork” edge.

What You’ll Need to Make the Viking Gnome

Here is the complete list of everything you’ll need to make the Viking Gnome. This list is also in the PDF Pattern.

  • Pin Loom Squares: 4” and 2”
  • Pin Loom Rectangles: 2” x 4” and 1” x 4”
  • Yarn:   Lion Brand: Basic Stitch – Medium (4)
  •             OLIVE #132 – 95 yds
  •             ECRU #098C – 25 yds
  •             SILVER HEATHER #404J – 35 yds
  •             CHARCOAL HEATHER #403J – 25 yds
  •             ALMOND #121L – 22 yds
  •             PUMPKIN #133A – 50 yds
  •             Lion Brand: Heartland – Medium (4)
  •             SEQUOIA #126U – 30 yds
  • Needle:  6” needle for weaving and
  •                yarn needle for sewing
  • Stuffing
  • Felt: Grey, 1” x 3”
  • Beans: to weigh the gnome down
  • Crochet Hook: – size G (optional)
  • Fabric Marker: – white, dark
  • Straight Pins
  • Tacky or Fabric GlueSteamer (optional

We wish your Viking gnome much success in his conquests and you in yours.

Buy the Viking gnome pin loom pattern on our Etsy shop.

Buy Now on Etsy

Football Fan Gnome Pin Loom Pattern

Weave a gnome mascot for your favorite football team. He’s so cute, your friends and family may want one, too! No worries, because this football fan gnome is really easy to make. The PDF step-by-step tutorial will show you how.

For example, the little football that the gnome is holding is made from a 2″x4″ rectangle. We have 4 photos that show you how to fold, tuck and sew it into the iconic football shape.

We provide helpful instructions for making certain details really pop. For instance, the beard is made with yarn that has been brushed with a metal cat comb to separate strands. Then steam ironed to straighten. It’s the little details that make this gnome really shine.

What’s included in the Football Fan Gnome Pin Loom pattern:

  • Gnome with Football Hat and Football
  • 25 Color photos and charts
  • Complete step-by-step written instructions
  • 11 Pages
  • Helpful Tips
  • Complete materials list

Football Fan Gnome Pin Loom Pattern Available on Etsy

The Football Fan Gnome Pin Loom Pattern is available in our Etsy Shop.

Available now on Etsy.

Buy Now on Etsy

More about the Football Fan Gnome

The materials needed to make your football fan gnome is surprisingly small. Some pin looms, yarn and stuffing are the main supplies. Specifically, you’ll need 4 pin looms. Here’s the complete list:

  • Pin Looms:     
  • Squares: 2” and 4”
  • Rectangles:  1” x 4” and 2” x 4”
  • Yarn:   Red Heart: Soft – Medium Worsted Weight (4)
  • BLACK #4614 – 95 yds
  • OFF WHITE #4601 – 55 yds
  • WHEAT #9388 – 15 yds
  • TANGERINE #4422 – 18 yds
  • TOAST #1882 – 75 yds
  • Needle:  6” needle for weaving and yarn needle for sewing
  • Stuffing
  • Beans: to weigh the gnome down
  • Fabric Marker: – white, dark
  • Pet comb: – metal
  • Steamer (optional)

Pin This to Pinterest

Share the Love: pin one of our images to Pinterest.

Great for Beginners

As we’ve mentioned, this is a great pattern for new weavers and those wanting to make toys for the first time. And it’s so cute, experienced weavers will enjoy making them, too. So, if you’re brand new to pin loom weaving, welcome!

The best way to get started is Etsy and YouTube. There are many shops that sell pin looms in all the sizes we use here. YouTube will show you how to weave and, if you’re so inclined, will show you how to make your own looms!

Here’s to playing a good game and being a super fan!

Buy the Football Fan Gnome Pin Loom Pattern in our Etsy Stop.

Buy Now on Etsy

Hammerhead Shark Pin Loom Pattern

Don’t wait for shark week to pin loom weave your own hammerhead shark stuffed animal! These pups are so fun and super adorable at only 10″ long. Real pups are about 24″ long when born, so these are about half the size.

Not only is this hammerhead shark adorable, we’ve made it really easy for you to make your own because we’ve created a step-by-step tutorial with lots of great photos and easy to follow directions.

What’s in the hammerhead shark pin loom PDF pattern tutorial?

  • Step-by-Step Written Instructions
  • 30 Color Photos
  • 7 Pages
  • Helpful Tips
  • Complete Materials List

Hammerhead Shark Pattern on Etsy

We’ve made the Hammerhead Shark Pin Loom Pattern available in our Etsy Shop.

Available now on Etsy.

Buy Now on Etsy

Share on Pinteret

Share the love, pin this photo to Pinterest.

In the photo above, the hammerhead shark is sitting on a diorama of coral. The entire coral reef is made from pin loom woven shapes. Unfortunately, there is no pattern at this time. There is a Starfish Pin Loom Pattern in our Etsy shop if you are looking for other sea creatures.

What You’ll Need to Weave a Hammerhead Shark

The materials list is surprisingly small for this hammerhead shark stuffed animal. In fact, it uses only 73 yards of yarn total! Here’s the complete list.

  • Pin Looms:   Squares: 1”, 2”, and 4”; (1” square loom is optional)
  •          Rectangles: 2” x 4” and 2” x 6”,
  •          Triangle: 2”
  • Yarn:   Lion Brand: Basic Stitch – Medium Worsted Weight (4)
  •             ECRU #098C – 25 yds
  •             SILVER HEATHER #404J – 45 yds
  •             CHARCOAL HEATHER #403J – 3 yds
  • Needle:  6” needle for weaving and
  •                yarn needle for sewing
  • Safety eyes (2) 8 mm
  • Stuffing

This hammerhead shark measures approximately 10″ long x 5 1/2″ wide x 3″ tall.

As you can see in the picture above, we’ve woven one hammerhead shark with all the fins a real hammerhead shark has. The other has fewer fins. But we think you’ll agree, both versions are super cute.

The Hammerhead Shark Pin Loom Pattern is available in our Etsy shop.

Buy Now on Etsy

Snake Sewing Pattern

Looking for a fun toy for the kids? Snakes are a blast to play with and they look great in a wide variety of fabric! This step-by-step sewing tutorial has printable templates to make a 21″ long snake. What makes this particular pattern unique is the eye hood. Some snakes have what appears to be a brow above their eyes…so we’ve added that feature to this pattern. It definitely gives this serpent an aura of invincibility.

The safety eyes used can make a big difference in how “sinister” your snake will look. We used various colors and sizes of safety eyes to demonstrate how that one little detail will impact the look of your stuffed animal.

What’s in the Snake Sewing Pattern?

This is a step-by-step tutorial with printable template. The template is at 100% scale so you’ll tape together pieces from 3 pages to create the 21″ long snake top and another 3 pages to create the bottom. Here’s what’s in the PDF pattern.

  • Step-by-step written instructions
  • 15 color photos
  • Template printable on 8 1/2″ x 11 paper
  • Materials List
  • Helpful tips
  • Links to sewing videos

Snake Sewing Pattern Available on Etsy

This snake sewing pattern is available in our Etsy Shop.

Available now on Etsy.

Etsy Shop

Pin This Snake Pattern to Pinterest

Share the love, pin this picture to Pinterest.

What Will You Need to Sew This Snake?

The materials you’ll need to are pretty minimal. Here’s what you’ll need to sew your own snake.

  • Template: at the end of the pattern
  • Fabric: 2 different colors – 22” x 7”
  • Felt or Ribbon for Tongue:    Red – 4” x ¼” or ½”
  • Needle and Thread: To match snake fabric
  • Straight Pins
  • Stuffing and Chopstick
  • Safety Eyes: (2) 5mm, 8mm, or 12mm
  • Scissors
  • Pencil or Washable Marker

We’ve kept this snake design pretty simple, yet added a few special details to make it interesting.

Happy sewing!

Statue of Liberty Gnome Pin Loom Pattern

Weave your own Lady Liberty with pin looms! This step-by-step PDF pattern will show you how to transform simple squares and rectangles into your very own Statue of Liberty Gnome toy.

This plushie has many similarities to the actual Statue of Liberty. The torch, tablet and crown being the key elements. But did you also notice the broken chain? Because of the nature of pin loom weaving and the size of the project, this stuffed gnome isn’t an exact replica, but she is pretty darn cute!

What’s Included in the Statue of Liberty PDF Pattern?

  • Statue of Liberty with crown, torch and tablet
  • Detailed writtten instructions
  • 30+ color photos
  • 16 Pages
  • Tips and Tricks for shaping and finishing

Statue of Liberty Gnome PDF Pattern Available Now

The Statue of Liberty Gnome PDF Pattern is now available in our Etsy Shop.

Available Now on Etsy.

Buy Now on Etsy

This gnome was made with medium worsted weight (4) yarn. Any worsted weight should work. We love the color of Red Heart Soft in Sea Foam #9520. Besides the usual items like stuffing, the other odd item needed is black felt. Let’s take a look at what you need more closely.

What You’ll Need to Weave Statue of Liberty.

  • Pin Looms:   Squares: 2” and 4”,
  • Pin Looms: Rectangles: and 2” x 4” and 2”x6” and
  • Pin Looms: Rectangle: 1” x 4” (for the chains only)
  • Yarn:   Red Heart: Soft – Medium (4) SEA FOAM #9520 –  250 yds
  • Lion Brand: Basic Stitch – Medium (4) MUSTARD #158I – 5 yds
  • Needles:  6” needle for weaving and yarn needle for sewing
  • Stuffing
  • Felt – black, ½” x 5” strip
  • Fabric Glue
  • Beans to weigh the gnome down
  • Pet comb – metal
  • Steamer (optional)

Pin This Statue of Liberty Gnome Pin Loom Pattern to Pinterest

Share the love; pin this Statue of Liberty Gnome Pin Loom Tutorial to Pinterest.

About the Statue of Liberty and the Gnome

Liberty Enlightening the World is a statue more commonly referred to as the Statue of Liberty. Libertas, the Roman Goddess of Liberty, holds a torch and tablet, and stands in New York Harbor. She is a copper statue, given to the United States by France, and dedicated in 1886. There is a broken chain and shackle at her feet symbolizing the abolition of slavery in the United States. Though this gnome only has 5, Liberty has 7 rays forming a halo that represent the sun, the seven seas and the seven continents. There are 25 windows in the crown for viewing the harbor (the gnome has 11).

This gnome has a simple construction with components added to it that represent elements on the real statue. For instance, the Statue of Liberty is wearing robe, the gnome is wearing a sash. The halo, or rays, on the gnome is a band attached to the hat. Little bits of felt create the windows.

Get your copy of the Statue of Liberty Gnome Pin Loom Pattern on our Etsy Shop.

Buy Now on Etsy

Hammerhead Shark Sewing Pattern

Hammerhead Shark sewing pattern

Sew your own plushie Hammerhead Shark with this step-by-step pattern tutorial. This is a great project for beginners and sewing enthusiasts alike. The supplies you need to make this on a sewing machine are very minimal. A few pieces of fabric, a couple safety eyes and thread and you’re ready to sew!

Follow this pdf sewing pattern and you’ll have a finished hammerhead shark stuffed animal in a few hours. It’s that easy.

The step-by-step tutorial includes:

  • 18″ Hammerhead Shark
  • Step-by-Step written instructions
  • 15+ color photos
  • Printable Template for 8 1/2″ x 11 paper
  • Tips and tricks for sewing the shark
  • Links to helpful videos

Hammerhead Shark Sewing Pattern Available on Etsy

Purchase the Hammerhead Shark Sewing Pattern on our Etsy Shop.

Available now on Etsy.

Buy Now on Etsy

This is also a great project to make with scraps of fabric. Choose colorful printed fabric to make a playful and unique shark. The hammerhead shark pictured here was made with fleece sheets that landed in the recycle pile. This could be made from old clothes. This is the perfect project to make as a memory pillow, too.

What you need to make your own Hammerhead Shark Stuffed Animal:

  • Template: Found at the end of the pattern
  • Fabric: Grey – 16” x 20” White – 8” x 20”
  • Stabilizer or Felt: White – 1 sheet
  • Needle and Thread: Grey
  • Safety Eyes: (2) 18mm
  • Straight Pins
  • Fabric Glue
  • Embroidery Thread: 1 yard, black
  • Stuffing and Chopstick
  • Scissors
  • Pencil or Washable Marker

Pin This to Pinterest

Share the love, pin this image to pinterest.

More about the Hammerhead Shark Pattern

This pattern stands out from the rest because it includes all the little details that make this so realistic. It has all 8 fins common to Hammerhead Sharks and even includes the notch on the caudal (tail) fin.

The pattern includes 4 pages of templates. The body of the shark spans 2 page so the template pieces will need to be cut out and taped together. The template includes a 1″ scale so you know if it’s printing at full size. Reduce or enlarge the pages to make a smaller or larger stuffed animal.

We’ll include helpful tips throughout like where to start and stop sewing. What tools might make a step easier. The templates are clearly labeled and easy to follow.

The fins are made with a layer of felt or stabilizer which helps them stay rigid yet soft and huggable.

Hammerhead Sharks usually have a litter of pups…so you may need to make more than one!

Get your Hammerhead Shark Sewing Pattern on our Etsy Shop.

Buy Now on Etsy