Weave a Pin Loom Square or Rectangle

Pin loom weaving is a lot of fun and quite simple. The 4″ square is the most popular size pin loom to weave and the most readily available. It can be found in lots of independent yarn shops as well as Amazon and Etsy. You can build your own pin loom, too.

Weaving a pin loom square is the same no matter the size. A 2″ is woven in the same manner as the 4″. The 4″ will just have more rows to repeat. Likewise, the 6″ loom will have even more rows to repeat. A rectangle is also woven like a square, it’s just wider.

There are 2 main types of pin looms on the market: 3 pin configuration vs evenly spaced pins. This tutorial shows how to weave a square with a 3 pin configuration.

Weave a Pin Loom Square (or rectangle) VIDEO

Weaving a pin loom square is really easy. Learn how with this short video.

Pin Loom Weaving a Square – Illustrations

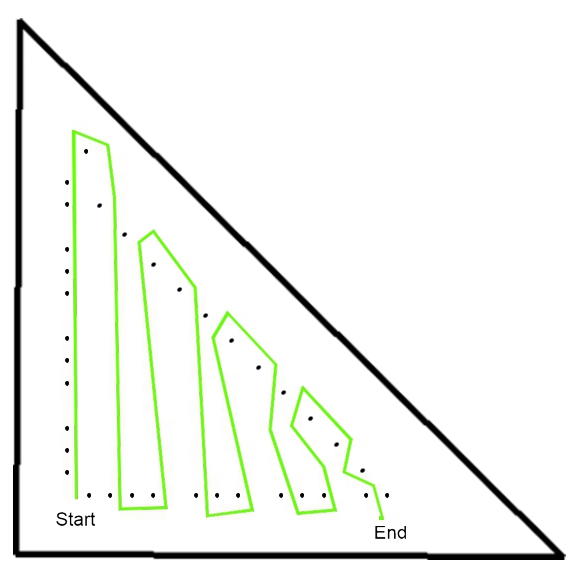
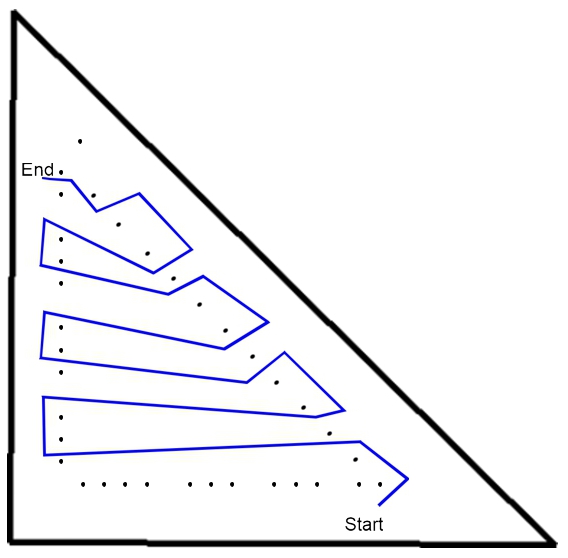
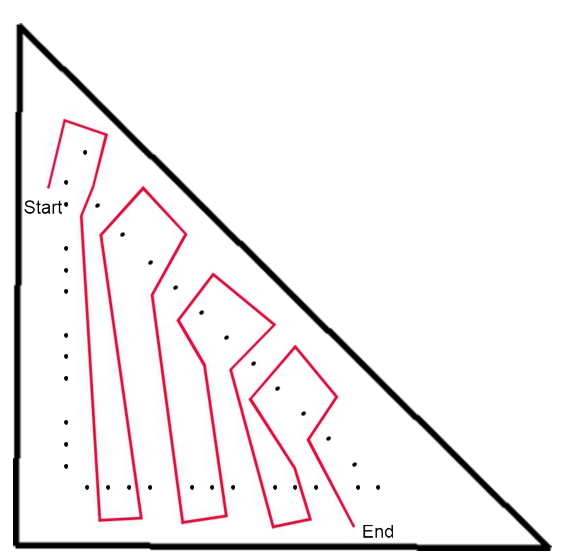
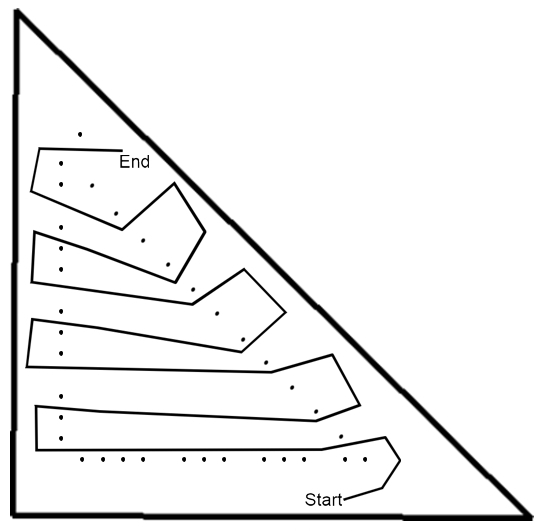
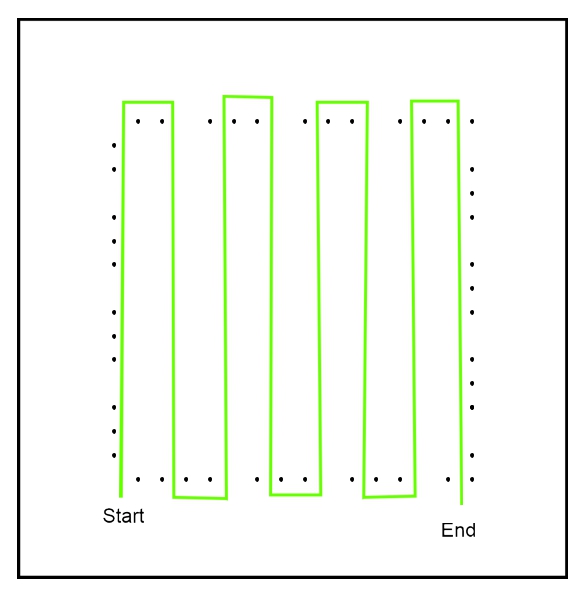
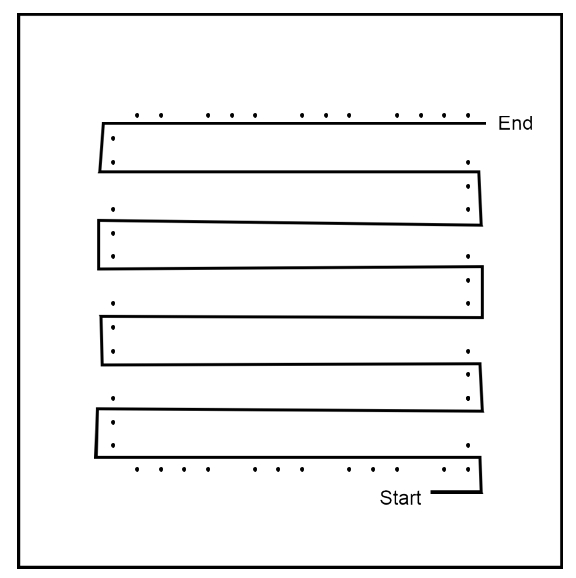
Don’t have time to watch the video? Below we have several illustrations for weaving a 2″ pin loom square. It’s accomplished in 4 layers: 3 warp and 1 weave.

Layer 1: Warp 1 (Illustrated in Green)

Orient the pin loom so the start arrow is at the bottom left. Most pin looms will have an arrow indicating where weaving should start. In this case, look for a cluster of 4 pins at bottom left corner with no pin at the top left corner. This layer will be worked bottom to top.

  • Hold yarn at start, bring yarn to top row and wrap it across the 2 pins there.
  • Bring yarn back down between pin 2 and 3 and wrap it across pins 3 and 4.
  • Bring yarn back to top, skip 1 pin, wrap it across the next 2 pins.
  • Bring yarn back down to bottom, skip 1 pin, wrap it across the next 2 pins.
  • Repeat previous 2 steps to end.
  • End by bringing yarn back to the bottom between last 2 pins.

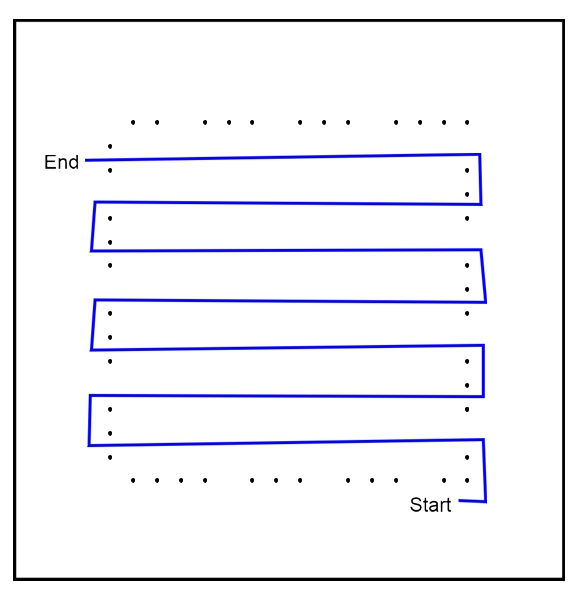
Layer 2: Warp 2 (illustrated in Blue)

This layer will work right to left. Continue from where you left off at warp layer 1.

  • Bring yarn to the right side.
  • Bring yarn up and wrap across 2 pins.
  • Bring yarn to left side of loom, skip 1 pin, wrap yarn across next 2 pins.
  • Bring yarn to right side of loom, skip 1 pin, wrap yarn across next 2 pins.
  • Repeat previous 2 steps to top.
  • End on left side between last 2 pins.

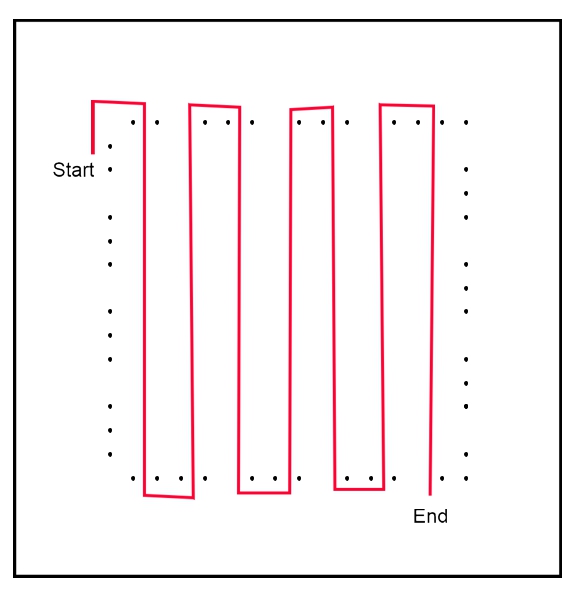
Layer 3: Warp 3 (illustrated in Red)

This layer will work from top to bottom. Continue from where you left off at warp layer 2.

  • Bring yarn to top of loom. Wrap it across 1st pin.
  • Bring yarn to bottom of loom. Skip a pin, wrap it across 2 pins.
  • Bring yarn to top of loom. Skip a pin, wrap it across 2 pins.
  • Repeat previous to steps across.
  • End with yarn in the gap to the left of the last 2 pins.

Step 4: Weave (illustrated in Black)

This layer will work left and right. Continue from where you left off at warp layer 3.

  • Before starting this layer, you need to measure out a length of yarn for weaving. Wrap the yarn around the outside of the pins (around all 4 sides) 4 to 6 times. This will give you enough yarn to weave and a little extra for joining shapes together.
  • Cut the yarn after the last wrap, unwrap the yarn back to end of last warp and place yarn on weaving needle.
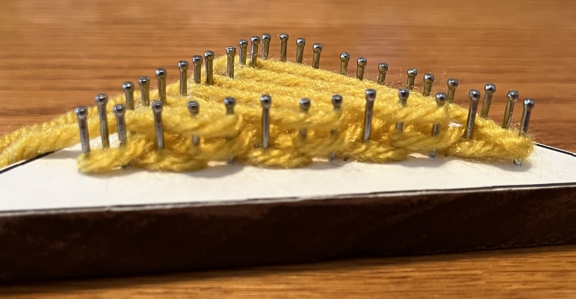
  • Plain weave is the most common pattern. You will bring needle under a strand, then over the next strand, repeating under, over all the way across.
  • Begin on right side. Look for the yarn that wraps across 2 pins, which is the 1st 2 pins on the bottom right. The yarn always goes over the loop that was wrapped across the pins.
  • Start by weaving the needle under the next strand, then over the next. You can tell which strand to weave under because it will be lower/recessed. The strand to weave over will be higher/raised.
  • Pull yarn needle all the way through.
  • Now weave from left to right (next up is weaving between the 2nd and 3rd pin).
  • Continue weaving back and forth. The last weave will be right next to the pins at the top.

Pin Loom Weaving Tips

Yarn Fiber

Some yarns are easier to weave with than others. Yarns with some elasticity are easier to weave because they can stretch a bit.

Weaving Tension

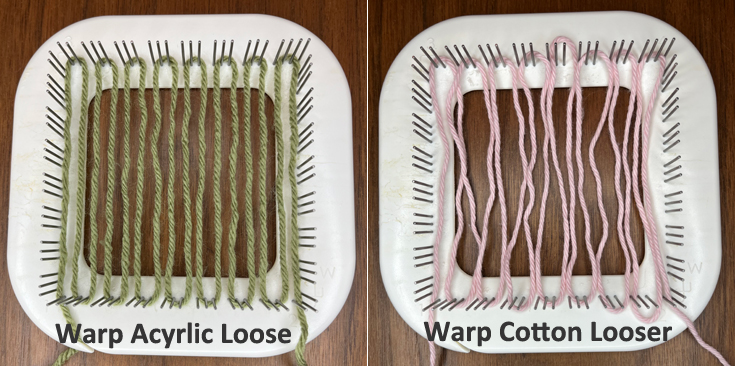
warping pin loom with acrylic vs cotton

When warping the pin loom, wrap with a light touch. Don’t stretch the warp. It will tighten up with each strand you weave. For cotton yarn, warp extra loose.

Tips for Weaving

Read our post 11 Tips for Pin Loom Weaving for more detail. Here are a few of our favorites:

  • Leave a long tail for joining woven shapes together.
  • Pack or beat the yarn after you weave a row. This will leave a gap for weaving the next row. You can use a kitchen fork for this!
  • It’s ok to use both hands to weave. Use one hand to move the needle and the other to move strands in or out of the way for weaving.

Want another take on how to pin loom weave? Schacht spindle company has granted us permission to share their weaving images from the Zoom Loom. Learn more about How to Weave on a Pin Loom.

So what can you make with pin loom woven shapes? Check out our YarnovationsShop on Etsy for some fun ideas.

Make a Pin Loom – Pattern

Pin loom weaving is fun…and even more so if you have looms of various shapes and sizes! There are several small and independent companies that manufacture pin looms. We highly recommend them. However, it can be hard to find pin looms in stores (other than weaving friendly yarn shops).

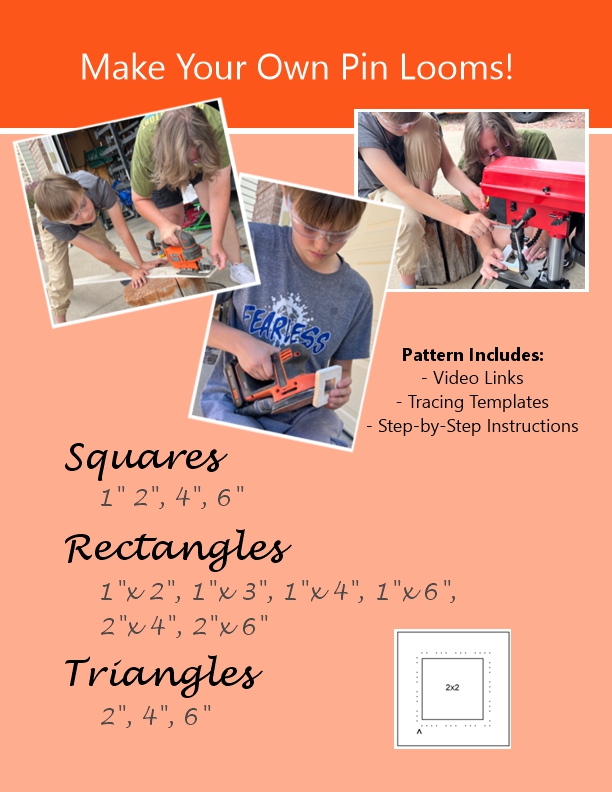
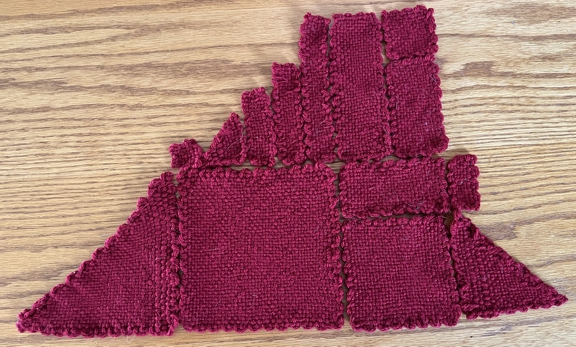
In order to get all the pin loom shapes you might need, you can make your own! This pattern includes pin loom templates for squares, rectangles and triangles measuring 1” up to 6”. Not only can you build your own, we show you how to build them with common household items.

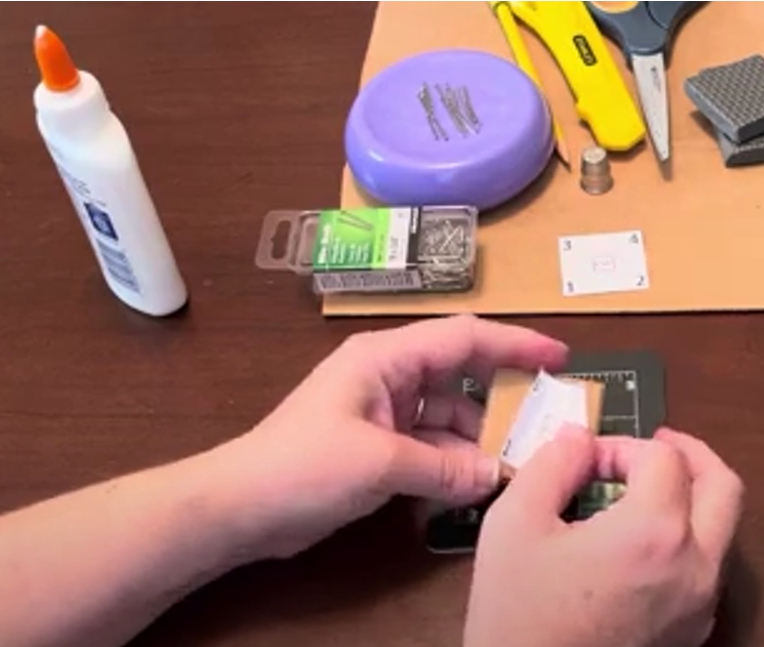
You can make a pin loom from items such as cardboard and straight pins. Those work ok for really small looms like the 1″ square and if used lightly. If you weave regularly or like the larger shapes, we recommend that you build a loom from wood like MDF or plywood and brad nails, all found at your local hardware store.

Build a Pin Loom Step-by-Step

The pattern for Making Your Own Pin Loom is awesome! It answers lots of questions you may have and offers step-by-step information for building a pin loom start to finish:

  • Step-by-Step Written Instructions
  • Tons of Photos
  • VIDEO link to Build a Loom from Cardboard or Foam
  • VIDEO link to Build a Loom from Wood
  • VIDEO link to Weaving a Square (or Rectangle)
  • VIDEO link to Weaving a Triangle
  • Links to Where to Buy Ready Made Pin Looms
  • Templates for Squares: 1″, 2″, 4″, 6″
  • Templates for Rectangles: 1″x2″, 1″x3″, 1″x4″, 1″x6″
  • Templates for Rectangles: 2″x4″, 2″x6″
  • Templates for Triangles: 2″, 4″, 6″
  • Materials List for Building Looms on Cardboard, Foam or Wood

Make a Pin Loom Pattern on Etsy

Buy the pattern with templates to Make Your Own Pin Looms in our Etsy shop.

Available now on Etsy.
Buy the pattern on etsy

Pin Loom Weaving Patterns

Pin looms are great for weaving up little fabric shapes. These shapes can be sewn together to create countless woven projects from coasters to blankets, to stuffed animals and decorations. You can make a ton of adorable projects with a simple square…but the possibilities are limitless with additional pin loom shapes like rectangles and triangles.

Visit our Etsy shop for lots of fun and exciting pin loom patterns to weave!

Pin Loom Flock Pattern

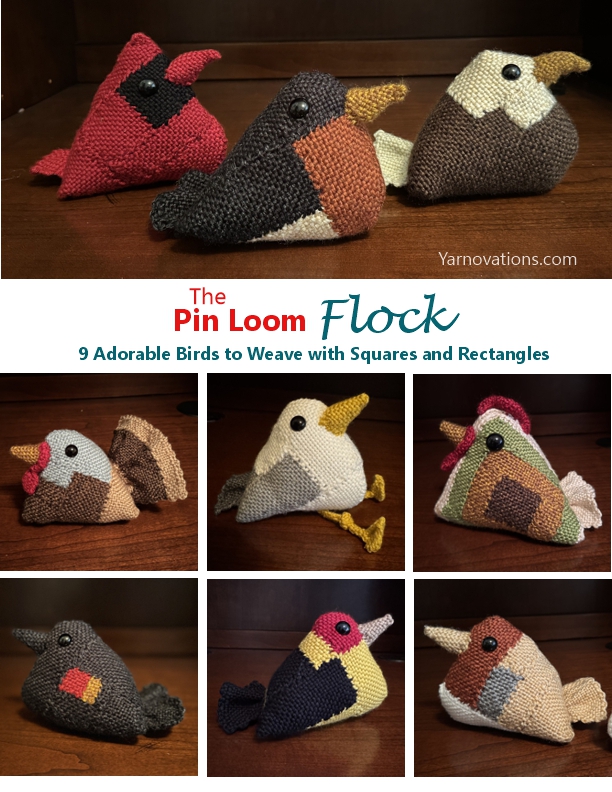
Introducing…The Pin Loom Flock: 9 Adorable Birds to Weave with Squares and Rectangles. Inspired by the Birds of a Feather crochet pattern, we’re excited to bring our most popular birds to the pin loom community.

9 Gorgeous Birds included in the pin loom pattern:

  • Bald Eagle
  • Cardinal
  • Chicken
  • European Robin
  • Red-Winged Blackbird
  • Robin (and a mini Robin)
  • Seagull
  • Turkey
  • Western Tanager

Shhh…I have a secret for you. All these birds can be made from 2 pin looms (the Robin can be made from 1!). We used 3 to 5 different looms to make each bird so there would be less tails to weave in, but you can make them with a 2″ square and 1″x4″ rectangle (with folding of the rectangle in some cases).

Pin looms we used to make all the birds include:

  • Squares: 1″, 2″, 4″, 6″
  • Rectangles: 1″x2″, 1″x4″, 2″x4″, 2″x6″

The Pin Loom Flock on Etsy

The pin loom pattern to make the Pin Loom Flock is available now on Etsy.
Available now on Etsy.
More about The Pin Loom Flock Pattern

The Pin Loom Flock is a beginner friendly pattern. Every square and rectangle will be woven in plain weave and joined with a simple overcast or your favorite join method. The birds measure: 5.5” length x 6.5” width x 4.5” height. The Chicken measures 7.75” x 5.75” x 6” because it has a couple rounds of single crochet (it is the only bird with crochet).

The pattern includes written instructions as well as helpful photos for rolling and folding shapes to make feet, beaks, wattles, snoods and combs. There are helpful charts to show yarn and loom sizes used to make each bird.

Materials needed are minimal and include:

  • Yarn: Size 4 medium worsted weight
    (Pattern used: Lion Brand Heartland and Basic Stitch, acrylic)
  • Pin Looms (see list above)
  • Weaving Needle (6″) and Yarn Needle
  • Stuffing
  • Safety Eyes: 14 mm – 2 each bird (chicken 18 mm)
  • Crochet Hook (chicken only): G/4.0mm

Birds for the Holidays and Special Occasions

The birds are fun to make for bird lovers, but they are also fun for several holidays and other special occasions.

  • Christmas Bird: Cardinal
  • Thanksgiving Bird: Turkey
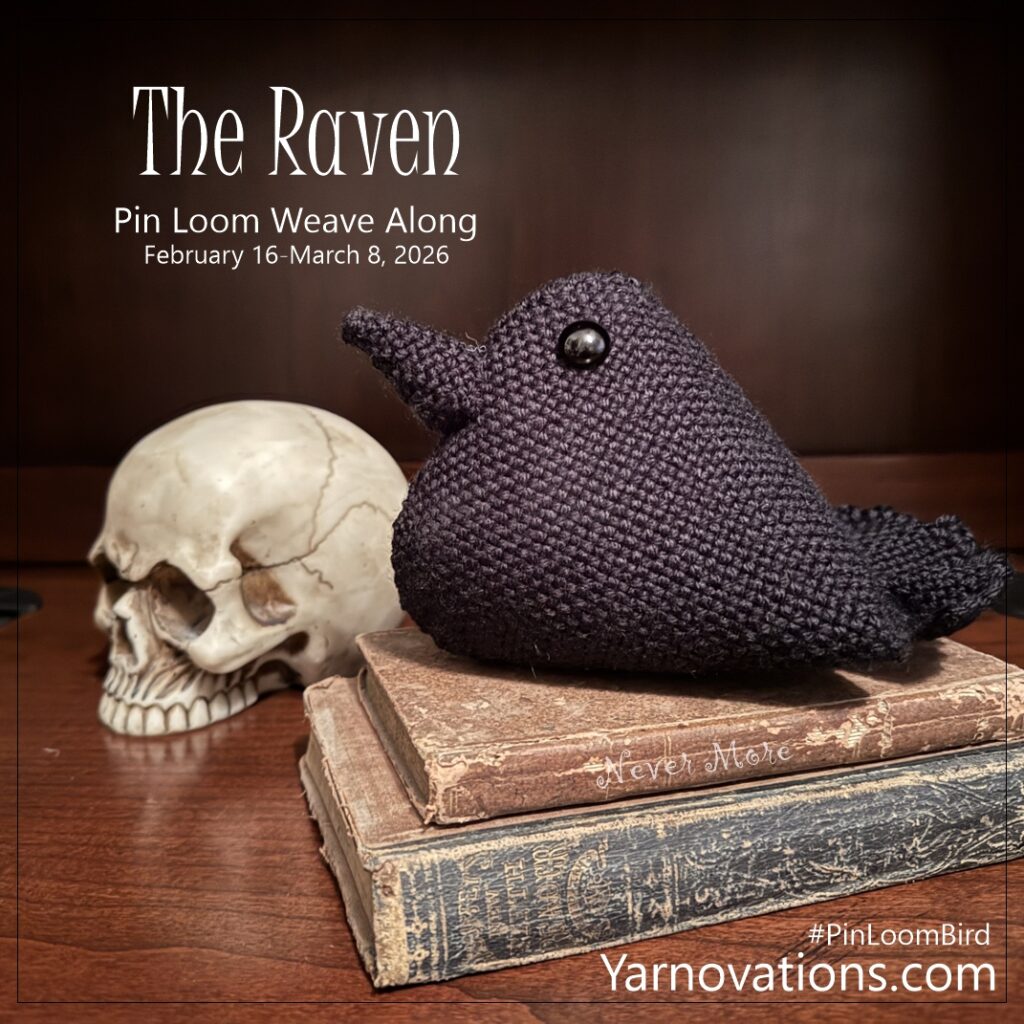
  • Halloween Bird: Blackbird (made in solid black as a Crow/Raven)
  • Wedding Bird: Make the Robin in white as a Dove.
  • Sports Teams: Cardinals, Eagles, Falcons, Ravens

Make one of these birds as a Thinking of You gift and add a little encouragement note:

  • “Fly high, little bird!”
  • “Trust your wings.”
  • “Sing your song.”

These little birds are fun sitting on a shelf or at your desk.

Get your copy of The Pin Loom Flock in our Etsy shop now.

Cardinal Christmas

Cardinals aren’t just sport mascots, they are a gorgeous reminder of Christmas. The cardinal from Birds of a Feather, Volume 1 is a lot of fun to use for decorating and gifting. Here’s how I’d use the 3 pictured above:

  • Smallest cardinal (right) is crocheted in cotton thread and would be adorable looped on a handbag as a charm.
  • Medium sized cardinal is crocheted in medium worsted weight yarn and is the perfect size for hanging on a tree (see photo below).
  • Largest cardinal is crocheted in super bulky yarn and it’s big. It would be a noticeable accent on a dinner table or bookshelf.
cardinal made from yarn from 2 small granny squares. Hanging as an Christmas ornament on an evergreen tree.

Want to know more about how to crochet smaller or larger granny square birds? Check out our blog post: Granny Square Birds in Different Yarn Weights blog post.

Birds of a Feather on Etsy

We have 19 granny square birds available in 2 volumes. Learn more on Etsy:

Granny Square Birds in Different Yarn Weights

3 Cardinals crocheted in different size yarns from the crochet pattern "Birds of a Feather"

Can you use larger or smaller yarn to crochet the Granny Square “Birds of a Feather”?

Great question! We’ve been asked if the granny square “Birds of a Feather” crochet pattern can made with larger (chenille yarn) or smaller (cotton thread) yarn. The simple answer is, Yes!

No changes are needed for the crochet portion of the pattern if you want to make a bird in larger or smaller yarn. As expected, the thicker or bulkier the yarn, the larger the bird and conversely, the thinner the yarn, the smaller the bird. The only change you’ll need to make in the pattern is the size of the eyes and crochet hook.

Pictured above are 3 cardinals made with different size yarn with NO changes to the crocheted portion of the pattern.

  • Left: Lion Brand Wool-Ease Thick & Quick, super bulky, 79% acrylic, 20% wool, 1% other
  • Middle: Lion Brand Heartland, medium worsted weight acrylic
  • Right: Aunt Lydia’s Cotton Thread #5
  • Rubber Duckie: (pictured below): Paton Grace #3 light weight yarn, mercerized cotton

Observations about Working with Different Size Yarn

  1. For most yarns we used a hook 1 or 2 sizes smaller than the yarn label recommended.
  2. Thicker yarn will made a bird that may feel more squishy and appear more holey. It’s great for cuddling.
  3. Thinner yarn makes it more difficult to see your stitches. Cotton thread creates a stiffer bird. Great for creating little charms for bags or Christmas ornaments.

Pattern Modifications for Change in Yarn Size

EYES

You’ll want to increase or decrease the size of the button or safety eye depending on the size bird you crochet. Here’s what we used in those pictured on this post.

  • Large cardinal used 5/8” buttons (loop back button which looks similar to a safety eye).
  • Medium cardinal used 10 mm safety eyes.
  • Small cardinal used 5 mm mini brads (like those used in scrapbooking).
  • Rubber Duckie used 6 mm safety eyes.

Birds, Birds, More Birds

There are so many beautiful birds in the world…and we’ve recreated several of them in 2 different crochet patterns. Each bird in these sets are made from 2 granny squares with color changes at just the right place to create different birds. Here’s what’s in each volume:

Birds of a Feather, Volume 1

The original set has 9 gorgeous birds that are fun to decorate with and for gifting. Birds of a Feather, Volume 1 is available on Etsy and includes the following birds:

  • Sunflower Chicken
  • Bald Eagle
  • Bluejay
  • Cardinal
  • Goldfinch
  • House Finch
  • Parakeet
  • Robin
  • Turkey
  • + Bonus: Mini Pumpkin
Duck, duck, goose. 3 birds each made from 2 granny squares. Left is rubber duckie, middle is a mallard, right is a goose.

Birds of a Feather, Volume 2

2 new features were added to Birds of a Feather, Volume 2. The step-by-step instructions for turning granny square birds (any from vol. 1 and 2) into a cell phone holder or a zippered pouch! Volume 2 also introduces some fun techniques to create birds with texture like furry feathers and 3D feathers! This set includes several exciting new birds including:

  • Blackbird / Crow / Raven / Dove
  • Black Breasted Red Phoenix Rooster
  • European Robin
  • Flamingo (2 styles)
  • Goose / Mother Goose
  • Mallard
  • Red Winged Blackbird
  • Rubber Duckie
  • Seagull
  • Stork with Baby Bundle

The crochet pattern for these fine feathered friends are available now on Etsy:

Ruana with Fur in “I Like Crochet” Magazine

Cover of I Like Crochet Magazine December 2025
Photo courtesy I Like Crochet magazine.

The Mocha Luxe Ruana I (Dana) crocheted for I Like Crochet magazine December 2025 made the cover! Woo hoo! This is very exciting. As you may know, my sister and I don’t often make garment type projects. But I took a chance on a one-size-fits-most project and I’m thrilled with how it turned out.

My goal was to make something soft, luxurious, and … easy. Yep, I selected these stitch patterns specifically so that the project would be approachable for newish crocheters. There are stitches with varying heights, but there are no decreases or other more complicated techniques.

Photo courtesy I Like Crochet magazine

A ruana is kind of like a blanket you wear as a coat. There are no buttons or sleeves. The front panels can be thrown over the shoulder to create a shawl-like appearance. I was very, very sad to have to mail this to the magazine for photos. I may have to make a second one that I can keep and wear. Goodbye coat, hello ruana.

I also loved this project because my mom helped me with the beading. We raided her stash and found some baubles that accent the sides of the shawl perfectly. Hmm…beading. I may incorporate those more often into my crochet projects.

Knit Picks Yarn

Photo from Knit Picks

The crown jewel of this garment is the luxurious fur yarn. I had a blast crocheting with Knit Picks Fairy Tale Fur yarn. Yes, it is difficult to see the stitches, but you it’s easy to feel where the next stitch goes if you use a taller stitch like double crochet. It’s also forgiving if you miss a stitch. It is so luxuriously soft, I started dreaming of other projects I can make with this yarn. I highly recommend this 100% polyester yarn for any project needing fur.

Photo from Knit Picks

The main portion of the ruana used Knit Picks Brava Worsted. This is a work horse yarn that’s easy to use. It’s 100% acrylic and gives great stitch definition. It pairs beautifully with the Fair Tail Fur.

I Like Crochet December 2025

Photo courtesy I Like Crochet.

Here are a few more photos of the Mocha Luxe Ruana. Words can not express how much I love this project. It’s fun to make and even more fun to wear!

Happy Stitching.

Photo courtesy I Like Crochet magazine.

Evergreens, Crochet World Winter 2025

Evergreens often remind me of winter and Christmas time. Why is that? They are green all year long! These darling crocheted evergreen trees are easy to make and can be enjoyed all year. I often put them out at Christmas, and put them away well into the new year. Now you can crochet your own evergreens as well!

Available on newsstands now, Crochet World magazine’s Winter 2025 is full of fun winter and Christmas-time projects perfect for wearing, decorating and gifting. We have another adorable pattern in the issue…Evergreen Trees! We show the trees in two different crochet stitch patterns and the instructions walk you step by step how to assemble them.

Each tree is crocheted with Omega Otono worsted weight yarn. They are crocheted with simple stitches and have simple construction making these fun and easy for beginner crocheters.

Just for added fun, I, Deborah, decided to create the little wooden reindeer as well! I saw a video of someone making one on a band saw, and cut one out myself using a scroll saw. I don’t do a lot of woodworking, but I was pleased with the result. It’s a cute little addition to my winter scene. Here’s the video of the reindeer using the band saw: https://www.youtube.com/watch?v=W335wRyLLiY&t=61s

Check out Crochet World Winter 2025 for the trees and 28 other fun and festive patterns to crochet.

October 2025 Crochet Classes

Back by popular demand, I (Dana) am teaching a granny square class this October. We had a “beat the heat” class in August which was a lot of fun. The snowbirds are back in town, so we’re stitching the granny square once again.

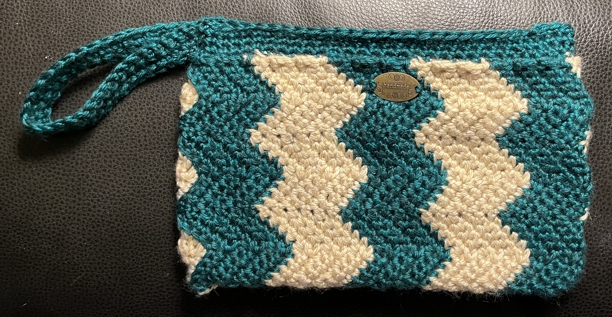
In addition to the granny square class, I’ll be teaching a class for the crochet chevron stitch. We’ll discuss the different looks of crocheting in both stitches or back loop only.

Both the granny square and crochet chevron classes are open to all members of Sew’n Sews sewing club in Sun Lakes, AZ. I love that this is a group of sewists that are bi-craftual…they love to sew and dabble in other crafts.

Reach out to me via facebook if you want more information on my crochet classes.

Triple Tassel Scarf Knitting Pattern

Photo courtesy of I Like Crochet magazine.

No increases, no decreases, no cables…just knit, purl and style. The Triple Tassel Scarf is a lush warm scarf knit in a bulky yarn. It features a different texture front and back, both gorgeous. The crowning glory of this scarf are the triple tassels on the corners. They are flirty and fun!

The knit pattern for the triple tassel scarf is great for beginners because it’s stitched in short rows and uses only knits and purls. The pattern repeat is easy to remember, too. And added bonus, the pattern gives step by step instructions for making the triple tassels with lots of photos.

Photo courtesy of I Like Crochet magazine.

Triple Tassel Scarf Knit Pattern on Etsy

The Triple Tassel Scarf originally appeared in I Like Knitting online magazine. We have the rights back, so you can get your copy directly from the designer! Get your copy in our Etsy shop: Triple Tassel Scarf on Etsy.

Available now on Etsy.
Buy the pattern on etsy

Triple Tassel Scarf Knitting Pattern Details

One of our favorite features of the Triple Tassel Scarf is that it’s fun to style. It’s long and wide making it perfect for wrapping, knotting and draping. The finished length is approximately 80″ long x 8″ wide.

The second feature we love about this scarf is how soft it is. It’s made with 6 balls of Cascade Yarns Pacific Chunky in Salmon Rose. This yarn is 60% acrylic / 40% superwash merino wool. Each skein is 100 grams which is 120 yds / 110 m.

Because it’s made in an acrylic / superwash merino wool blend…our third favorite feature is that this scarf is machine washable and dryable! It’s nice to know that after a hard day of play, we can toss this scarf in the laundry (but play it safe by putting it in a mesh bag first).

Share the Love, Post our Pictures on SM

Share the love…pin one of our pictures to Pinterest or share on social media.

Thank you.

Triple Tassel Scarf Knitting Pattern Available Now

Ready to get knitting? Instantly download your copy of the Triple Tassel Scarf knitting pattern on Etsy.
Available now on Etsy!

Pig Crochet Pattern

Pork Chop the pig crochet pattern comes with 4 options + accessories.

Pigs are popular in American culture. When we first designed pork chop, the crochet pig stuffed animal, we marveled at how pigs are used in literature, sports and even entertainment. Here are some of our favorite pigs:

  • Maxwell, the Geico Pig – give him a pinwheel and watch him squeal “weeeeee” all the way home.
  • Napoleon from Animal Farm – have him stand on his hind feet and give him some clothes.
  • Piglet from Winnie the Pooh – dress him in a striped pink shirt and have him stand on his hind feet.
  • Porky Pig from Looney Tunes – dress him in a blue shirt and red tie and have him stand on his hind feet.
  • Tusk, the Arkansas Razorbacks mascot – crochet him in red with a black sweater.
  • Wilbur from Charlotte’s Web – give him an award winning collar.

Pork Chop would make a great gift for new baby or young child. Gifting this crochet pig with a copy of the book Charlotte’s Web would be very fun and thoughtful.

The accessories for the pig crochet pattern are a free pdf download on our free patterns page. You can make a shirt, metal / tag, and pinwheel.

Pig Crochet Pattern on Etsy

Get Pork Chop the pig crochet pattern in our Etsy shop.

Available now on Etsy.