Pin loom weaving is a lot of fun and quite simple. The 4″ square is the most popular size pin loom to weave and the most readily available. It can be found in lots of independent yarn shops as well as Amazon and Etsy. You can build your own pin loom, too.
Weaving a pin loom square is the same no matter the size. A 2″ is woven in the same manner as the 4″. The 4″ will just have more rows to repeat. Likewise, the 6″ loom will have even more rows to repeat. A rectangle is also woven like a square, it’s just wider.
There are 2 main types of pin looms on the market: 3 pin configuration vs evenly spaced pins. This tutorial shows how to weave a square with a 3 pin configuration.
Weave a Pin Loom Square (or rectangle) VIDEO
Weaving a pin loom square is really easy. Learn how with this short video.
Pin Loom Weaving a Square – Illustrations
Don’t have time to watch the video? Below we have several illustrations for weaving a 2″ pin loom square. It’s accomplished in 4 layers: 3 warp and 1 weave.
Layer 1: Warp 1 (Illustrated in Green)
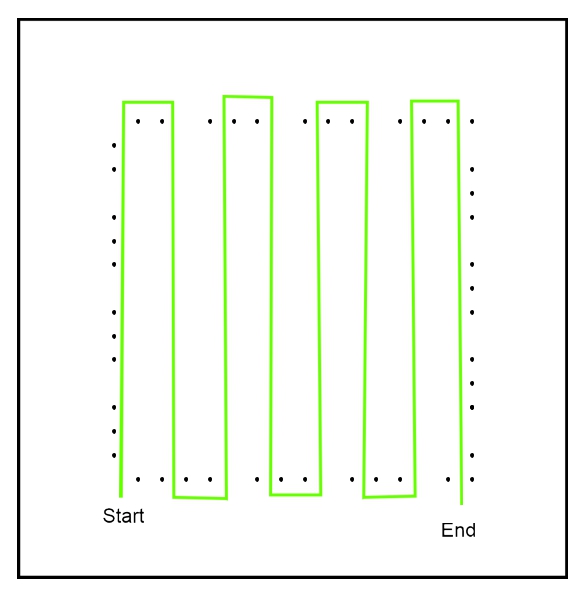
Orient the pin loom so the start arrow is at the bottom left. Most pin looms will have an arrow indicating where weaving should start. In this case, look for a cluster of 4 pins at bottom left corner with no pin at the top left corner. This layer will be worked bottom to top.
- Hold yarn at start, bring yarn to top row and wrap it across the 2 pins there.
- Bring yarn back down between pin 2 and 3 and wrap it across pins 3 and 4.
- Bring yarn back to top, skip 1 pin, wrap it across the next 2 pins.
- Bring yarn back down to bottom, skip 1 pin, wrap it across the next 2 pins.
- Repeat previous 2 steps to end.
- End by bringing yarn back to the bottom between last 2 pins.
Layer 2: Warp 2 (illustrated in Blue)
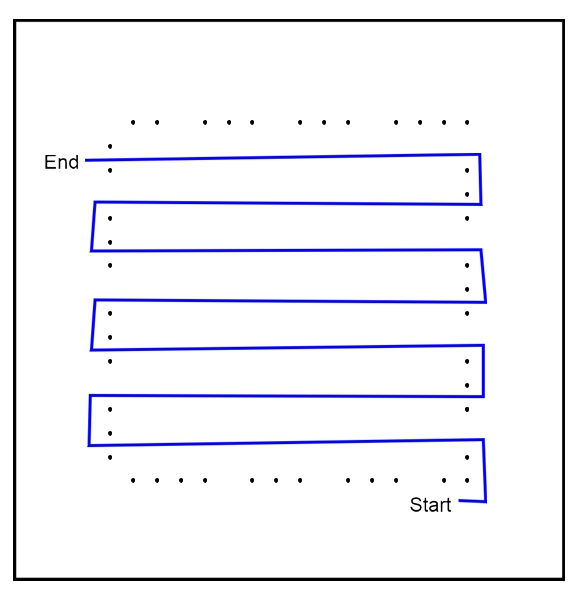
This layer will work right to left. Continue from where you left off at warp layer 1.
- Bring yarn to the right side.
- Bring yarn up and wrap across 2 pins.
- Bring yarn to left side of loom, skip 1 pin, wrap yarn across next 2 pins.
- Bring yarn to right side of loom, skip 1 pin, wrap yarn across next 2 pins.
- Repeat previous 2 steps to top.
- End on left side between last 2 pins.
Layer 3: Warp 3 (illustrated in Red)
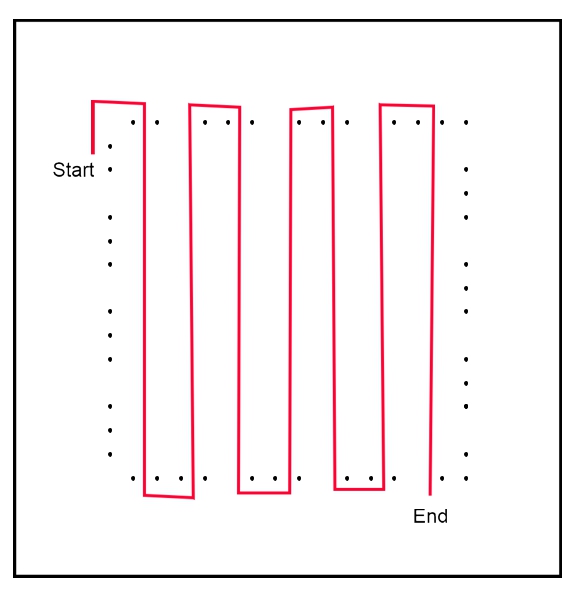
This layer will work from top to bottom. Continue from where you left off at warp layer 2.
- Bring yarn to top of loom. Wrap it across 1st pin.
- Bring yarn to bottom of loom. Skip a pin, wrap it across 2 pins.
- Bring yarn to top of loom. Skip a pin, wrap it across 2 pins.
- Repeat previous to steps across.
- End with yarn in the gap to the left of the last 2 pins.
Step 4: Weave (illustrated in Black)
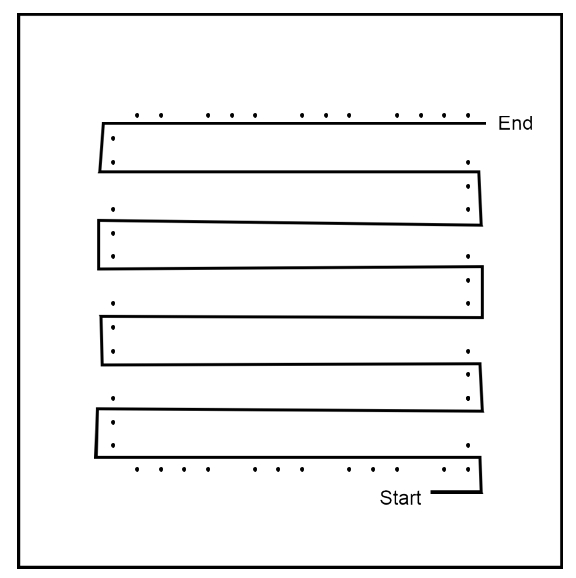
This layer will work left and right. Continue from where you left off at warp layer 3.
- Before starting this layer, you need to measure out a length of yarn for weaving. Wrap the yarn around the outside of the pins (around all 4 sides) 4 to 6 times. This will give you enough yarn to weave and a little extra for joining shapes together.
- Cut the yarn after the last wrap, unwrap the yarn back to end of last warp and place yarn on weaving needle.
- Plain weave is the most common pattern. You will bring needle under a strand, then over the next strand, repeating under, over all the way across.
- Begin on right side. Look for the yarn that wraps across 2 pins, which is the 1st 2 pins on the bottom right. The yarn always goes over the loop that was wrapped across the pins.
- Start by weaving the needle under the next strand, then over the next. You can tell which strand to weave under because it will be lower/recessed. The strand to weave over will be higher/raised.
- Pull yarn needle all the way through.
- Now weave from left to right (next up is weaving between the 2nd and 3rd pin).
- Continue weaving back and forth. The last weave will be right next to the pins at the top.
Pin Loom Weaving Tips
Yarn Fiber
Some yarns are easier to weave with than others. Yarns with some elasticity are easier to weave because they can stretch a bit.
- Easier Yarns: acrylic, wool (think, animal fiber)
- Difficult yarns: cotton, bamboo (think, plant fiber)
- Learn more in our Selecting Yarn post.
- Want to make dishcloths with scrubby yarn? Read our post on Tips and Tricks for Weaving with Scrubby Yarn.
Weaving Tension
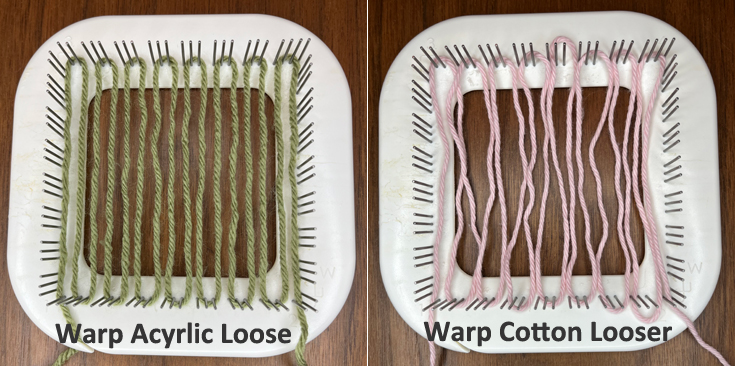
When warping the pin loom, wrap with a light touch. Don’t stretch the warp. It will tighten up with each strand you weave. For cotton yarn, warp extra loose.
Tips for Weaving
Read our post 11 Tips for Pin Loom Weaving for more detail. Here are a few of our favorites:
- Leave a long tail for joining woven shapes together.
- Pack or beat the yarn after you weave a row. This will leave a gap for weaving the next row. You can use a kitchen fork for this!
- It’s ok to use both hands to weave. Use one hand to move the needle and the other to move strands in or out of the way for weaving.
Want another take on how to pin loom weave? Schacht spindle company has granted us permission to share their weaving images from the Zoom Loom. Learn more about How to Weave on a Pin Loom.
So what can you make with pin loom woven shapes? Check out our YarnovationsShop on Etsy for some fun ideas.

