Archives for December 2016

Crochet Cable Dishcloth and Tea Towel

Dishcloth+ Series: Celery Stalks Dishcloth and Tea Towel – pattern with crochet cables.

Dishcloth and Tea Towel with crochet cables

Create stunning cables in these two lovely kitchen accessories.

Dishcloth and Tea Towel
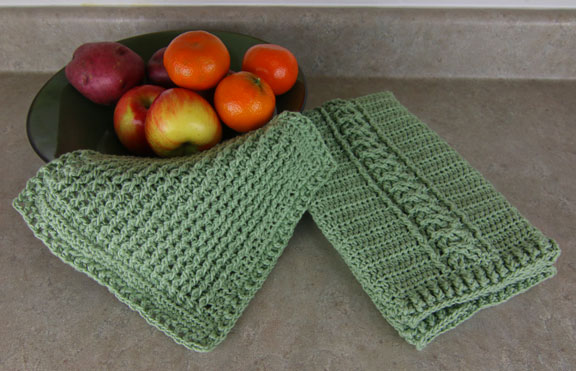
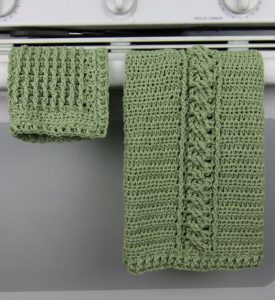
Whether you’re new to working post stitches or an old hat, the post work dishcloth is a must for your kitchen. The columns of stitches create a bumpy texture perfect for scrubbing pots and pans.

The tea towel takes crochet cables to a whole other level. Create a stunning tea towel as a house warming gift or for your own home.

Buy Now on Etsy

The Cabled Dishie and Tea Towel are available in our Etsy Shop.

Available on Etsy.

Buy Now on Etsy

This set is crocheted with  Fibra Natura Good Earth distributed by Universal Yarn. This cotton linen blend is perfect for going from sink to washing machine and back again.

Pin Loom Woven Gift Bags

Weave your own gift bags!


img_3526

Christmas is four days away and I decided today that I just had to weave 8 little drawstring gift bags for family members! Shouldn’t be too hard with a toddler and preschooler around. Not to mention that there is paint involved. What could go wrong?

I love these bags because they can be personalized to match the recipient and can be made for any season or reason. The color of yarn and stencil do all the work!

What you need:

Yarn

4 inch pin loom (I use the Zoom Loom)

Stencil and paint brush

Paint and some form of paint tray

Scissors, yarn needle

How-to Make a Drawstring Gift Bag

Plain weave 8 four inch squares per gift bag. I sewed the squares together so they were 2 x 4, then folded it in half so it was 2 x 2 with the top open. I always sew on the inside and use the double overcast method. It seems to make the nicest looking join on the front (in my humble opinion) and is sturdy for holding things in the bag.

Next I made a twisted cord. (I started with about 16 feet of yarn, twisted it, folded it in half and let it twist on itself.) Then I turned the bag inside out, folded the top of the bag over the cord, and sewed it to the bag making sure not to sew through the cord. I centered the cord in the bag and tied a knot about eight inches from the bag and trimmed off the rest.

img_3525

I bought several stencils at the store making sure they were small enough to fit on a project 8 inches square. I turned the bag right side out, inserted a piece  of paper in the bag (so the paint wouldn’t soak through to the other side), and painted the desired scene. To give it extra pizzazz, I used a Sharpie marker to add shading.

img_3523


And voila, I was on my way to making the gift bags I needed. Excuse me now, I need to weave more squares for the rest of the gift bags!