Graduate Gnome Pin Loom Pattern

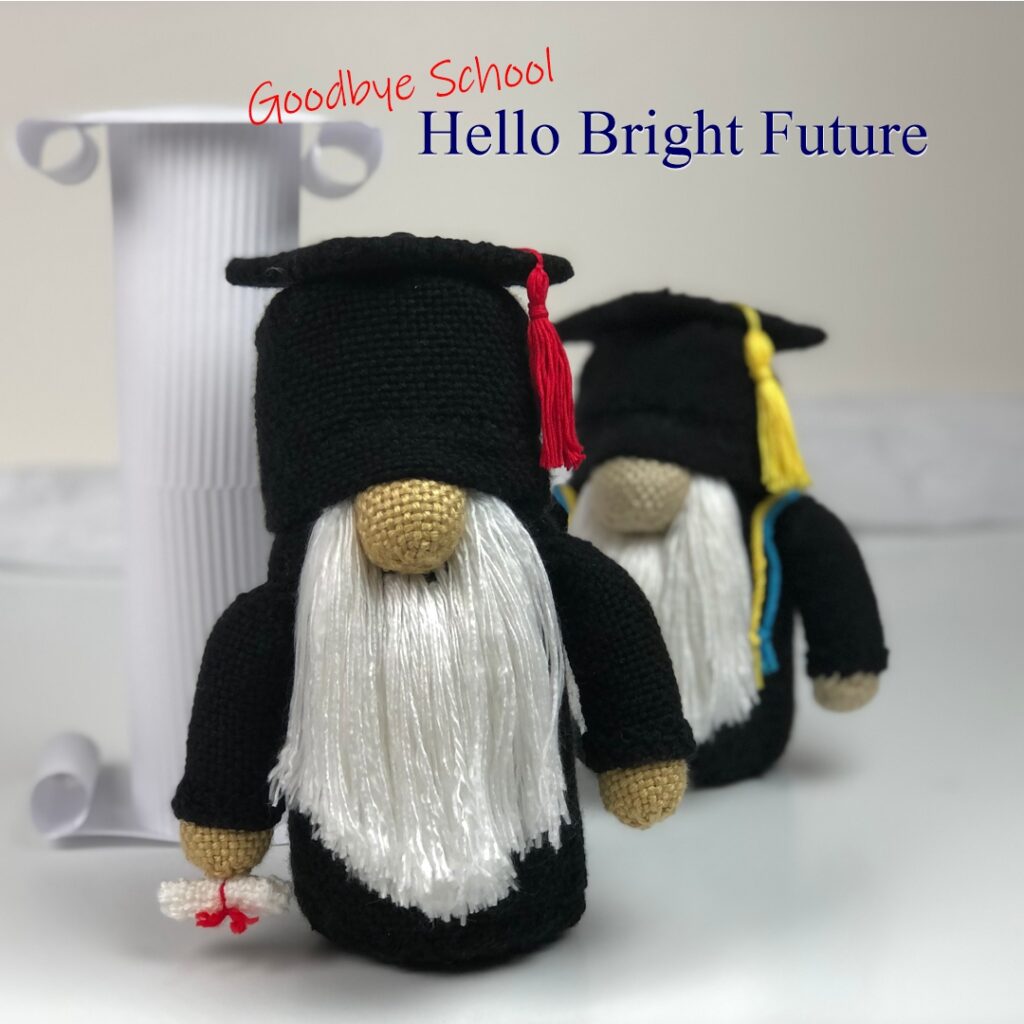
The tassel was worth the hassle. Celebrate their recent achievement with a hand woven graduate gnome stuffed toy. It’s fun and easy to make with this pin loom pattern.

This pin loom pattern includes step by step instructions for making an adorable graduate gnome that measure approximately 9 3/4″ tall x 6″ deep and 7 1/2″ wide. If you’re graduate has honor cords, the pattern includes instructions for making those, too.

Graduate Gnome Pin Loom Pattern PDF

The pin loom pattern to make the graduate gnome has step by step written instructions and lots of photos. It will tell you how to roll, tuck and sew pin loom woven squares and rectangles to create a gnome stuffed toy that looks like a graduate student who recently accepted their diploma. Here’s what’s included in the tutorial:

  • Gnome Instructions
  • Cap Instructions
  • Tassel Instructions
  • Honors Cords Instructions (and color meanings)
  • Step-by-Step Written Instructions
  • 30+ Photos and Charts
  • 15 Pages

Graduate Gnome Pin Loom Pattern on Etsy

The step-by-step Graduate Gnome Pin Loom Pattern PDF is available in our Etsy shop.

Available now on Etsy.

Buy the pattern on etsy

Pin the Graduate Gnome to Pinterest

Share the love, pin one of these graduate gnome photos to pinterest. We appreciate it so very much.

Thank you.

Reviews of Our Pin Loom Patterns

Our step-by-step gnome tutorials are fun and easy. Don’t just take our word for it…here’s what others are saying about our pin loom weaving patterns:

  • “Fun pattern. Matches description. Fast download.”
    Kim M.
  • “Very easy pattern to read.”
    Sandra H.
  • “Super explained, cute, everything done well.”
    Steffi K.

Graduate Gnome Pin Loom Materials List

The graduate gnome can be made with just 2 pin looms: 4″ square and 2″x4″ rectangle. The diploma can be made with a piece of paper or a 2″ square pin loom. If you opt to make it with yarn, than that would be a third pin loom. Here’s the complete materials list.

  • Pin Looms:
    • Squares: 4”; (2” optional)
    • Rectangles:  2” x 4”
  • Yarn:   Lion Brand: Basic Stitch – Medium Worsted Weight (4)
    • BLACK #153 – 150 yds
    • WHITE #100 – 37 yds
    • ALMOND #121L – 15 yds
  • Embroidery Thread: 1-3 skeins (1 for tassel, 1 per graduation cord)
  • Button: (1) 10mm
  • Plastic Canvas (or cardboard): 3” square
  • Needle:  6” needle for weaving and yarn needle for sewing
  • Stuffing
  • Fringe Twister or premade gold cord
  • Beans: to weigh the gnome down
  • Fabric Marker: – white
  • Pet comb: – metal
  • Steamer (optional)

The honors cords were made with a fringe twister. If you don’t have one, no worries. We’ve included a link to a video on how to make a cord without a fringe twister.

This is a really fun graduation gift. Make the gnome in black yarn or make it in the same color as the graduating student. It’s fun to give hand made gifts and this is one they will cherish.

All the shapes in this pin loom gnome are woven in plain weave. The chart at the beginning of the pattern will tell you how many shapes you need in each color so you can weave them all ahead of time, then assemble them at the end. You’ll be surprised at how easy it is to make this stuffed toy.

Graduate Gnome Pattern on Etsy

The Graduate Gnome Pin Loom Pattern PDF is available in our Etsy shop.

Available now on Etsy.

Buy the pattern on etsy

The pattern is for your eyes only. You have permission to give away or sell your finished project with credit to Yarnovations as the original designer.

Roman Soldier Gnome Pin Loom Pattern

It’s easier than you think to pin loom weave your own Roman Soldier. This step-by-step pattern will guide you every step of the way – showing you how to fold, tuck and sew squares and rectangles into a Roman Soldier Gnome including a helmet, spear, and shield.

Reviews of Our Pin Loom Patterns

Here’s what people are saying about our pin loom patterns:

  • “Well written pattern, nicely illustrated with good photos showing any tricky parts.”
  • “Well written pattern. Highly recommend her patterns.”
  • “This pattern in incredible and the designer is wonderful!”

The Roman Soldier Gnome Pin Loom Pattern is available in our Etsy shop.

About the Roman Soldier Gnome Pin Loom Pattern

The Roman Soldier Gnome measures approximately 13″ tall x 9″ wide and 5″ deep while holding the shield. This toy soldier tutorial includes:

  • Gnome Instructions
  • Helmet, Shield, Spear, Belt, etc. Instructions
  • Step by Step Written Instructions
  • 16 Pages
  • 40+ photos

Roman Soldier Gnome Pattern on Etsy

The Roman Soldier Gnome Pin Loom Pattern is now available in our Etsy shop for immediate download.

Available now on Etsy

Buy the pattern on etsy

Share the Love – Pin This to Pinterest

Share the love of pin loom weaving with the world, pin one of our images to pinterest.

Thank you!

More about the Roman Soldier Pin Loom Pattern

The Roman Soldier Gnome is made with only 5 pin looms. We use these sizes a lot. Here’s what you’ll need to make your own woven warrior:

  • Pin Looms: Square: 2” and 4”
  • Pin Looms: Rectangle: 1” x 4”, 2” x 4” and 2” x 6”
  • Yarn: Lion Brand: Basic Stitch – Medium (4)
    • RED HEATHER #400G – 100 yds
    • ALMOND #121L – 40 yds
    • SILVER HEATHER #404J – 100 yds
    • WHITE #100 – 120 yds
    • MUSTARD #158I – 20 yds
    • MAHOGANY #126AL – 40 yds
  • Needle: 6” needle for weaving and yarn needle for sewing
  • Stuffing
  • Beans: to weigh the gnome down
  • Felt: gold, 2” square
  • Fabric Glue
  • Skewer: 8 ½” long, wooden
  • Fabric Marker: – white, dark
  • Pins
  • Pet comb: – metal
  • Steamer (optional)
  • Spray Starch (optional)

Buy on Etsy

The Roman Soldier Gnome Pin Loom Pattern is now available in our Etsy shop for immediate download.

Available now on Etsy

Buy the pattern on etsy

Santa Gnome Pin Loom Pattern

Is that you, Santa Claus?

Weave your own Santa with gift sack with this easy to follow step-by-step tutorial for Pin Loom Weaving. This pattern is beginner friendly – everything is woven in plain weave and the tutorial shows you how to tuck, roll and cinch pin loom woven squares and rectangles into jolly old St. Nick gnome / stuffed toy.

The Santa Gnome Pin Loom Pattern includes:

  • Santa Claus Gnome
  • Santa Gift Sack
  • Step by Step Written Instructions
  • 40+ Color Photos
  • 18 Pages

The Santa Gnome Pin Loom Pattern is available on Etsy

This Santa Gnome Pin Loom Pattern step by step tutorial is now available in our Etsy Shop.

Available now on Etsy.

Buy the pattern on etsy

More about Santa Gnome Pin Loom Pattern

This version of Kris Kringle, aka Santa Claus, is made with worsted weight yarn. He’s approximately 12″ tall x 7″ wide x 4 1/2″ deep.

Only 3 pin looms are needed to make this festive home decor Santa Gnome. We use these pin looms all the time, especially in our Gnome series. You’ll need:

  • Square 4″
  • Rectangle 2″x4″
  • Rectangle 1″x4″

Share the Love, Pin a Photo to Pinterest

Share the love of pin loom weaving and Christmas by pinning one of these images to pinterst.

Thank you!

Materials Needed to Make Papa Noel

Chances are, you have most of the tools you’ll need to make this Papa Noel, aka Santa Claus, Gnome. Here’s what you’ll need:

  • Pin Looms: Squares: 4”
  • Pin Looms: Rectangles: 2” x 4” and 1” x 4”
  • Yarn: Lion Brand: Basic Stitch – Medium (4)
    • RED HEATHER #400g – 175 yds
    • BLACK #153 – 32 yds
    • ALMOND #121l – 16 yds
    • WHITE #100 – 132 yds
    • MUSTARD #158 – 4 yds
  • Needle: 6” needle for weaving and yarn needle for sewing
  • Stuffing
  • Beans: to weigh the gnome down
  • Fringe Twister, Gold Cord or Braided Yarn
  • Fabric Marker/Chalk: – white, dark
  • Straight Pins – (optional)
  • Pet Comb – metal (optional)
  • 1 ½” pompom maker
  • Steamer (optional)

Santa by Any Other Name

Santa Claus is known by many names: St. Nicholas, Sinterklaas, Kris Kringle, Papa Noel, and Father Christmas. No matter what you call him, this Gnome is sure to bring festive cheer this holiday season with a “Ho, Ho, Ho” and “Merry Christmas” to everyone you know.

Get Your Santa Gnome Pin Loom Pattern

The Santa Gnome Pin Loom Pattern step-by-step tutorial is now available in our Etsy Shop.

Available now on Etsy.

Buy the pattern on etsy

Frankenstein’s Monster Gnome Pattern

Frankenstein’s Monster just got a whole lot cuter. And now you can pin loom weave your own gnome. Here he is sporting a Frankenstein’s Monster hat and a trick or treat bag. He’s all ready for Halloween and a spooky night of trick or treating.

The PDF pattern is a step-by-step guide to pin loom weaving your own Frankenstein’s Monster and Pumpkin Trick or Treat Bag. Every shape is woven in plain weave. He measures 10″ tall x 7″ wide x 4 1/2″ deep.

Here’s what’s included in the Frankenstein’s Monster Gnome Pin Loom Pattern:

  • Gnome with Frankenstein’s Monster Hat
  • Pumpkin Trick or Treat Bag
  • 14 Pages
  • 35+ Color Photos and Charts
  • Detail Written Step-by-Step Instructions
  • Complete Materials List

Purchase Frankenstein’s Monster Pin Loom Pattern

Frankenstein’s Monster Pin Loom Pattern is now available to purchase in our Etsy Shop.

Available Now on Etsy.

Mary Shelley introduced Frankenstein’s Monster in her novel Frankenstein in 1818. The concept of electricity to spark life into Frankenstein’s monster was introduced later in James Whale’s 1931 film. The main plot remains consistent, but modifications are made with each adaptation of the story…and now he’s been changed once again. This time Frankenstein’s Monster is a Halloween costume and this gnome is hoping to gather a ton of candy in his oversize pumpkin trick or treat bag.

Pin These Frankenstein’s Monster Photos To Pinterest

Share the Love, pin one of these Photos to Pinterest

The Step-by-Step tutorial makes this gnome really easy to make. If you can pin loom weave, then you can make this gnome. He makes for a great handmade Halloween decoration. But…he’s also fantastic gift for those friends and family members who are fans of horror books and films.

Here’s what we used to construct our own pin loom woven Frankenstein’s Monster:

  • Pin Loom Squares: 4” and 1”
  • Pin Loom Rectangle: 2” x 4”
  • Pin Loom Triangle: 2”
  • Yarn:   Red Heart: Soft – Medium (4)
  •             GRAPE #3729 – 100 yds
  •             BLACK #4614 – 40 yds
  •             WHEAT #9388 – 25 yds
  •             GUACAMOLE #4420 – 20 yds
  •             LIGHT GREY HEATHER #9440 – 10 yds
  •             CORAL #9251 – 16 yds
  •             WHITE #4600 – 120 yds
  • Needle:  6” needle for weaving and yarn needle for sewing
  • Stuffing
  • Felt: Black, remnant
  • Button: (2) 5/8”
  • Beans: to weigh the gnome down
  • Fabric Marker/Chalk: – white, dark
  • Straight Pins – (optional)
  • Tacky or Fabric Glue
  • Pet Comb – metal (optional)
  • Steamer (optional)

Buy the PDF Pattern for Frankenstein’s Monster

Instant download for Frankenstein’s Monster Gnome Pin Loom Pattern is available in our Etsy Shop.

Available Now on Etsy.

Buy Now on Etsy

Toy Soldier Gnome Pin Loom Pattern

Make your own little drummer boy with this Toy Soldier Pin Loom Pattern. We’ll show step-by-step how easy it is to turn yarn into a nutcracker gnome with this PDF download. The toy was made with only 4 pin looms.

It’s quite adorable at 11 1/2″ tall. The finished measurements are approximately 6 1/2″ wide x 4 1/2″ deep x 11 1/2″ tall.

When you look closely at the drummer boy, you’ll notice extra little scallops on the sleeves and shoulders, etc. Lucky for us, this is a natural feature if pin loom shapes. It’s little “cheats” like that which give the illusion of grandeur to the toy soldier.

What’s in the Toy Soldier Gnome Pin Loom Pattern

This step-by-step tutorial for the Toy Soldier Gnome includes all of the following:

  • Toy Soldier Gnome Instructions
  • Drum Instructions
  • Step-by-Step Written Instructions
  • 17 Pages
  • 50+ Color Photos and Charts
  • Complete Materials List
  • Helpful Tips

Toy Soldier Gnome Pattern Available on Etsy

The Toy Soldier Gnome Pin Loom Pattern is available in our Etsy Shop.

Available now on Etsy.

Buy Now on Etsy

Pin the Toy Soldier Gnome to Pinterest

Share the love, pin these pictures to Pinterest.

More about the Toy Soldier Gnome Pin Loom Pattern

We rate the Toy Soldier Gnome as intermediate, but it’s very doable by the confident beginner. This gnome is made by folding, rolling and tucking woven shapes. The photos will show you step-by-step how to do that.

Here are the supplies you’ll need to make your own Nutcracker Gnome.

  • Pin Loom Squares: 2” and 4”
  • Pin Loom Rectangles:  1”x4” and 2”x4”
  • Yarn:   Caron Simply Soft –
  • Medium Worsted Weight (4)
  •             BLACK #727 – 55 yds
  •             WHITE #701 – 55 yds
  •             BONE #9388 – 15 yds
  •             HARVEST RED #763 – 75 yds
  •             OCEAN #759 – 40 yds
  •             GOLD #782 – 50 yds
  •             TAUPE #783 – 8 yds
  • Needle:  6” needle for weaving and yarn needle for sewing
  • Stuffing
  • Fringe Twister or premade gold cord – 14”
  • Beans: to weigh the gnome down
  • Fabric Marker: – white, dark, or chalk
  • Pet comb: – metal
  • Steamer (optional)
  • Starch or Hair Spray (optional)

We’ve added a little bonus at the end for turning the drum into a Christmas ornament. This little drummer boy would make a great decoration for a table or fireplace mantel. He’s also a great gift to make for your friends and family who love the Nutcracker ballet or have a passion for drums.

Get your copy of the Toy Soldier Gnome Pin Loom Pattern today.

Buy Now on Etsy

Viking Gnome Pin Loom Pattern

Make a Viking Gnome stuffed toy with yarn and pin looms! This little plushie is 12″ tall to the top of the horns. He’s surprisingly easy to make. The step-by-step tutorial will show you how to tuck, roll, pinch and cinch pin loom woven squares and rectangles to create this iconic Viking gnome.

There are a lot of little details that transform a simple gnome into a Viking. Most notable is the horned hat. What makes the “ironwork” so realistic is the two colors of “metal” yarn as well as the rivets that are made from felt. The bright orange braided beard is also a can’t-miss detail that makes this tough little Viking so adorable. The axe and shield complete the iconic image of a Viking.

Here’s what’s in the Viking Gnome Pin Loom Pattern:

  • 45+ Color Photos and Charts
  • 14 Pages
  • Step-by-Step written instructions
  • Complete materials list
  • Helpful tips

Viking Gnome Pattern Available on Etsy

This Viking Gnome Pin Loom Pattern is available for purchase in our Etsy Shop.

Available on Etsy.

Buy Now on Etsy

Pin This Viking Gnome to Pinterest

Share the love; pin one of these photos to Pinterest.

More About the Viking Gnome Pin Loom Pattern

This Viking Gnome Pattern, like our other gnome patterns, begins with a helpful chart listing the total number of pin loom shapes you’ll need for the project. This allows you to sit and weave all the squares and rectangles before you begin. Of course, you can weave them as you need them, or weave them all prior to beginning assembly.

There are two very small sections of crochet in this project. Single crochet (US terms) is used in both areas. The grey at the ends of the horns are crocheted, this is where the horn meets the helmet. The edge of the shield is also crocheted. This joins two pieces together and creates and “ironwork” edge.

What You’ll Need to Make the Viking Gnome

Here is the complete list of everything you’ll need to make the Viking Gnome. This list is also in the PDF Pattern.

  • Pin Loom Squares: 4” and 2”
  • Pin Loom Rectangles: 2” x 4” and 1” x 4”
  • Yarn:   Lion Brand: Basic Stitch – Medium (4)
  •             OLIVE #132 – 95 yds
  •             ECRU #098C – 25 yds
  •             SILVER HEATHER #404J – 35 yds
  •             CHARCOAL HEATHER #403J – 25 yds
  •             ALMOND #121L – 22 yds
  •             PUMPKIN #133A – 50 yds
  •             Lion Brand: Heartland – Medium (4)
  •             SEQUOIA #126U – 30 yds
  • Needle:  6” needle for weaving and
  •                yarn needle for sewing
  • Stuffing
  • Felt: Grey, 1” x 3”
  • Beans: to weigh the gnome down
  • Crochet Hook: – size G (optional)
  • Fabric Marker: – white, dark
  • Straight Pins
  • Tacky or Fabric GlueSteamer (optional

We wish your Viking gnome much success in his conquests and you in yours.

Buy the Viking gnome pin loom pattern on our Etsy shop.

Buy Now on Etsy

Football Fan Gnome Pin Loom Pattern

Weave a gnome mascot for your favorite football team. He’s so cute, your friends and family may want one, too! No worries, because this football fan gnome is really easy to make. The PDF step-by-step tutorial will show you how.

For example, the little football that the gnome is holding is made from a 2″x4″ rectangle. We have 4 photos that show you how to fold, tuck and sew it into the iconic football shape.

We provide helpful instructions for making certain details really pop. For instance, the beard is made with yarn that has been brushed with a metal cat comb to separate strands. Then steam ironed to straighten. It’s the little details that make this gnome really shine.

What’s included in the Football Fan Gnome Pin Loom pattern:

  • Gnome with Football Hat and Football
  • 25 Color photos and charts
  • Complete step-by-step written instructions
  • 11 Pages
  • Helpful Tips
  • Complete materials list

Football Fan Gnome Pin Loom Pattern Available on Etsy

The Football Fan Gnome Pin Loom Pattern is available in our Etsy Shop.

Available now on Etsy.

Buy Now on Etsy

More about the Football Fan Gnome

The materials needed to make your football fan gnome is surprisingly small. Some pin looms, yarn and stuffing are the main supplies. Specifically, you’ll need 4 pin looms. Here’s the complete list:

  • Pin Looms:     
  • Squares: 2” and 4”
  • Rectangles:  1” x 4” and 2” x 4”
  • Yarn:   Red Heart: Soft – Medium Worsted Weight (4)
  • BLACK #4614 – 95 yds
  • OFF WHITE #4601 – 55 yds
  • WHEAT #9388 – 15 yds
  • TANGERINE #4422 – 18 yds
  • TOAST #1882 – 75 yds
  • Needle:  6” needle for weaving and yarn needle for sewing
  • Stuffing
  • Beans: to weigh the gnome down
  • Fabric Marker: – white, dark
  • Pet comb: – metal
  • Steamer (optional)

Pin This to Pinterest

Share the Love: pin one of our images to Pinterest.

Great for Beginners

As we’ve mentioned, this is a great pattern for new weavers and those wanting to make toys for the first time. And it’s so cute, experienced weavers will enjoy making them, too. So, if you’re brand new to pin loom weaving, welcome!

The best way to get started is Etsy and YouTube. There are many shops that sell pin looms in all the sizes we use here. YouTube will show you how to weave and, if you’re so inclined, will show you how to make your own looms!

Here’s to playing a good game and being a super fan!

Buy the Football Fan Gnome Pin Loom Pattern in our Etsy Stop.

Buy Now on Etsy

Statue of Liberty Gnome Pin Loom Pattern

Weave your own Lady Liberty with pin looms! This step-by-step PDF pattern will show you how to transform simple squares and rectangles into your very own Statue of Liberty Gnome toy.

This plushie has many similarities to the actual Statue of Liberty. The torch, tablet and crown being the key elements. But did you also notice the broken chain? Because of the nature of pin loom weaving and the size of the project, this stuffed gnome isn’t an exact replica, but she is pretty darn cute!

What’s Included in the Statue of Liberty PDF Pattern?

  • Statue of Liberty with crown, torch and tablet
  • Detailed writtten instructions
  • 30+ color photos
  • 16 Pages
  • Tips and Tricks for shaping and finishing

Statue of Liberty Gnome PDF Pattern Available Now

The Statue of Liberty Gnome PDF Pattern is now available in our Etsy Shop.

Available Now on Etsy.

Buy Now on Etsy

This gnome was made with medium worsted weight (4) yarn. Any worsted weight should work. We love the color of Red Heart Soft in Sea Foam #9520. Besides the usual items like stuffing, the other odd item needed is black felt. Let’s take a look at what you need more closely.

What You’ll Need to Weave Statue of Liberty.

  • Pin Looms:   Squares: 2” and 4”,
  • Pin Looms: Rectangles: and 2” x 4” and 2”x6” and
  • Pin Looms: Rectangle: 1” x 4” (for the chains only)
  • Yarn:   Red Heart: Soft – Medium (4) SEA FOAM #9520 –  250 yds
  • Lion Brand: Basic Stitch – Medium (4) MUSTARD #158I – 5 yds
  • Needles:  6” needle for weaving and yarn needle for sewing
  • Stuffing
  • Felt – black, ½” x 5” strip
  • Fabric Glue
  • Beans to weigh the gnome down
  • Pet comb – metal
  • Steamer (optional)

Pin This Statue of Liberty Gnome Pin Loom Pattern to Pinterest

Share the love; pin this Statue of Liberty Gnome Pin Loom Tutorial to Pinterest.

About the Statue of Liberty and the Gnome

Liberty Enlightening the World is a statue more commonly referred to as the Statue of Liberty. Libertas, the Roman Goddess of Liberty, holds a torch and tablet, and stands in New York Harbor. She is a copper statue, given to the United States by France, and dedicated in 1886. There is a broken chain and shackle at her feet symbolizing the abolition of slavery in the United States. Though this gnome only has 5, Liberty has 7 rays forming a halo that represent the sun, the seven seas and the seven continents. There are 25 windows in the crown for viewing the harbor (the gnome has 11).

This gnome has a simple construction with components added to it that represent elements on the real statue. For instance, the Statue of Liberty is wearing robe, the gnome is wearing a sash. The halo, or rays, on the gnome is a band attached to the hat. Little bits of felt create the windows.

Get your copy of the Statue of Liberty Gnome Pin Loom Pattern on our Etsy Shop.

Buy Now on Etsy

Shark Attack Gnome

Shark Attack Gnome Pin Loom Pattern

This beach loving gnome spent a bit too much time in the water. His magnetic personality attracted a hammerhead shark and a trio of starfish!

Weave your own hammerhead shark gnome with this easy to follow tutorial. The Shark Attack Gnome Pin Loom Pattern includes:

  • 25+ Photos and Charts
  • 14 Pages
  • Step-by-Step Instructions
  • Hammerhead Shark
  • Gnome
  • 2 Types of Starfish

Several sizes of pin looms were used to create this beachy gnome. You’ll need:

  • Square Looms in 4″ and 2″ and 1″
  • Rectangle Looms in 1″x4″ and 2″x4″
  • Triangle Loom in 2″

Every element is plain weave woven on a pin loom except the shark teeth which are crocheted.

Get your Shark Attack Gnome Pin Loom Pattern today on our Etsy Shop.

Available now on:

Pin Shark Attack Gnome to Pinterest

Share the love; pin Shark Attack Pin Loom Gnome Pattern to Pinterest.

About Shark Attack Gnome Pin Loom Pattern

The assembled gnome measures about 18″ tall x 7″ wide x 5 1/2″ deep.

The pattern provides a chart of how many shapes are needed and in what color so you can weave them all ahead of time before you begin assembling the project. The yarn used was Lion Brand Basic Stitch.

There are helpful tips in the pattern. For the beard, for example, the pattern will mentioned that the yarn should be attached above the nose so the shark hat covers it. And that a metal cat comb was used to separate the strands making the beard appear more full. And a steam iron will help straighten out the yarn.

The shark is created separately and sits on the gnome like a hat.

The pattern includes a tutorial for making 2 different types of starfish. These were made on 1″ square looms.

Though the pattern is for your eyes only, we encourage you to give away or sell your finished projects.

Enjoy!

Gingham Gnome Pin Loom Pattern

This pin loom gnome has gorgeous fashion sense! Make your own gnome, hat and muff and learn a new pattern for pin loom weaving.

This step-by-step tutorial will show you how to use two colors to make a square and a rectangle with a quadrant print which looks just like gingham. The pattern has lots of photos and clear written instructions for making the gnome, hat and muff, too.

The Gingham Gnome Pattern includes:

  • Instructions to make a Gnome, Hat and Muff
  • Instructions to make a Gingham Square and Rectangle
  • 12 pages with color photos
  • Step-by-Step written instructions

PDF Download for Gingham Gnome Pin Loom Pattern Available Now.

The Gingham Gnome Pin Loom Pattern is available in our Etsy shop.

Available now on Etsy.

Buy Now on Etsy

Pin the Gingham Gnome to Pinterest

Share the love; pin this Gingham Gnome to pinterest.

More About the Gingham Gnome Pin Loom Pattern

You’ll be surprised at how easy it is to make this gnome. We list it as intermediate because of all the folding, tucking and sewing but this step-by-step tutorial will make it easy and fun to create.

What you’ll need to make this Gingham Gnome:

  • Pin Looms: –4” square, 2” x 4” rectangle
  • Yarn:   Red Heart: Soft – Medium (4)
  •  BLACK #4614 – 130 yds
  •  OFF WHITE #4601 – 45 yds
  •  WHITE #4600 – 50 yds
  • WHEAT #9388 – 10 yds
  • Needle:  6” needle for weaving and yarn needle for sewing
  • Pompom Maker: – 1 ¾” pom pom
  • Stuffing
  • Beans: to weigh the gnome down
  • Crochet Hook: – size G (optional)
  • Fabric Marker: – white, dark
  • Pet comb: – metal
  • Steamer (optional)

About Pin Loom Weaving the Gingham Gnome

This gingham gnome is made with only two pin looms: 4″ square and 2″x4″ rectangle. That’s all! It’s hard to imagine that this cute little gnome is made with only squares and rectangles, but simple folds, rolls and tucks transform simple shapes into a darling toy.

The base of the gnome is stuffed with beans to give it weight and prevent it from wabbling about. The rest is filled with polyfill stuffing.

The beard is made with yarn, then combed with a metal cat come to separate the strands. Then a steam iron was used to straighten out the yarn. These little details really make the beard shine.

Get your copy of the Gingham Gnome Pin Loo Pattern in our Etsy Shop.

Buy Now on Etsy