Shells and Lace Crochet Baby Blanket Set

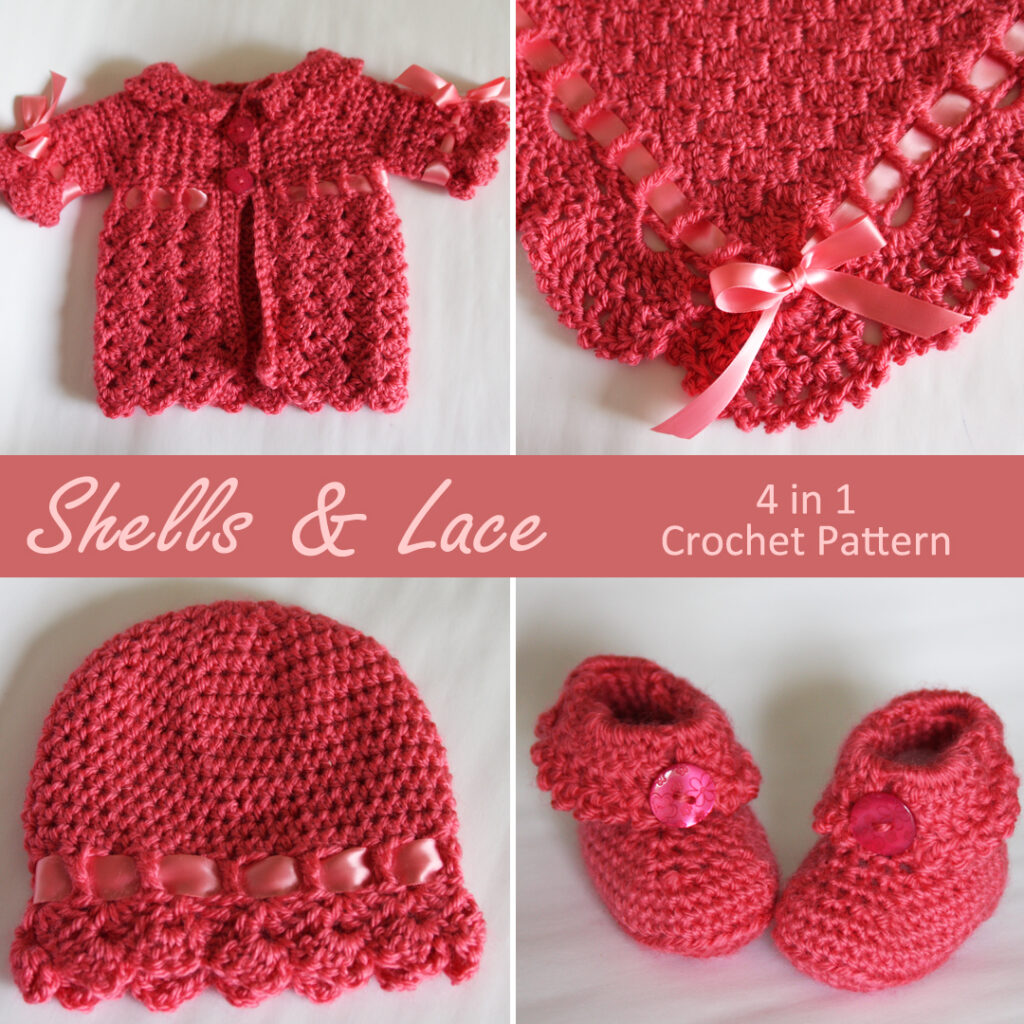
The Shells and Lace crochet baby blanket pattern set is surprisingly quick to stitch, and it comes with 3 accessories making it a great baby shower gift. This pattern set includes a baby blanket, sweater, hat and booties for newborns.

The baby blanket measures 27″ wide x 36″ tall.

The Shells and Lace pattern looks great in so many colors. We’ve stitched one in pink and one in blue. They are so sweet! The main stitch of the baby blanket is corner-to-corner with a twist. The edging is stitched in 5 rounds and it adds a gorgeous finish to the solid center panel.

Corner to Corner – C2C In Rows!

Did I mention this is a fun pattern to crochet? Sooo much fun.

The main pattern of the baby blanket is like corner-to-corner but better! This is worked in rows without any decreases or increases. In fact, it has a one row repeat. It’s made in a rectangle rather than from corner to corner. No more worrying about when to make a corner. This C2C stitch is worked back and forth until you have the length needed.

The blanket is a great project to work on while watching tv or at a ball game, because you just need to glance down every so often to work a cluster.

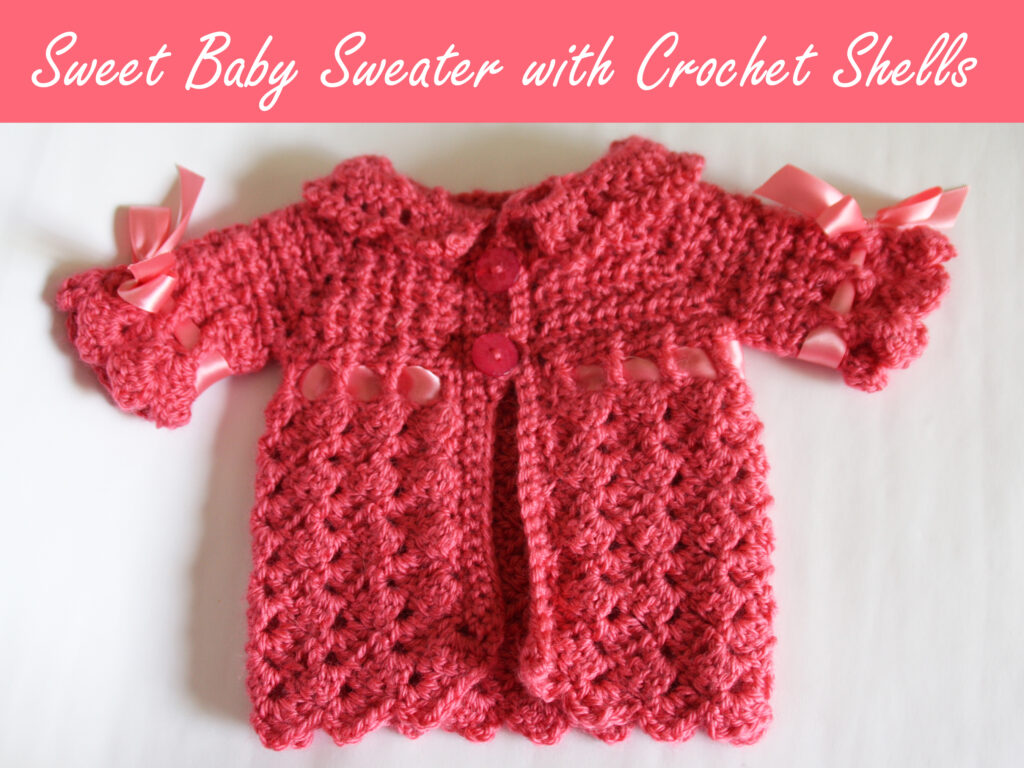
Shells and Lace includes a Newborn Baby Sweater

Yep, you read that right. The Shells and Lace crochet pattern includes a newborn baby sweater. It coordinates with the baby blanket with a bit of corner-to-corner stitching.

The collar has a bit of the crochet shell pattern found on the edging of the baby blanket, too.

newborn baby sweater crochet pattern with some corner-to-corner stitch

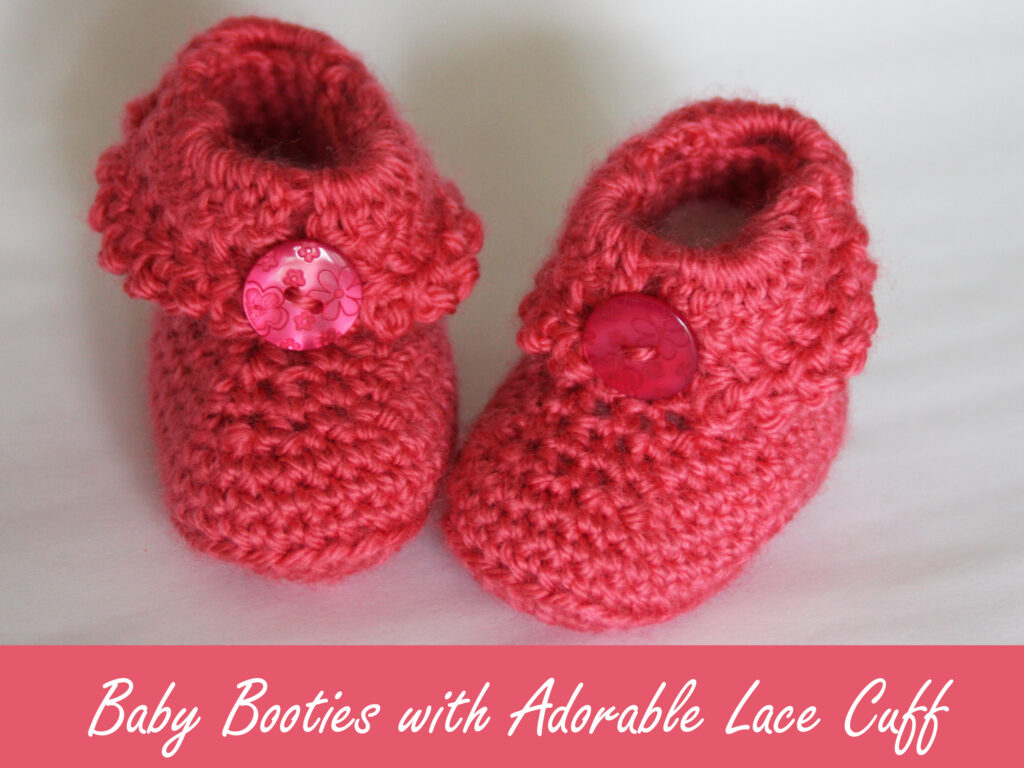
Shells and Lace includes Baby Booties

Oh yeah. The fun continues with adorable newborn baby booties. The main body of the baby booties is single crochet, but the cuffs are similar to the shells edging the Shells and Lace Baby Blanket Pattern.

We’ve attached cute pink buttons, but we’ve also seen these dressed up with little daisy buttons, too. We recommend that you crochet the booties then take them to the store to select a pair of sweet and whimsical buttons.

baby booties with shell cuff crochet pattern

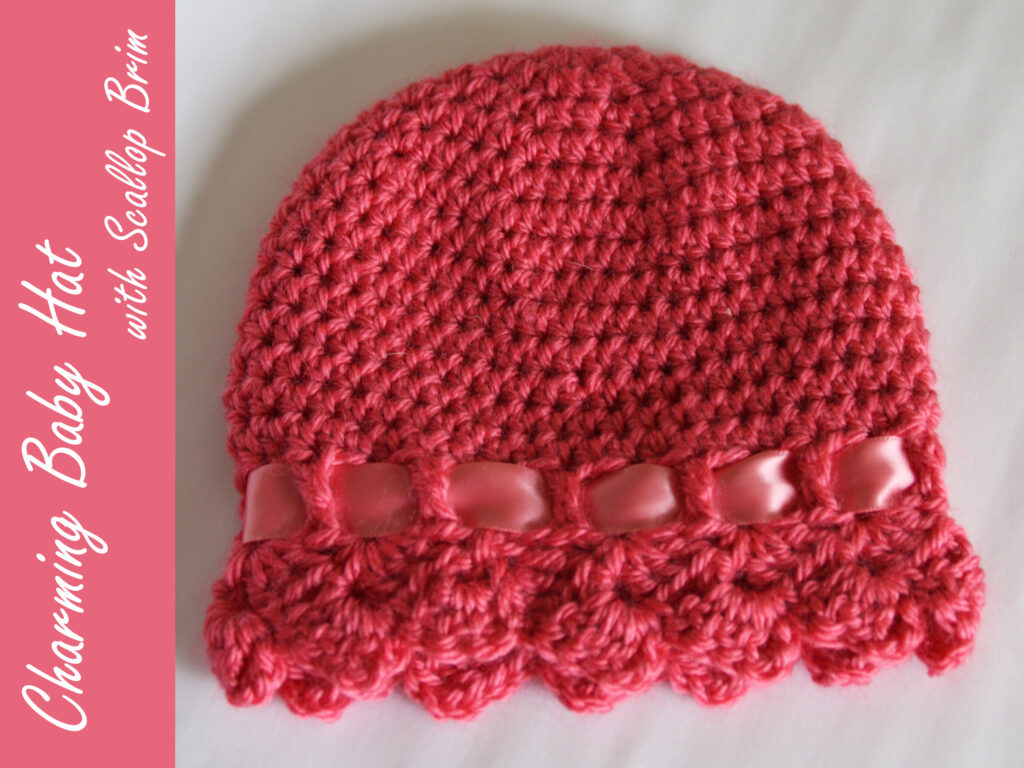
Shells and Lace includes Newborn Hat

The set wouldn’t be complete without a baby hat! This newborn beanie is stitched in half double crochet and edged with corner-to-corner stitch. Yep, corner-to-corner makes a great edging! Who knew?

newborn baby hat crochet pattern

Pin to Pinterest

Share the love, pin our pictures to pinterest.

4 in 1 Crochet Newborn Set Available on Etsy

The Shells and Lace Baby Blanket Set crochet pattern is available in our Etsy Shop.

Available now on Etsy.

Buy the pattern on etsy

4 in 1 Crochet Pattern includes:

  • Baby Blanket: 27″ x 36″
  • Newborn Baby Hat
  • Newborn Sweater
  • Newborn Baby Booties

More about the Shells and Lace Baby Set

Shells and Lace Crochet Baby Set was made with a size 3 light weight yarn.

  • Yarn: Bernat Softee Baby: Light Weight (3) Soft Red

Stitched in USA abbreviations:

  • ch = chain
  • dc = double crochet
  • dec = decrease
  • hdc = half double crochet
  • inc = increase
  • picot = ch 3, sl st in 3rd ch from hook
  • rnd = round; work in the round
  • sc = single crochet
  • sc inc = single crochet increase; two single crochet in the same stitch
  • sl st = slip stitch
  • st(s) = stitch(es)
  • trc = treble / triple crochet
  • *instructions* = repeat the instructions written between the ** the number of times indicated after the second *
  • [instructions] = repeat the instructions written between the [ ] the number of times indicated after the ]

About the Shells and Lace Crochet Pattern

The pattern was written as part of the Twins Face Off in 2015 where Deborah and Dana each made a baby set and asked people to vote for their favorite. The pattern has not been modified.

The pattern is not written as a beginner pattern. There’s nothing complicated, but the pattern is a bit abbreviated which a beginner may find confusing. We assume one stitch will be worked in each stitch and only specify if multiple stitches are worked in the same space or stitch. For example:

  • “8 hdc, 3 hdc in next st”
  • This means to hdc in each of the next 8 sts, then 3 hdc in the next st.

This abbreviated version of pattern writing allows you to read each line more quickly and condenses the pattern.

Get Shells and Lace Baby Set on Etsy

Purchase your copy of Shells and Lace Baby Blanket Set crochet pattern in our Etsy Shop.

Available now on Etsy.

Buy the pattern on etsy

The pattern is for your eyes only. We give you permission to give away and sell your finished projects with credit to Yarnovations.com as pattern designers.

Frankenstein’s Monster Gnome Pattern

Frankenstein’s Monster just got a whole lot cuter. And now you can pin loom weave your own gnome. Here he is sporting a Frankenstein’s Monster hat and a trick or treat bag. He’s all ready for Halloween and a spooky night of trick or treating.

The PDF pattern is a step-by-step guide to pin loom weaving your own Frankenstein’s Monster and Pumpkin Trick or Treat Bag. Every shape is woven in plain weave. He measures 10″ tall x 7″ wide x 4 1/2″ deep.

Here’s what’s included in the Frankenstein’s Monster Gnome Pin Loom Pattern:

  • Gnome with Frankenstein’s Monster Hat
  • Pumpkin Trick or Treat Bag
  • 14 Pages
  • 35+ Color Photos and Charts
  • Detail Written Step-by-Step Instructions
  • Complete Materials List

Purchase Frankenstein’s Monster Pin Loom Pattern

Frankenstein’s Monster Pin Loom Pattern is now available to purchase in our Etsy Shop.

Available Now on Etsy.

Mary Shelley introduced Frankenstein’s Monster in her novel Frankenstein in 1818. The concept of electricity to spark life into Frankenstein’s monster was introduced later in James Whale’s 1931 film. The main plot remains consistent, but modifications are made with each adaptation of the story…and now he’s been changed once again. This time Frankenstein’s Monster is a Halloween costume and this gnome is hoping to gather a ton of candy in his oversize pumpkin trick or treat bag.

Pin These Frankenstein’s Monster Photos To Pinterest

Share the Love, pin one of these Photos to Pinterest

The Step-by-Step tutorial makes this gnome really easy to make. If you can pin loom weave, then you can make this gnome. He makes for a great handmade Halloween decoration. But…he’s also fantastic gift for those friends and family members who are fans of horror books and films.

Here’s what we used to construct our own pin loom woven Frankenstein’s Monster:

  • Pin Loom Squares: 4” and 1”
  • Pin Loom Rectangle: 2” x 4”
  • Pin Loom Triangle: 2”
  • Yarn:   Red Heart: Soft – Medium (4)
  •             GRAPE #3729 – 100 yds
  •             BLACK #4614 – 40 yds
  •             WHEAT #9388 – 25 yds
  •             GUACAMOLE #4420 – 20 yds
  •             LIGHT GREY HEATHER #9440 – 10 yds
  •             CORAL #9251 – 16 yds
  •             WHITE #4600 – 120 yds
  • Needle:  6” needle for weaving and yarn needle for sewing
  • Stuffing
  • Felt: Black, remnant
  • Button: (2) 5/8”
  • Beans: to weigh the gnome down
  • Fabric Marker/Chalk: – white, dark
  • Straight Pins – (optional)
  • Tacky or Fabric Glue
  • Pet Comb – metal (optional)
  • Steamer (optional)

Buy the PDF Pattern for Frankenstein’s Monster

Instant download for Frankenstein’s Monster Gnome Pin Loom Pattern is available in our Etsy Shop.

Available Now on Etsy.

Buy Now on Etsy

Toy Soldier Gnome Pin Loom Pattern

Make your own little drummer boy with this Toy Soldier Pin Loom Pattern. We’ll show step-by-step how easy it is to turn yarn into a nutcracker gnome with this PDF download. The toy was made with only 4 pin looms.

It’s quite adorable at 11 1/2″ tall. The finished measurements are approximately 6 1/2″ wide x 4 1/2″ deep x 11 1/2″ tall.

When you look closely at the drummer boy, you’ll notice extra little scallops on the sleeves and shoulders, etc. Lucky for us, this is a natural feature if pin loom shapes. It’s little “cheats” like that which give the illusion of grandeur to the toy soldier.

What’s in the Toy Soldier Gnome Pin Loom Pattern

This step-by-step tutorial for the Toy Soldier Gnome includes all of the following:

  • Toy Soldier Gnome Instructions
  • Drum Instructions
  • Step-by-Step Written Instructions
  • 17 Pages
  • 50+ Color Photos and Charts
  • Complete Materials List
  • Helpful Tips

Toy Soldier Gnome Pattern Available on Etsy

The Toy Soldier Gnome Pin Loom Pattern is available in our Etsy Shop.

Available now on Etsy.

Buy Now on Etsy

Pin the Toy Soldier Gnome to Pinterest

Share the love, pin these pictures to Pinterest.

More about the Toy Soldier Gnome Pin Loom Pattern

We rate the Toy Soldier Gnome as intermediate, but it’s very doable by the confident beginner. This gnome is made by folding, rolling and tucking woven shapes. The photos will show you step-by-step how to do that.

Here are the supplies you’ll need to make your own Nutcracker Gnome.

  • Pin Loom Squares: 2” and 4”
  • Pin Loom Rectangles:  1”x4” and 2”x4”
  • Yarn:   Caron Simply Soft –
  • Medium Worsted Weight (4)
  •             BLACK #727 – 55 yds
  •             WHITE #701 – 55 yds
  •             BONE #9388 – 15 yds
  •             HARVEST RED #763 – 75 yds
  •             OCEAN #759 – 40 yds
  •             GOLD #782 – 50 yds
  •             TAUPE #783 – 8 yds
  • Needle:  6” needle for weaving and yarn needle for sewing
  • Stuffing
  • Fringe Twister or premade gold cord – 14”
  • Beans: to weigh the gnome down
  • Fabric Marker: – white, dark, or chalk
  • Pet comb: – metal
  • Steamer (optional)
  • Starch or Hair Spray (optional)

We’ve added a little bonus at the end for turning the drum into a Christmas ornament. This little drummer boy would make a great decoration for a table or fireplace mantel. He’s also a great gift to make for your friends and family who love the Nutcracker ballet or have a passion for drums.

Get your copy of the Toy Soldier Gnome Pin Loom Pattern today.

Buy Now on Etsy

Bear Pillow Sewing Pattern

Looking for a bear sewing pattern? Look no further. This step-by-step tutorial will guide you through each step of turning fabric into a cute and cuddly bear pillow. Mix and match your fabric to make your own one of a kind bear.

This sewing project is so much fun, and easy, that we kept coming up with more bears to make. This tutorial is great for making all kinds of bears such as: Asiatic black bear (moon bear), brown bear (including grizzly), giant panda, North American black bear, polar bear, sloth bear, Andean bear (spectacled), and sun bear!

Not only that, this bear pillow is festive, too. One can be made for various holidays by changing out the fabric on the scarf. These are great for new baby, nursery and baby shower gifts, Christmas, Halloween, and going away to college gifts. They also make great gifts for boys and gifts for girls, memory bears, gifts for bear enthusiasts and bears for those who love to cuddle.

They can also be a heartfelt and thoughtful gift for someone that has lost a loved one. Sew the bear with a shirt that belonged to their special person and they can hug it in times of sorrow.

The bear sewing pattern includes:

  • Bear Pillow Pal Rectangular Pillow Pattern
  • Panda Bear Instructions
  • Bamboo Instructions
  • Step-by-Step Written Instructions
  • 25+ Color Photos
  • 10 Printable Template Pages (8.5″x11″)
  • Complete Materials List
  • Helpful Tips
  • Information About Sewing Machine Settings
  • Links to helpful videos

The finished measurements of the bear pillow are approximately 16″ wide x 3 1/2″ deep x 12″ tall. The templates are drawn at 100% and can be printed on 8.5″ x 11″ paper. So you’ll need to cut out the templates and tape pieces together.

Bear Pillow Available on Etsy

Our bear pillow sewing pattern is available in our Etsy Shop.

Available now on Etsy.

Buy Now on Etsy

More About the Bear Pillow Pattern

Bonus: Panda and Bamboo are included!

This bear pillow pattern can be sewn in an afternoon if you have all the supplies. Here’s what you’ll need to sew your own bear pillow:

  • Pattern Pieces: Template included with pattern
  • Fabric: Head Color: 20” x 10”
  • Snout Color: 12” x 5”
  • Scarf Color: 25” x 12”
  • Bamboo: 25” x 4” per stalk
  • Felt: Black – 1 sheet (10” x 5”)
  • Thread: To match felt and fabric
  • Straight Pins and Needle
  • Stuffing: Approximately 8-10 oz of Poly-fil or 12”x16” pillow form
  • Scissors
  • Sewing Machine
  • Pencil, Pen or Chaulk

Pin a Picture to Pinterest

Share the love, pin these pictures to Pinterest.

Even More about the Bear Sewing Pattern

This is a great pattern for sewists of all abilities from the brand new to the seasoned enthusiast. The tutorial includes information about how to set up your sewing machine and different stitches to use. Three different stitches were used on the bear because sometimes the fabric is sewn on the right side and sometimes on the wrong side.

The pattern will take you step-by-step with written instructions and helpful color photos. Helpful tips and included as well as links to videos that will show you different sewing techniques.

So, pick out your fabric and head over to Etsy for your copy of the Bear Pillow Sewing Pattern.

This pattern is for your eyes only. We encourage you to give away or sell your finished projects and ask that you mention Yarnovations.com as designer. Thanks.

Get your copy of the Bear Pillow Sewing Pattern on Etsy.

Buy Now on Etsy

Viking Gnome Pin Loom Pattern

Make a Viking Gnome stuffed toy with yarn and pin looms! This little plushie is 12″ tall to the top of the horns. He’s surprisingly easy to make. The step-by-step tutorial will show you how to tuck, roll, pinch and cinch pin loom woven squares and rectangles to create this iconic Viking gnome.

There are a lot of little details that transform a simple gnome into a Viking. Most notable is the horned hat. What makes the “ironwork” so realistic is the two colors of “metal” yarn as well as the rivets that are made from felt. The bright orange braided beard is also a can’t-miss detail that makes this tough little Viking so adorable. The axe and shield complete the iconic image of a Viking.

Here’s what’s in the Viking Gnome Pin Loom Pattern:

  • 45+ Color Photos and Charts
  • 14 Pages
  • Step-by-Step written instructions
  • Complete materials list
  • Helpful tips

Viking Gnome Pattern Available on Etsy

This Viking Gnome Pin Loom Pattern is available for purchase in our Etsy Shop.

Available on Etsy.

Buy Now on Etsy

Pin This Viking Gnome to Pinterest

Share the love; pin one of these photos to Pinterest.

More About the Viking Gnome Pin Loom Pattern

This Viking Gnome Pattern, like our other gnome patterns, begins with a helpful chart listing the total number of pin loom shapes you’ll need for the project. This allows you to sit and weave all the squares and rectangles before you begin. Of course, you can weave them as you need them, or weave them all prior to beginning assembly.

There are two very small sections of crochet in this project. Single crochet (US terms) is used in both areas. The grey at the ends of the horns are crocheted, this is where the horn meets the helmet. The edge of the shield is also crocheted. This joins two pieces together and creates and “ironwork” edge.

What You’ll Need to Make the Viking Gnome

Here is the complete list of everything you’ll need to make the Viking Gnome. This list is also in the PDF Pattern.

  • Pin Loom Squares: 4” and 2”
  • Pin Loom Rectangles: 2” x 4” and 1” x 4”
  • Yarn:   Lion Brand: Basic Stitch – Medium (4)
  •             OLIVE #132 – 95 yds
  •             ECRU #098C – 25 yds
  •             SILVER HEATHER #404J – 35 yds
  •             CHARCOAL HEATHER #403J – 25 yds
  •             ALMOND #121L – 22 yds
  •             PUMPKIN #133A – 50 yds
  •             Lion Brand: Heartland – Medium (4)
  •             SEQUOIA #126U – 30 yds
  • Needle:  6” needle for weaving and
  •                yarn needle for sewing
  • Stuffing
  • Felt: Grey, 1” x 3”
  • Beans: to weigh the gnome down
  • Crochet Hook: – size G (optional)
  • Fabric Marker: – white, dark
  • Straight Pins
  • Tacky or Fabric GlueSteamer (optional

We wish your Viking gnome much success in his conquests and you in yours.

Buy the Viking gnome pin loom pattern on our Etsy shop.

Buy Now on Etsy

Football Fan Gnome Pin Loom Pattern

Weave a gnome mascot for your favorite football team. He’s so cute, your friends and family may want one, too! No worries, because this football fan gnome is really easy to make. The PDF step-by-step tutorial will show you how.

For example, the little football that the gnome is holding is made from a 2″x4″ rectangle. We have 4 photos that show you how to fold, tuck and sew it into the iconic football shape.

We provide helpful instructions for making certain details really pop. For instance, the beard is made with yarn that has been brushed with a metal cat comb to separate strands. Then steam ironed to straighten. It’s the little details that make this gnome really shine.

What’s included in the Football Fan Gnome Pin Loom pattern:

  • Gnome with Football Hat and Football
  • 25 Color photos and charts
  • Complete step-by-step written instructions
  • 11 Pages
  • Helpful Tips
  • Complete materials list

Football Fan Gnome Pin Loom Pattern Available on Etsy

The Football Fan Gnome Pin Loom Pattern is available in our Etsy Shop.

Available now on Etsy.

Buy Now on Etsy

More about the Football Fan Gnome

The materials needed to make your football fan gnome is surprisingly small. Some pin looms, yarn and stuffing are the main supplies. Specifically, you’ll need 4 pin looms. Here’s the complete list:

  • Pin Looms:     
  • Squares: 2” and 4”
  • Rectangles:  1” x 4” and 2” x 4”
  • Yarn:   Red Heart: Soft – Medium Worsted Weight (4)
  • BLACK #4614 – 95 yds
  • OFF WHITE #4601 – 55 yds
  • WHEAT #9388 – 15 yds
  • TANGERINE #4422 – 18 yds
  • TOAST #1882 – 75 yds
  • Needle:  6” needle for weaving and yarn needle for sewing
  • Stuffing
  • Beans: to weigh the gnome down
  • Fabric Marker: – white, dark
  • Pet comb: – metal
  • Steamer (optional)

Pin This to Pinterest

Share the Love: pin one of our images to Pinterest.

Great for Beginners

As we’ve mentioned, this is a great pattern for new weavers and those wanting to make toys for the first time. And it’s so cute, experienced weavers will enjoy making them, too. So, if you’re brand new to pin loom weaving, welcome!

The best way to get started is Etsy and YouTube. There are many shops that sell pin looms in all the sizes we use here. YouTube will show you how to weave and, if you’re so inclined, will show you how to make your own looms!

Here’s to playing a good game and being a super fan!

Buy the Football Fan Gnome Pin Loom Pattern in our Etsy Stop.

Buy Now on Etsy

Hammerhead Shark Pin Loom Pattern

Don’t wait for shark week to pin loom weave your own hammerhead shark stuffed animal! These pups are so fun and super adorable at only 10″ long. Real pups are about 24″ long when born, so these are about half the size.

Not only is this hammerhead shark adorable, we’ve made it really easy for you to make your own because we’ve created a step-by-step tutorial with lots of great photos and easy to follow directions.

What’s in the hammerhead shark pin loom PDF pattern tutorial?

  • Step-by-Step Written Instructions
  • 30 Color Photos
  • 7 Pages
  • Helpful Tips
  • Complete Materials List

Hammerhead Shark Pattern on Etsy

We’ve made the Hammerhead Shark Pin Loom Pattern available in our Etsy Shop.

Available now on Etsy.

Buy Now on Etsy

Share on Pinteret

Share the love, pin this photo to Pinterest.

In the photo above, the hammerhead shark is sitting on a diorama of coral. The entire coral reef is made from pin loom woven shapes. Unfortunately, there is no pattern at this time. There is a Starfish Pin Loom Pattern in our Etsy shop if you are looking for other sea creatures.

What You’ll Need to Weave a Hammerhead Shark

The materials list is surprisingly small for this hammerhead shark stuffed animal. In fact, it uses only 73 yards of yarn total! Here’s the complete list.

  • Pin Looms:   Squares: 1”, 2”, and 4”; (1” square loom is optional)
  •          Rectangles: 2” x 4” and 2” x 6”,
  •          Triangle: 2”
  • Yarn:   Lion Brand: Basic Stitch – Medium Worsted Weight (4)
  •             ECRU #098C – 25 yds
  •             SILVER HEATHER #404J – 45 yds
  •             CHARCOAL HEATHER #403J – 3 yds
  • Needle:  6” needle for weaving and
  •                yarn needle for sewing
  • Safety eyes (2) 8 mm
  • Stuffing

This hammerhead shark measures approximately 10″ long x 5 1/2″ wide x 3″ tall.

As you can see in the picture above, we’ve woven one hammerhead shark with all the fins a real hammerhead shark has. The other has fewer fins. But we think you’ll agree, both versions are super cute.

The Hammerhead Shark Pin Loom Pattern is available in our Etsy shop.

Buy Now on Etsy

Snake Sewing Pattern

Looking for a fun toy for the kids? Snakes are a blast to play with and they look great in a wide variety of fabric! This step-by-step sewing tutorial has printable templates to make a 21″ long snake. What makes this particular pattern unique is the eye hood. Some snakes have what appears to be a brow above their eyes…so we’ve added that feature to this pattern. It definitely gives this serpent an aura of invincibility.

The safety eyes used can make a big difference in how “sinister” your snake will look. We used various colors and sizes of safety eyes to demonstrate how that one little detail will impact the look of your stuffed animal.

What’s in the Snake Sewing Pattern?

This is a step-by-step tutorial with printable template. The template is at 100% scale so you’ll tape together pieces from 3 pages to create the 21″ long snake top and another 3 pages to create the bottom. Here’s what’s in the PDF pattern.

  • Step-by-step written instructions
  • 15 color photos
  • Template printable on 8 1/2″ x 11 paper
  • Materials List
  • Helpful tips
  • Links to sewing videos

Snake Sewing Pattern Available on Etsy

This snake sewing pattern is available in our Etsy Shop.

Available now on Etsy.

Etsy Shop

Pin This Snake Pattern to Pinterest

Share the love, pin this picture to Pinterest.

What Will You Need to Sew This Snake?

The materials you’ll need to are pretty minimal. Here’s what you’ll need to sew your own snake.

  • Template: at the end of the pattern
  • Fabric: 2 different colors – 22” x 7”
  • Felt or Ribbon for Tongue:    Red – 4” x ¼” or ½”
  • Needle and Thread: To match snake fabric
  • Straight Pins
  • Stuffing and Chopstick
  • Safety Eyes: (2) 5mm, 8mm, or 12mm
  • Scissors
  • Pencil or Washable Marker

We’ve kept this snake design pretty simple, yet added a few special details to make it interesting.

Happy sewing!

Statue of Liberty Gnome Pin Loom Pattern

Weave your own Lady Liberty with pin looms! This step-by-step PDF pattern will show you how to transform simple squares and rectangles into your very own Statue of Liberty Gnome toy.

This plushie has many similarities to the actual Statue of Liberty. The torch, tablet and crown being the key elements. But did you also notice the broken chain? Because of the nature of pin loom weaving and the size of the project, this stuffed gnome isn’t an exact replica, but she is pretty darn cute!

What’s Included in the Statue of Liberty PDF Pattern?

  • Statue of Liberty with crown, torch and tablet
  • Detailed writtten instructions
  • 30+ color photos
  • 16 Pages
  • Tips and Tricks for shaping and finishing

Statue of Liberty Gnome PDF Pattern Available Now

The Statue of Liberty Gnome PDF Pattern is now available in our Etsy Shop.

Available Now on Etsy.

Buy Now on Etsy

This gnome was made with medium worsted weight (4) yarn. Any worsted weight should work. We love the color of Red Heart Soft in Sea Foam #9520. Besides the usual items like stuffing, the other odd item needed is black felt. Let’s take a look at what you need more closely.

What You’ll Need to Weave Statue of Liberty.

  • Pin Looms:   Squares: 2” and 4”,
  • Pin Looms: Rectangles: and 2” x 4” and 2”x6” and
  • Pin Looms: Rectangle: 1” x 4” (for the chains only)
  • Yarn:   Red Heart: Soft – Medium (4) SEA FOAM #9520 –  250 yds
  • Lion Brand: Basic Stitch – Medium (4) MUSTARD #158I – 5 yds
  • Needles:  6” needle for weaving and yarn needle for sewing
  • Stuffing
  • Felt – black, ½” x 5” strip
  • Fabric Glue
  • Beans to weigh the gnome down
  • Pet comb – metal
  • Steamer (optional)

Pin This Statue of Liberty Gnome Pin Loom Pattern to Pinterest

Share the love; pin this Statue of Liberty Gnome Pin Loom Tutorial to Pinterest.

About the Statue of Liberty and the Gnome

Liberty Enlightening the World is a statue more commonly referred to as the Statue of Liberty. Libertas, the Roman Goddess of Liberty, holds a torch and tablet, and stands in New York Harbor. She is a copper statue, given to the United States by France, and dedicated in 1886. There is a broken chain and shackle at her feet symbolizing the abolition of slavery in the United States. Though this gnome only has 5, Liberty has 7 rays forming a halo that represent the sun, the seven seas and the seven continents. There are 25 windows in the crown for viewing the harbor (the gnome has 11).

This gnome has a simple construction with components added to it that represent elements on the real statue. For instance, the Statue of Liberty is wearing robe, the gnome is wearing a sash. The halo, or rays, on the gnome is a band attached to the hat. Little bits of felt create the windows.

Get your copy of the Statue of Liberty Gnome Pin Loom Pattern on our Etsy Shop.

Buy Now on Etsy

Hammerhead Shark Sewing Pattern

Hammerhead Shark sewing pattern

Sew your own plushie Hammerhead Shark with this step-by-step pattern tutorial. This is a great project for beginners and sewing enthusiasts alike. The supplies you need to make this on a sewing machine are very minimal. A few pieces of fabric, a couple safety eyes and thread and you’re ready to sew!

Follow this pdf sewing pattern and you’ll have a finished hammerhead shark stuffed animal in a few hours. It’s that easy.

The step-by-step tutorial includes:

  • 18″ Hammerhead Shark
  • Step-by-Step written instructions
  • 15+ color photos
  • Printable Template for 8 1/2″ x 11 paper
  • Tips and tricks for sewing the shark
  • Links to helpful videos

Hammerhead Shark Sewing Pattern Available on Etsy

Purchase the Hammerhead Shark Sewing Pattern on our Etsy Shop.

Available now on Etsy.

Buy Now on Etsy

This is also a great project to make with scraps of fabric. Choose colorful printed fabric to make a playful and unique shark. The hammerhead shark pictured here was made with fleece sheets that landed in the recycle pile. This could be made from old clothes. This is the perfect project to make as a memory pillow, too.

What you need to make your own Hammerhead Shark Stuffed Animal:

  • Template: Found at the end of the pattern
  • Fabric: Grey – 16” x 20” White – 8” x 20”
  • Stabilizer or Felt: White – 1 sheet
  • Needle and Thread: Grey
  • Safety Eyes: (2) 18mm
  • Straight Pins
  • Fabric Glue
  • Embroidery Thread: 1 yard, black
  • Stuffing and Chopstick
  • Scissors
  • Pencil or Washable Marker

Pin This to Pinterest

Share the love, pin this image to pinterest.

More about the Hammerhead Shark Pattern

This pattern stands out from the rest because it includes all the little details that make this so realistic. It has all 8 fins common to Hammerhead Sharks and even includes the notch on the caudal (tail) fin.

The pattern includes 4 pages of templates. The body of the shark spans 2 page so the template pieces will need to be cut out and taped together. The template includes a 1″ scale so you know if it’s printing at full size. Reduce or enlarge the pages to make a smaller or larger stuffed animal.

We’ll include helpful tips throughout like where to start and stop sewing. What tools might make a step easier. The templates are clearly labeled and easy to follow.

The fins are made with a layer of felt or stabilizer which helps them stay rigid yet soft and huggable.

Hammerhead Sharks usually have a litter of pups…so you may need to make more than one!

Get your Hammerhead Shark Sewing Pattern on our Etsy Shop.

Buy Now on Etsy