Sheep Pillow Published in Little Looms

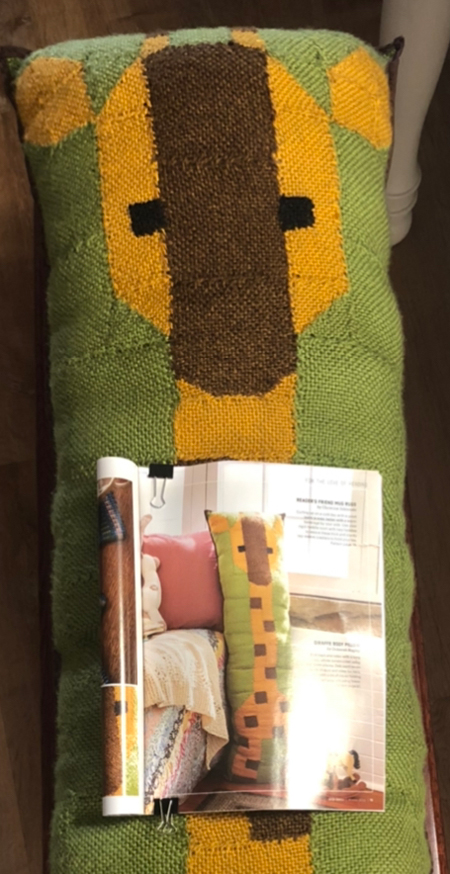
Sheep are neat and so are pillows that look like them! Deborah designed an adorable sheep pillow using yarn and pin loom woven shapes.

We love this pillow because it’s fairly easy to make, yet has lots of little details that make it quite interesting. The 4″ squares give it a puffed / quilted look. The woven texture of each square adds more interest. The fleck in the yarn adds still more depth.

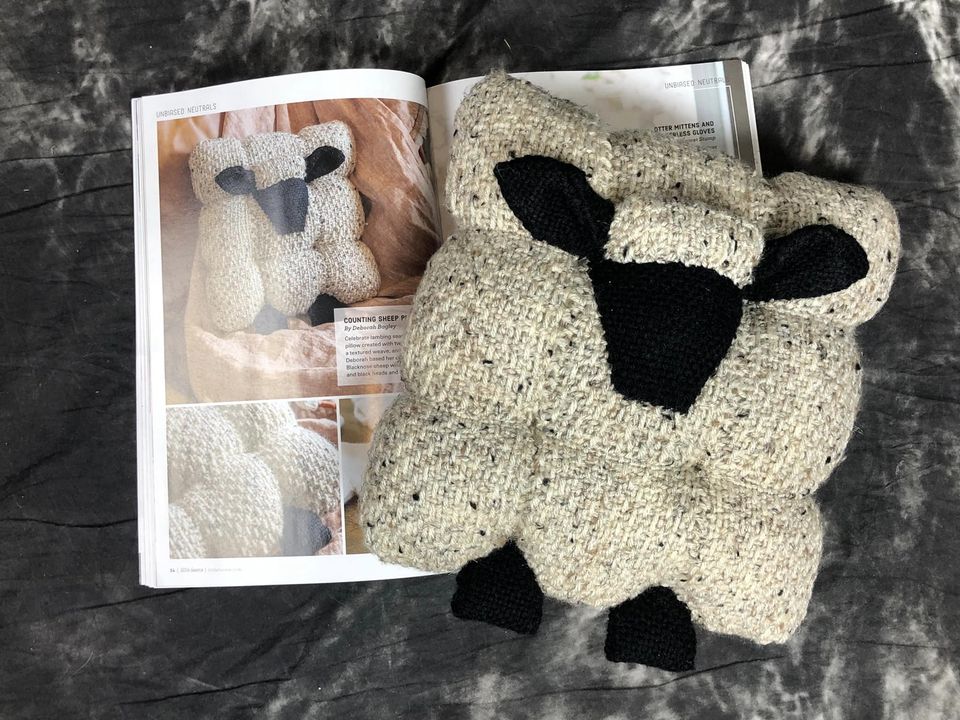
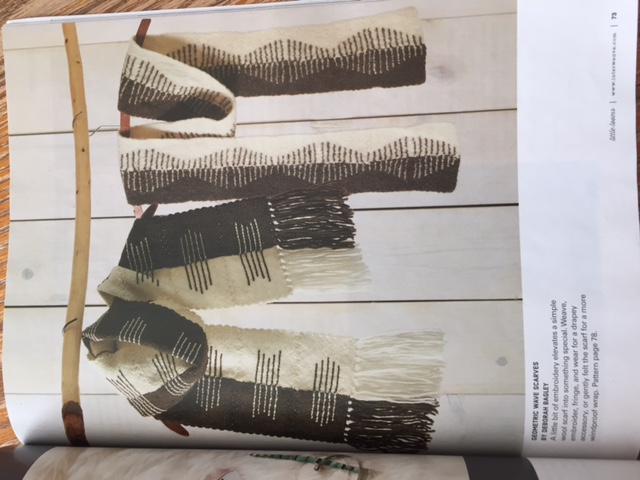
Sheep Pillow Pin Loom Pattern in Little Looms Magazine

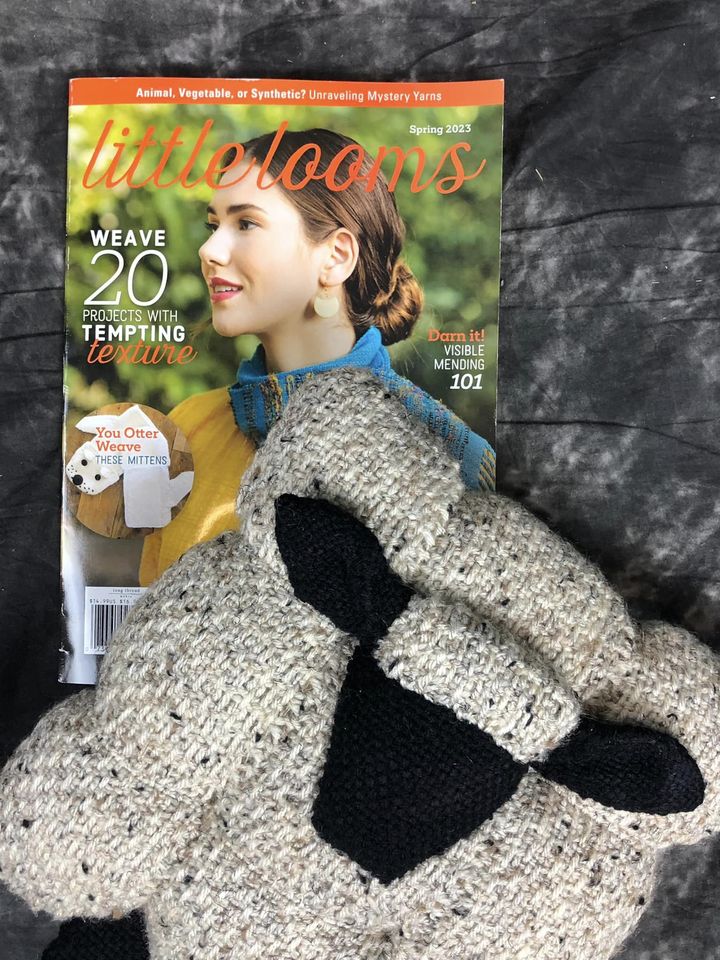
Little Looms Magazine first published this “Counting Sheep” pattern in their Spring 2023 issue. You can access the pattern either by purchasing that single issue or joining their all access subscription service.

About the Pin Loom Sheep Pillow Pattern

The finished size is approximately 10″ x 11″ x 4 1/2″.

There are two weaving structures: plain weave and Loomette Weave #1. Check out our blog post for the Loomette Weave #1 pattern. Here are the supplies needed to make your own Pin Loom Sheep Pillow:

  • Pin Loom Square: 4″
  • Pin Loom Rectangle: 2” x 4”
  • 5” weaving needle
  • Tapestry Needle
  • Yarns: Lion Brand Yarns Vanna’s Choice Heather (92% acrylic/8% rayon; 145 yd/3 oz), #400D Oatmeal, 160 yd.
  • Lion Brand Yarns Vanna’s Choice Solid (100% acrylic, 170 yd/3.5oz), #153 Black, 40 yd.
  • Stuffing
  • Pins

It’s really fun to see how many people find this project so appealing. Even though it’s pin loom woven, we find that fiber enthusiasts of all kids find this little guy irresistible. So do farmers and city folk…and people who like to count sheep before they nod off to sleep.

Giraffe Pin Loom Pillow in Little Looms

The worlds tallest mammal is now the worlds tallest pin loom pillow. Ok, we just made that up. But it might be true. This giraffe pin loom body pillow measures approximately 16″ wide x 49″ tall. If it’s not the tallest pin loom pillow, we don’t know what is!

Kick back and relax with your very own cozy long-necked friend. This large pin loom body pillow has a quilt-like front and a fabric back, sewn together with a binding edge. There is shaping and layering on the nose portion of the giraffe, otherwise, each woven shape is sewn to the shapes next to it like a puzzle.

Giraffe Pin Loom Pillow available at Little Looms

We designed the Giraffe Pin Loom Pillow for Little Looms magazine and it made it’s debut in the Little Looms Magazine Winter 2022. To get the pattern, you can purchase a digital copy of the magazine or join their all access program. Learn more on the Little Looms website.

About the Giraffe Pin Loom Body Pillow Pattern

As we’ve said, this giraffe pillow is tall, so there are a lot of shapes to weave. It’s kind of like weaving a lapghan only more cuddly. To cut down on the weaving, we’ve attached a fabric back. But you could certainly weave squares for the back as well.

Everything is woven in plain weave.

Here’s what you’ll need to make your own Giraffe Pin Loom Pillow:

  • Pin Loom Squares: 1”, 2”, and 4”
  • Pin Loom Triangles: 2” and 4” right triangles
  • Pin Loom Rectangles: 2” x 4” and 2” x 6”
  • Needle: 7″ weaving needle; tapestry needle; sewing needle
  • Sewing Machine (though you could hand stitch the project)
  • Yarns Lion Brand Heartland (100% acrylic; 251 yd/5 oz), #173 Everglades, 370 yd; #158 Yellowstone, 160 yd; #124 Big Bend, 70 yd; #153 Black Canyon, 1 yd.
  • Fiber-fil
  • 17” x 50” fabric
  • 4 yds brown double fold ¼” bias tape,
  • brown thread

Enjoy!

Scrubby Dishcloths

Pros and Cons of Knit, Crocheted and Woven Dishcloths using Scrubby Yarn.

Though I enjoy using any of the scrubby dishcloths, there are definitely some pros and cons to each type. Let’s take a look at each one separately.

Knit

The Knit dishcloth was the easiest one to make. It was easiest on which to find the stitches. I made mine 25 stitches wide using the garter stitch with size H needles. I did not count the rows, so I’m really not sure how many there are, and it’s nearly impossible to count! It has the nicest drape and is stretchy. It is fairly thin and fits nicely in glasses and pots.

Crochet

The crocheted one was the fastest to work up. I also worked it 25 stitches across and the number of rows needed to make it a square using an H hook. It was very difficult to find the stitches, so I had to count my stitches every row. It was surprisingly not too difficult to pull out stitches if I missed a loop. It is the thickest dishcloth and has a moderate amount of drape. It feels bulky in comparison, but feels very sturdy for washing.

Pin Loom Woven

The pin loom woven dishcloth was the most difficult to make. I sewed four 4″ squares together. I wove the squares on the Zoom Loom, a 3-pin arrangement with 3 warp layers. The weaving needle often caught in the middle of a warp strand and was very difficult to pull through. I tried exaggerating the weaving motion, but that only helped a little. It was also very difficult to sew the squares together as it was hard to see the loops on the edges. The sewing needle often went through the strands and were difficult to pull through. It is the thinnest dishcloth and most static. It does not stretch. Because it is the thinnest, it fits into cups and bottles the easiest. And despite the frustrations to weave, it is fun to use.

*It might be easier to weave a 2-warp square, as there will be fewer layers around which to maneuver, though I’ve not tried this. Some weavers have found it much easier to warp the loom in cotton, and only weave with the Scrubby yarn. That would most certainly take away almost all of the difficulties I mentioned before. Continuous weaving would also be much easier, like on the Turtle Loom or other continuous weaving looms. Speaking of which, now I want to see how a hexagonal dishcloth works up!

All of the dishcloths were made using Red Heart Scrubby yarn. The woven one used the least amount of yarn and will make 11 squares, enough for 2.75 dischloths. The knit dishcloth used slightly more yarn and will easily make two dishcloths. The crocheted dishcloth used the most yarn, but you should still get two scrubbies of 25 stitches wide using an H hook.

Pin Loom Corn

Corn

The scarecrow may have a hard time keeping the birds away with this delicious corn ready for the picking!  The corn itself is made from texture 4” squares, while the husk is made from 2” x 6” rectangles (which could easily be substituted with 4” squares folded in half.)   

SUPPLIES:

Loom: Schacht Zoom Loom – 4″ pin loom, Wunderwag 2” x 6” rectangle pin loom

Yarn: Red Heart Super Saver: Lemon; Lion Brand Vanna’s Choice: Kelly Green

Yarn Needle

Scissors

Stuffing

Chopstick

Textured Weave:

All odd rows: Plain weave

All even rows: *Under 3, over one* across ending with under 3

CORN

  1. Plain weave four 2” x 6” rectangles in Kelly Green.
  2. Texture weave four 4” squares in Lemon using the texture weave.
  3. Sew the 4 textured Lemon squares together to make a 2 x 2 square.
  4. Fold the square in half with the wrong side facing and sew along 8” side to make a cylinder.
  5. With Lemon, cinch the top of the corn by passing the needle and yarn through each loop along the top, then pulling tightly to close.
  6. Turn right side out. Tuck the top right and top left corners in about 1 cm and use whip stitches to create a tapered top. See photo.
  7. Stuff. (I add a foam ball in the middle so I can stick the chopstick/skewer into it to make a yard pick.)
  8. With Lemon, cinch the bottom of the corn by passing the needle and yarn through each loop along the bottom, then pulling tightly to close. Weave in ends.
  9. For each husk/leaf, tri-fold just the top 2”. Use Kelly Green and make small stitches to sew the folded area down to the husk/leaf on both sides. This is just to create a more tapered end of the husk/leaves. Make 4.
  10. Sew all four husks/leaves together along the bottom half to make a 1 x 4 rectangle.
  11. Fold in half so that the unsewn ends are all in the same direction. Sew along the bottom 3”.
  12. With Kelly Green, cinch the bottom of the husks together by passing the needle and yarn through each loop on the bottom of each leaf, then pull tightly to close.
  13. Place the corn in the husk as far as it will go and tack into place with Kelly Green.
  14. To make a yard pick, insert a chopstick/skewer/wire approximately 2/3 the way up.

Patterns for the Scarecrow, Pumpkins, and Ghost are available in the Shop here. They are also available in my Etsy shop here.

Crochet Stars!

Seeing (Crocheted) Stars!

You are a star! And now your projects can light up like them too, with these quick, fun and beautiful crocheted stars. They are so fun to make, you will want to put them everywhere! They are great for greeting cards, wall hangings, pallet art, and so much more! Add sparkle to your stars by using glittery or sequined yarn.

I’ve written the instructions for multiple sizes, so you can add stars to any project. No yarn size or hook size is listed as you should use the yarn and hook size that most fits the size project you are making. For the smallest stars, I recommend using crochet thread and size 2 hooks. Otherwise, I use size 3 or 4 yarn with a C-E hook. Medium stars are great for size 4 yarn with size F-J hooks. The large star looks great in size 4-6 yarn using hooks sized G and up. The size of yarn and hook really will depend on the project you are making.

These are 5 pointed stars, though you can make more points if desired. Because the stars are individual points, (as opposed to connected points), the points tend to curl. Pin and spray starch them to lay flat, unless you are sewing, gluing or stapling them to a project!

The large star uses a special linked stitch so there is not a big gap between the center circle and the bottom of the point. Linking the point is not necessary. I only linked it on projects where I didn’t want what appeared to be a hole.

Special Abbreviation

Linked double treble crochet (Ldtrc): YO 3 times, insert hook in stitch indicated, YO and pull through, YO and pull through 2 loops on hook, skip a stitch on Rnd 2, insert hook in next st of Rnd 2, YO and pull through and pull through 2 loops on hook, YO and pull through 2 loops on hook, YO and pull through 2 loops on hook.

SMALL STAR

Ch 2 or use magic circle/magic ring
Rnd 1: Work 10 sc in second ch from hook or in magic ring. Join with a sl st. (10)
Rnd 2: Make 5 points as follows: *Ch 4, work in back bump of ch sts, sc in second ch from hook, hdc in next ch, dc in next ch, skip a st on Rnd 1, sl st in next st* (on point made), repeat 4 more times. Fasten off. Cut yarn leaving a tail if sewing on a project.


MEDIUM STAR

Ch 2 or use magic circle/magic ring
Rnd 1: Work 7 sc in second ch from hook or in magic ring. Join with a sl st. (7)
Rnd 2: Work 3 sc in first st, work 2 sc in each st around. (15)
Rnd 3: Make 5 points as follows: *Ch 5, work in the back bump of the ch sts, sc in second ch from hook, hdc in next ch, dc in next ch, trc in next ch, skip two sts on Rnd 2, sl st in next st* (one point made), repeat four more times. Fasten off. Cut yarn leaving a tail if sewing on a project.


LARGE STAR

Ch 4, join with a sl st.
Rnd 1: Ch 1, 10 dc in ring. Join with a sl st. (10)
Rnd 2: Ch 1, 2 dc in each st around. Join with a sl st. (20)
Rnd 3: Make 5 points as follows: *Ch 7, work in the back bump of the ch sts, sl st in second ch from hook, sc in next, hdc in next, dc in next, trc in next, ldtrc in last st, skip a st on Rnd 2, sl st* (one point made), repeat four more times. Fasten off. Cut yarn leaving a tail if sewing it on a project.

Little Looms 2017 Patterns

Two New Pin Loom Patterns

Two of my pin loom patterns appear in the 2017 Little Looms magazine by Handwoven. You are going to love them.

Pin Color Flow Rug

First, the Color Flow Rug. I call it Color Flow because the colors transition nicely due to the quadrant squares between the solid squares. Because you change colors during the warping and weaving process, part of the square is solid, and part of the square is a mixed color. The twisted cord tassels really finish off the rug nicely.

Pin Geo Waves Scarves

Second, the Geometric Waves Scarves. These striking scarves are actually just solid squares sewn with a dark color on one half and a light color on the other. The lines are all embroidered on. If you use wool, it can be felted. Just be sure to make it extra long as it will shrink in the felting process!

Check out these and more great patterns in the 2017 Little Looms magazine.

What are you weaving?

Crochet Cable Dishcloth and Tea Towel

Dishcloth+ Series: Celery Stalks Dishcloth and Tea Towel – pattern with crochet cables.

Dishcloth and Tea Towel with crochet cables

Create stunning cables in these two lovely kitchen accessories.

Dishcloth and Tea TowelWhether you’re new to working post stitches or an old hat, the post work dishcloth is a must for your kitchen. The columns of stitches create a bumpy texture perfect for scrubbing pots and pans.

The tea towel takes crochet cables to a whole other level. Create a stunning tea towel as a house warming gift or for your own home.

Buy Now on Etsy

The Cabled Dishie and Tea Towel are available in our Etsy Shop.

Available on Etsy.

Buy Now on Etsy

This set is crocheted with  Fibra Natura Good Earth distributed by Universal Yarn. This cotton linen blend is perfect for going from sink to washing machine and back again.

Pin Loom Woven Gift Bags

Weave your own gift bags!


img_3526

Christmas is four days away and I decided today that I just had to weave 8 little drawstring gift bags for family members! Shouldn’t be too hard with a toddler and preschooler around. Not to mention that there is paint involved. What could go wrong?

I love these bags because they can be personalized to match the recipient and can be made for any season or reason. The color of yarn and stencil do all the work!

What you need:

Yarn

4 inch pin loom (I use the Zoom Loom)

Stencil and paint brush

Paint and some form of paint tray

Scissors, yarn needle

How-to Make a Drawstring Gift Bag

Plain weave 8 four inch squares per gift bag. I sewed the squares together so they were 2 x 4, then folded it in half so it was 2 x 2 with the top open. I always sew on the inside and use the double overcast method. It seems to make the nicest looking join on the front (in my humble opinion) and is sturdy for holding things in the bag.

Next I made a twisted cord. (I started with about 16 feet of yarn, twisted it, folded it in half and let it twist on itself.) Then I turned the bag inside out, folded the top of the bag over the cord, and sewed it to the bag making sure not to sew through the cord. I centered the cord in the bag and tied a knot about eight inches from the bag and trimmed off the rest.

img_3525

I bought several stencils at the store making sure they were small enough to fit on a project 8 inches square. I turned the bag right side out, inserted a piece  of paper in the bag (so the paint wouldn’t soak through to the other side), and painted the desired scene. To give it extra pizzazz, I used a Sharpie marker to add shading.

img_3523


And voila, I was on my way to making the gift bags I needed. Excuse me now, I need to weave more squares for the rest of the gift bags!


Dishcloth and Plant Holder Pattern

Who says dishcloths have to be square? This month’s dishie pattern is a beautiful pentagonal cloth made from FibraNatura Good Earth distributed by Universal Yarns. Though I stopped with an 8″ dishcloth, it could be made in any size. It’s the perfect dishcloth for washing and scrubbing as well as gift giving.

This lovely dishcloth would also be great as a doily or as a hot pad.

thumbnail_star-dishie

I fell in love with this design so much, I decided to turn it into a plant holder! The plant holder starts with a pentagonal base, with the side supports crocheted around that. Because of the design, it can hold various sized pots a little smaller or larger than 1.46 quarts.

thumbnail_holding-plant

Plants make a house so homey. Plant some ivy or perhaps some spices. Turn your kitchen into a living space!

Finished Measurements:

  • Dishcloth: 8″
  • Plant Holder: 26 x 4 1/2″, holds a 1.46 qt pot

PDF Instant Download Now Available

The Dishcloth+ Series: Pentagonal Dishcloth and Plant Holder is now available in our Etsy Store.

Available Now on Etsy.

Buy Now on Etsy

Christmas Pin Loom Project Set

Pin Loom your Christmas decorations and gifts this year! All with only a 4″ square pin loom.

christmas-pin-loom-group1

These festive woven projects have you and your friends’ names written all over them. Who doesn’t love a gnome? Add a little snowman to your indoor collection. Decorate with a beautiful wreath and garden flag. Relax on these lovely pillows. It truly is amazing what you can create with squares with a little shaping and sewing.

  • thumbnail_christmas-pin-loom-group2

Each project is made with 4″ squares done in plain weave. (The pattern does NOT include how to plain weave.) Projects range from 1 to 38 squares, making them quick and easy to make.

The pattern includes:

  • Gnome
  • Pillow with Crochet Snowflake
  • Santa’s Belly Pillow
  • Santa’s Belly Wall Hanging
  • Snowflake Ornament
  • Bethlehem Garden Flag
  • Holly & Berry Wreath
  • Reindeer Squares
  • Snowman Squares
  • Santa’s Pants
  • Christmas Present
  • Miniature Snowmen
  • Step-by-step photos
  • Step-by-Step written instructions
  • Templates for the felt pieces

thumbnail_bethlehem-flag

Pattern also includes instructions on how to turn some of these things into magnets, little gift bags, greeting cards, and more.

Projects shown here are made with Red Heart Soft yarn. Not only is it soft, it also has a nice sheen. This is a great yarn for pin looming.

PDF Instant Download Available Now

The pattern and templates for the Christmas Pin Loom Projects are now available in our Etsy Shop.

Available on Etsy.

Buy Now on Etsy